


11
Viron e-Quilibirum Series Chlorinator
Installation Manual
10
Viron e-Quilibirum Series Chlorinator
Installation Manual
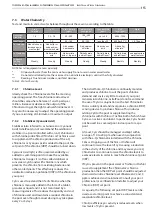
Chlorinator basic functions are:
a. Maintenance – special functions and initial set up
to suit your pool and spa.
b. Setting – adjust chlorine production and pH of pool
and spa water.
c. Clock and Timer – set current time and timers for
filtration, chlorine production and pH monitoring.
d. Pool and Spa Mode – select mode specific to
producing chlorine and acid dosing either the pool
or the spa
4.1
Initial Startup
Press MAINT from the Chlorinator menu to access
startup functions.
1.
From MAINT press NEXT, NEXT
2.
Choose INSTALL.
4.1.1
Select Language
Select INSTALL from the Maintenance menu and
you ACCEPT the appropriate Language for your
Chlorinator (English is the default language). INSTALL
CHLORINATOR is displayed.
4.1.2
Chlorinator Installation Settings
After setting the Language option, you will be asked if
you want to INSTALL CHLORINATOR.
Set the following install options:
• TIMER ENABLED – Turn your timer on or off. Press ACCEPT.If the
chlorinator is connected to an external timer clock or Genus
Remote Control system choose Disable.
• FAST COMMS – Do not change this function unless you are
using an older version Hurlcon/AstralPool controller (no
touchscreen).
• VARIABLE SPEED PUMP – Program the speed of the pump as
part of the timer setting in the chlorinator. Choose YES if you
have an AstralPool 3 speed pump.
• FLUSH AFTER TIMER – Turn on pump will momentarily after
timed cycle to flush residual chemicals from the injection
chamber.
• PUMP FLOW CHECK – Monitor the flow sensor inside the
chlorinator cell. If water flow is not detected for over 5 minutes,
power to the pump outlet will be shut down to prevent
damage to the pump.
• ENABLE LIGHT – Set your Chlorinator to control a Connect LITE
lighting controller (SLX setting) or to directly power a single
AstralPool ARC LED light. (ARC setting).
NOTE: ARC setting is for service replacement only
• CELL REVERSAL PERIOD – Do not change this setting without
consulting with your local AstralPool dealer or service
department. Standard setting is 4 hours.
• REVERSE CELL? – Perform a manual reverse of your chlorinator
cell – designed for use by your pool technician only.
• SET POOL WATER VOLUME – Change the volume of your pool.
Select YES and use up/down arrows to change. Press ACCEPT.
NOTE: Setting is only available if probes are installed.
• SET SPA WATER VOLUME – Change the volume if you have a
spa attached to your pool. Select YES and use up/down arrows
to change. Press ACCEPT.
NOTE: Setting is only available if probes are installed
• RESET SYSTEM? – Revert the Chlorinator back to factory
settings. Select NO. Use only in the case of a system error that
can’t be cleared.
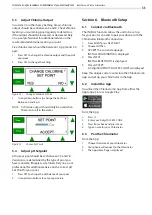
4.1.3
Set Auto Operation Schedule
Cycle through POOL MODE button to select Auto,
Manually ON or Manually OFF.
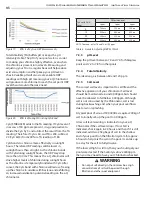
AUTO will allow the unit to operate your filter pump,
chlorine production and pH adjustment on the timer
periods you have selected. If you have not changed
the timer periods, the default timer turns the filter
pump and unit on at 08:00 hours for a period of 4
hours and then again at 16:00 hours for a further
period of 4 hours. This is the default setting from the
factory.
4.2
Backwash the Filter
Before running the Chlorinator for the first time,
ensure your sand filter is backwashed for 2 to 3
minutes and then rinsed for 1 minute.
1.
Turn pump off when changing the position of the
backwash valve on your filter.
2.
Press MAINT
3.
Press BACKWASH and the up or down arrows to
choose the backwash time duration.
4.
To rinse the filter, select BACKWASH again and select
the time duration.
NOTE: You can press ABORT at any time to stop the
backwash cycle.
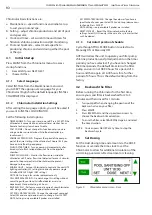
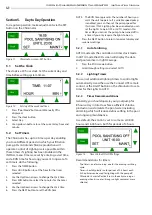
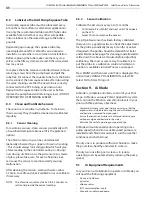
4.3
Set Dosing
Set the Acid dosing time and amount via the DOSE
function or override the time clock to set the
Chlorinator to allow for additional circulation of the
swimming pool water after treatment or cleaning.
Figure 9.
Chlorinator menu screen - Dose