background image

21

Viron e-Quilibirum Series Chlorinator    

Installation Manual

20

Viron e-Quilibirum Series Chlorinator    

Installation Manual

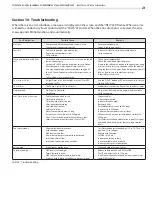
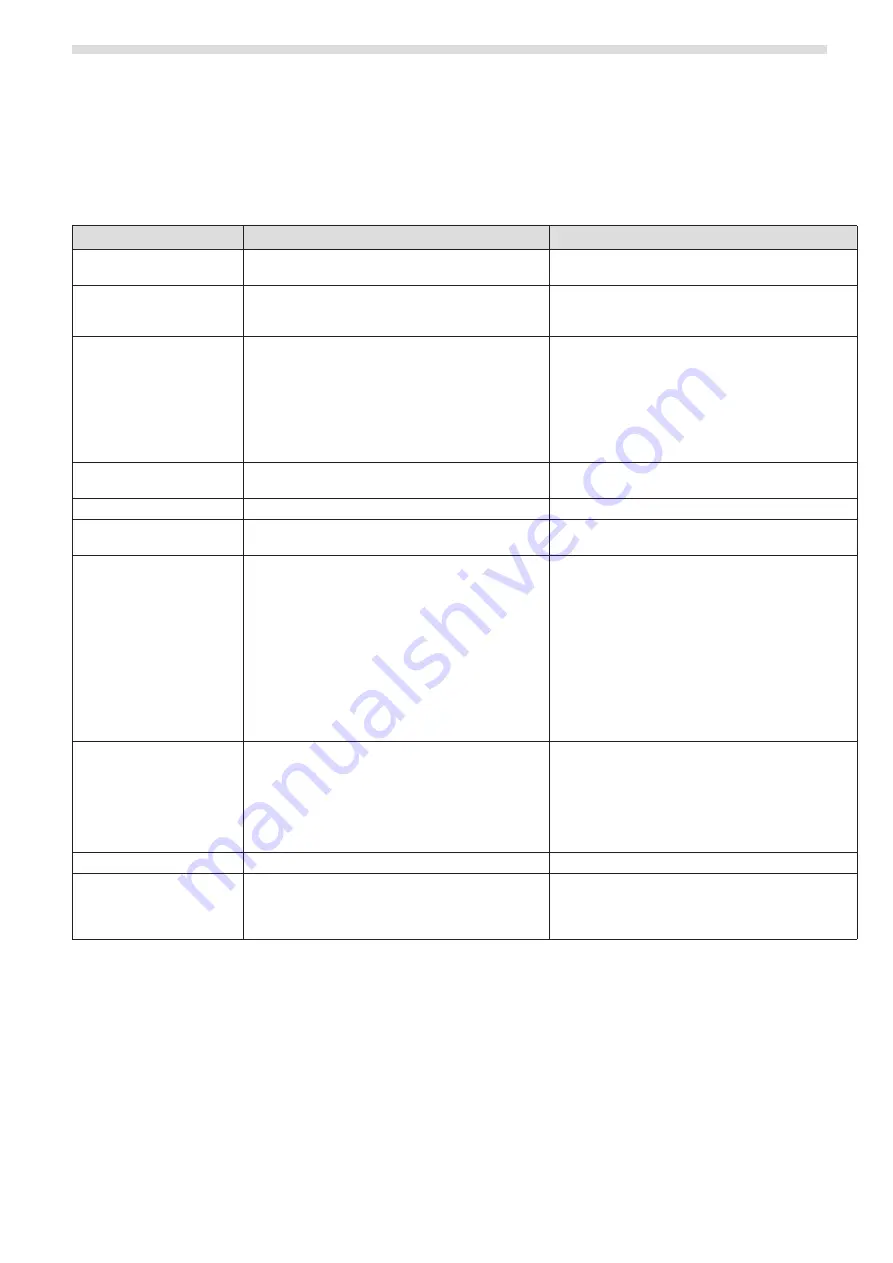
Section 10.  Troubleshooting

When there is an error condition, a message is displayed on the screen and the “INFO” LED flashes. When an error 

is linked to conductivity (low conductivity) the “SALTS” LED is ON. When the error situation is corrected, the error 

message and LED illumination ends automatically.  

Fault Indication

Possible Cause

Remedy

No Flow

•  Pump turned off/disconnected or valves closed
•  Sense wire disconnected from cell

•  Ensure valves/pump on
•  Connect sense wire to cell

Low salt

•  Salt level in pool has dropped too low
•  Pool water temperature is low
•  Cell has failed

•  Increase salt level or raise water temperature
•  Call a technician

Sense wire disconnected from 
cell

•  For models with a temp sensor this error can be caused 

by low conductivity.

•  Lack of salt < 4000 ppm due to water loss or dilution 

(filter backwash, water renewal, rain, leaks, etc.).

•  Can vary depending on the temperature and age of 

the cell. The voltage across the cell terminals varies in 
time.

•  Cell calcified, worn, or out of order.

•  Check water temperature.
•  Check the condition of the cell plates.
•  Measure the salt concentration in the pool water using 

a salt tester or a test strip, then add salt to the pool to 
keep the level at 4000 ppm. If you do not know the salt 
level or how to test it, contact your retailer.

•  Is the salt level is correct?

Check Light Mode

•  A Light Timer is set, but the light is set to ON or OFF 

instead of AUTO

•  Use the “LIGHT” button or RF remote control to set the 

Light to AUTO mode

Check Timer

•  The Pump is set to OFF in all timers

•  Modify timers so that the Pump is on in at least 1 timer.

Display blank

•  No Power to Controller
•  Fuse blown

•  Plug in controller and ensure mains power available
•  Call a technician

Low/No chlorine production

•  Cables not connected to cell
•  Timer period too short
•  Chlorine output level too low
•  Filter needs backwashing
•  Pool stabiliser too low
•  Salt level too low
•  Water Temperature below 15 deg
•  Excessive Salt Level (Above 10,000 ppm)
•  The e-Q has locked out on fail safe with very low 

chlorine levels present (less than 100 mv ORP)

•  Connect cables
•  Increase timer period
•  Increase chlorine output
•  Backwash filter
•  Get Stabiliser between 30 and 60 ppm
•  Increase salt to 4000ppm
•  Increase water temperature or salt level
•  Chlorinator cuts out on overload, reduce salt level to 

4000 ppm

•  Test Chlorine levels and add chlorine to pool. Start pool 

pump and allow one hour for sensor to read chlorine 
levels 

Pool water cloudy

•  Chemical balance in incorrect
•  Acid container empty
•  ORP level set too low
•  Pool water volume set too low in install menu
•  Insufficient Water flow
•  Insufficient water turnovers each day

•  Test Water and adjust as needed pH 7.2 to 7.6, TA to 120 

ppm and CH to 180ppm

•  Replace Acid Container
•  Set ORP to 700 mv
•  Increase pool water volume
•  Increase variable speed of pump
•  Increase water turns in Install menu

pH too high

•  Probe/sensor malfunction

•  Clean and calibrate probe/sensor

Chlorine too high

•  ORP level is set too high
•  Total Alkalinity too low
•  ORP sensor is not immersed in pool water
•  Cyanuric Acid (Chlorine Stabiliser) is present in pool

•  Reduce to between 600 and 650 mv ORP
•  Test TA and adjust to 80 to 120 ppm
•  Install sensor chamber so that it is always in pool water
•  Lower ORP set point

Table 5.  Troubleshooting

Summary of Contents for Viron EQ

Page 1: ...icable regulations Before installing this product read and follow all warning notices and instructions that accompany this product Failure to follow warning notices and instructions may result in prop...

Page 2: ...es Chlorinator Installation Manual EQUIPMENT INFORMATION RECORD DATE OF INSTALLATION INSTALLER INFORMATION INITIAL PRESSURE GAUGE READING WITH CLEAN FILTER PUMP MODEL HORSEPOWER FILTER MODEL CONTROL P...

Page 3: ...t 13 5 4 Adjust pH Setpoint 13 Section 6 Bluetooth Setup 13 6 1 Connect via Bluetooth 13 6 2 Install the App 13 6 3 Pair the Chlorinator 13 6 4 Basic App Functions 14 Section 7 Pool Chemistry and Bala...

Page 4: ...10 minutes b Since excessive water temperatures have a high potential for causing fetal damage during the early months of pregnancy pregnant or possibly pregnant women should limit spa water temperatu...

Page 5: ...during the use of a spa or hot tub to avoid unconsciousness and possible drowning Before entering a spa or hot tub measure the water temperature with an accurate thermometer Do not use a spa or hot t...

Page 6: ...Equipment Configuration Acid Dosing 2 1 Overview The Viron e Quilibrium Chlorinator incorporates a controller with inbuilt acid pump an electrode cell for converting minerals or salts into chlorine a...

Page 7: ...ng the unit in position on the wall or post the length of the PVC tubing provided should be measured and taken into consideration Ensure the controller and cell are close enough for the power supply l...

Page 8: ...t corrode the equipment It will be necessary to drill a second hole in the cap fitted tightly with a length of tubing which should then be vented outside the filter enclosure This procedure is recomme...

Page 9: ...is the most reliable and safest way to determine the level of the sanitiser in your water but is affected by other factors influencing the efficiency of the chlorine Water pH the use of sunscreens cya...

Page 10: ...ARC setting NOTE ARC setting is for service replacement only CELL REVERSAL PERIOD Do not change this setting without consulting with your local AstralPool dealer or service department Standard setting...

Page 11: ...In this model you can determine the dosing rate of the acid by selecting 1 to 10 in the pH set screen The Chlorinator will adjust the dosing level according to the chlorine production the higher the c...

Page 12: ...is enabled you can then set the pump speed for this timer If SLX Lighting has been enabled you can set the Lights to be in OFF or AUTO mode in this timer NB you can set the pump to be turned off in a...

Page 13: ...fibreglass vinyl liner Rely on a pool professional for additional advice on the correct pH Set Point for your pool 1 Press SET to change the pH balance of your pool 2 Use up down buttons to set your...

Page 14: ...ycles Time pH pH evolution 7 30 7 35 7 40 7 45 7 50 7 55 7 60 7 65 7 70 7 75 7 80 7 85 7 90 7 95 8 00 8 05 8 10 8 15 8 20 100 75 50 20 Factory Set Point 7 4 pH Figure 18 pH Evolution Graph 7 2 Chlorin...

Page 15: ...o swimming pools to make the available chlorine last longer It is often called stabiliser or sunscreen CyA bonds with chlorine ions which prevents the chlorine from oxidizing bacteria and other contam...

Page 16: ...ng an increased oxidization potential reading on the e Q chlorinator Cyanuric Acid Level Chlorine Level 2ppm 3ppm 4ppm 0 700 mv 725 mv 750 mv 10 550 mv 600 mv 625 mv 20 500 mv 525 mv 550 mv 50 350 mv...

Page 17: ...s disinfecting the water even at levels of 1ppm ORP remains the best method to measure the sanitiser s chlorine s effectiveness in the water At a reading of 750mv a virus kill time is as low as one se...

Page 18: ...rate if necessary NOTE The chlorine sensor may take 30 to 45 minutes to settle and provide the correct reading 8 3 2 Sensor Calibration Calibrate the pH sensor every 6 to 12 months 1 To Calibrate Pres...

Page 19: ...on and dose acid to achieve the desired levels The Viron e Quilibrium will ensure the pump operates until its primary two objectives are achieved Water is turned over 1 5 times on a 50 000 litre pool...

Page 20: ...as the unit adjusts to weather and environmental conditions 9 6 1 Extended Hours and High Speed Pump Operation Should Ai mode keep your pump in high speed for most of the day perform the following che...

Page 21: ...ump is set to OFF in all timers Modify timers so that the Pump is on in at least 1 timer Display blank No Power to Controller Fuse blown Plug in controller and ensure mains power available Call a tech...

Page 22: ...g Fan 2030037 1 10 Label Facia LABEL256 1 11 Main Cover 950902 1 12 PCB User 71401 1 13 Screws for User PCB 395201 4 14 Wall Mount Bracket 950905 1 15 Cell Cable Strain Relief 20028 1 16 Power Cable S...

Page 23: ...or place of purchase Claims must include the serial number and model this information can be found on the product installation date and name of the installer Shipping costs are not included i the war...

Page 24: ...019 Fluidra S A All rights reserved This document is subject to change without notice Fluidra Group Australia Pty Ltd 219 Woodpark Road Smithfield NSW2 2164 Australia 1 300 186 875 www astralpool com...

Reviews: