


9
Viron e-Quilibirum Series Chlorinator
Installation Manual
8
Viron e-Quilibirum Series Chlorinator
Installation Manual
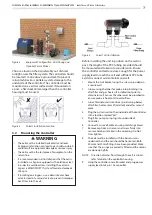
4.
Make a small 2mm breather hole in the cap to allow air
to fill the void created by the acid.
5.
Connect the other end of the PVC tube to the inlet of
the acid pump on the front of the controller.
6.
Connect the remaining hose to the outlet of the acid
pump on the underside of the controller.
7.
Thread the remaining end of the PVC hose through
the cable gland in the 50mm PVC mixing cell fitting
so that it passes through the cable gland by 25mm to
30mm.
8.
Position the injection chamber in a horizontal position
after the Chlorinator cell on the return to pool side.
TIP:
Soaking the ends of the PVC tubing in hot water or
gently heating with a lighter will make it easier to
push onto the barb.
3.4
pH Sensor (optional, part no. 525147)
An optional pH sensor eliminates the need to regularly
test your pH balance of your pool and spa. The sensor
must be checked and recalibrated every 6 months.
When installed and connected, the Viron e-Quilibrium
will automatically detect the pH sensor and the
factory pH setpoint is 7.6. You can adjust your ideal pH
setting in the Settings menu.
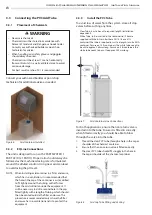
3.4.1
Connect the pH Sensor
The pH sensor is supplied with a sensor chamber that
is connected into 50mm PVC pipe work using 50mm
union tails and lock nuts.
1.
Install the sensor chamber vertically, where possible
after the filter and before the chlorinator cell.
2.
Glue in 50mm PVC pipe into union tails.
3.
Remove rubber boot from pH sensor and screw into
the sensor chamber port.
4.
Blank off the remaining ports in the sensor chamber
using the caps and gaskets supplied.
3.5
Chlorine Sensor (optional, part no.
525145)
An optional chlorine sensor eliminates the need
to test the chlorine level in your pool and allows
the Viron e-Quilibrium to automatically control the
chlorine and pH levels of your pool and spa water. A
chlorine sensor is highly recommended for pool and
spa combinations, spa pools and indoor pools and
spas.
The Chlorine Sensor uses Oxidation Reduction
Potential (ORP) readings to determine the chlorine
level in your pool or spa water. ORP is the most
reliable and safest way to determine the level of the
sanitiser in your water but is affected by other factors
influencing the efficiency of the chlorine. Water pH,
the use of sunscreens (cyanuric acid), Hardness and
other items can all influence the reading of the ORP
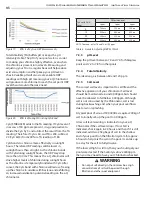
The Viron e-Quilibrium will adjust the production
of chlorine to meet the ORP which may mean
the chlorine level, when measured in simple PPM
(parts per million) levels may change from time to
time. This is normal. An example of higher chlorine
readings when measured in ppm is if the acid runs
out and is not replaced. In this case, the pH will start
to increase and the effectiveness of the chlorine will
reduce. As the chlorine effectiveness reduces the ORP
measurement declines and the Viron e-Quilibrium will
increase the power to the electrode cell to produce
more chlorine. Once the pH level is corrected the Viron
e-Quilibrium will reduce or turn off the power to the
electrode cell as the ORP reading will rise.
Once connected, the e-Quilibirum will automatically
detect the sensor and a factory pre-set chlorine level
of 600 mv will be maintained.
3.5.1
Connect the Chlorine Sensor
The chlorine sensor is provided with a 3 metre RJ12
cable for connection to a Viron variable speed energy
efficient pump.
1.
Screw the chlorine sensor into the pH sensing
chamber connected to the bottom of the Viron
e-Quilibrium controller.
2.
Install the sensor chamber vertically, where possible
after the filter and before the chlorinator cell.
NOTE: The sensor chamber must have the acid dosing
point installed away from the chlorine and pH
sensors. Make sure the acid dosing point is after the
chlorinator cell and the chlorine and pH sensors are
before the chlorinator cell.
3.
Remove rubber boot from the chlorine sensor and
screw into the sensor chamber port (glued into
pipework either before filter or between filter and
Chlorinator cell).
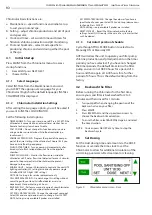
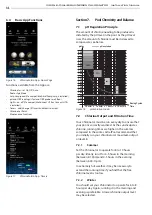
Section 4. Chlorinator Setup
The Chlorinator can be controlled using the
screen and buttons or via an App on a compatible
smartphone or tablet using Bluetooth.
Initial set up for equipment such as variable speed
pumps etc, needs to be performed using the
Chlorinators screen and buttons. After initial setup,
most other functions can be performed using either
the Chlorinator or the App.


