Installation
900738-00 04/2017
Innovative Hearth Products
MHD35 Series Direct-Vent Gas Fireplaces
31
9. Change vent direction
—At transition from or to a horizontal/inclined run, install SV4.5E45 or SV4.5E90 elbows
in the same manner as the straight vent sections. The elbows feature a twist section to allow them to be routed
about the center axis of their initial collar section to align with the required direction of the next vent run element.
Twist elbow sections in a clockwise direction only so as to avoid the possibility of unlocking any of the previously
connected vent sections
(
Figure 17, Page 22
).
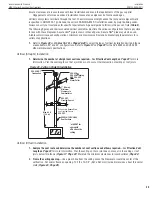
10. Continue installation of horizontal/inclined sections
—Continue with the installation of the straight vent
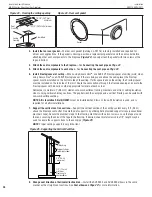
sections in horizontal/inclined run. Install support straps every 5 ft. (1.52 m) along horizontal/inclined vent
runs using conventional plumber’s tape
(
Figure 29, page 30
)
. Maintain the horizontal/inclined run in a straight
(no dips), slightly elevated plane. The recommended incline is approximately 1/4” per 1 ft (20 mm per 1 m)
horizontal, in a direction away from the fi replace.
Smaller rise per foot run ratios are acceptable all the way
to at or near level.
Use a carpenter’s level to measure from a constant surface and adjust the support straps as
necessary.
Maintain the required clearances to combustibles
(
Page 24
)
.
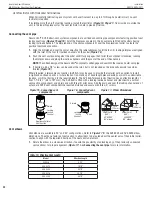
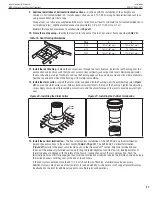
11. Assemble the vent run to the exterior wall
—If not previously measured, locate the center of the vent at the
exterior wall. Prepare the opening. Assemble the vent system until the terminus of the last section is within
7” (178 mm) to 11-1/4” (286 mm) inboard of the exterior surface to which the SV4.5HT termination is to be
attached
(
Figure 30, page 32
)
. If the terminus of the last section is not within this distance, use the telescopic
vent section SV4.5LA, as the last vent section.
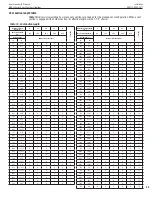
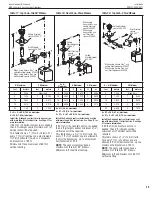
Table 20, page 33
lists the additional venting components needed
(in addition to the termination and adaptor) for a range of wall thicknesses.
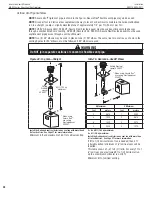
12. Attach the termination adaptor
—Attach the adaptor (SV4.5RCH, provided with the termination) to the vent
section or telescoping vent section, elbow or fi replace collar
(
Figure 31, page 32
)
.
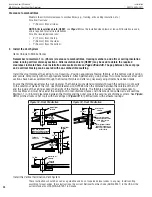
13. Install the fi restop/spacer at the exterior wall
—When using the square termination, install SV4.5HF (Secure
Vent), SF4.5HF (Secure Flex) Firestop/Spacer over the opening at the exterior side of the framing, long side up,
with the 3” spacer clearance at the top
(
Figure 30, page 32
)
and nail into place.
NOTE:
The fi restop/spacer may also be installed over the opening at the interior side of the framing.
14. Install the termination (
SV4.5HT-2 or SV4.5HTSS
)
—From outside the exterior wall, slide the collars of the
termination onto the adaptor (the outer over the outer and the inner inside the inner) until the termination seats
against the exterior wall surface to which it will be attached. Orient the housing of the termination with the arrow
pointed upwards. Secure the termination to the exterior wall. The horizontal termination must not be recessed
into the exterior wall or siding by more than the 1-1/4” (32 mm)
(
Figure 31, page 32
)
.
NOTE:
If the venting exits the building below grade, or close to grade, see
Installation Accessories on
Page 45
for available snorkel terminations. The termination must be above grade and above the expected level of
snow accumulation.
NOTE:
The vent termination is hot while in operation and for a period of time following the use of the fi replace.
To prevent contact with hot surfaces, use a horizontal termination guard; available for purchase at your local
dealer.
The horizontal terminations have been designed to perform in a wide range of weather conditions. Our
terminations meet or exceed industry standards.
When selecting the locations of your horizontal terminations,
do not place the termination where water from
eaves and adjoining roofl ines may create a heavy fl ow of cascading water onto the termination cap
. If the cap
must be placed where the possibility of cascading water exists, it is the responsibility of the builder to direct the
water away from the termination cap by using gutters or other means.
Take care to carefully follow the installation instructions for the termination, including the use of silicone caulking
where required.


