background image


Nexus DSC 

Pro

 Quick Setup Guide 

Then select 

Time and Date


It will show the current time and date that can 
be changed: 


If all parameters are set correctly then pressing 
the 

 key can be used to avoid changing any 

parameter. 
If  the  time  zone,  time  and  date  need  to  be 
changed then 

 and 

 keys can be used 

to  select  the  parameter  that  needs  to  be 
adjusted. 

  and 

  keys  are  used  to 

change the value.  
Setting the time and date is only required if time 
synchronisation with GPS is disabled. However 
the  time  zone  and  date  needs  to  be  set  for 
Nexus DSC 

Pro

 to show the local time correctly.  

The easiest way to set the time and date is 
to set the date and time zone and then step 

outside to allow the GPS receiver to get a 
fix and thus synchronise time from GPS. 

 
It  usually  takes  30  to  60  seconds  for  the 
GPS  receiver  to  get  a  fix  on  the  location 

(under  open  sky  conditions).  Nexus  DSC 

Pro

 will update the internal real time clock 

with the time received by the GPS receiver 
at  this  time.  The  GPS  receiver  will 
automatically  be  switched  into  a  power 
saving mode after it acquired the location 
to conserve the battery power. 

Connecting to your telescope 

Please plug the encoder cable into ‘Encoders’ 
port on Nexus DSC 

Pro

To  make  sure  that  encoders  are  functioning 
correctly  Nexus  DSC 

Pro

  has  a  test  mode. 

Selecting ‘Test’ from the main menu activates 
it: 


Then selecting ‘Encoders’: 


will show the current encoder steps and angles: 


In order for Nexus DSC 

Pro

 to function correctly 

it is required to adjust the encoder steps now to 
make sure that: 

  the  RA/AZ  current  position  in  degrees  is 

increasing  when  rotating  the  telescope 
clockwise around RA/AZ axis 

  the  Dec/Alt  current  position  in  degrees  is 

increasing when moving the telescope up in 
declination/altitude 

If either of those values is not increasing then 
set the sign in front of the encoder steps for that 
axis  to  a  negative  sign  in  the  Telescope 
Settings. 

Telescope Settings 

Nexus  DSC 

Pro

  needs  the  mount  type  and 

encoder steps to be set correctly before it can 
be used to locate celestial object precisely. 
The  mount type  and  encoder  steps are  set  in 
the Telescope Settings that can be accessed by 
selecting ‘Setting’ from the main menu: 


then by selecting ‘Telescope’: 


Then you need to select the telescope: 


Nexus  DSC 

Pro

  allows  to  have  up  to  five 

different telescope configurations. You can also 
rename 

TELESCOPE  1

  to  your  telescope 

name.  You  just  need  to  activate  the 

Rename


ESC

Summary of Contents for Nexus DSC Pro

Page 1: ...Nexus DSC Pro Quick Setup Guide 7 8 4 1 0 2 5 9 6 3 ESC OK OFF ON DSC Nexus Pro...

Page 2: ...levels as well as high DO NOT leave Nexus DSC Pro where it is in direct sunlight or in an enclosed space such as a car that can become extremely hot very rapidly Do not drop or subject the Nexus DSC...

Page 3: ...port running Windows XP or Windows 7 8 10 Apple computers with WiFi support running Mac OS X Please also refer to the system requirements for your favourite planetarium software Package Content The pa...

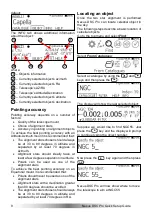
Page 4: ...The main screen consists of a status bar horizontal menu with icons and a text description of the currently selected menu item Status bar Main menu Menu description The status bar has the following el...

Page 5: ...r Connecting to your telescope Please plug the encoder cable into Encoders port on Nexus DSC Pro To make sure that encoders are functioning correctly Nexus DSC Pro has a test mode Selecting Test from...

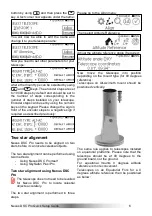
Page 6: ...cate celestial objects The two star alignment can be performed using two methods Using Nexus DSC Pro itself Using SkySafari Plus Pro Two star alignment using Nexus DSC Pro The telescope does not need...

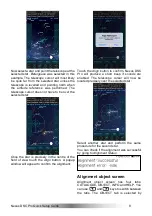
Page 7: ...pe should be pointed at Gacrux using an eyepiece with a reticle crosshair or a very high magnification eyepiece Press the button once the telescope is pointing at the star Nexus DSC Pro will now switc...

Page 8: ...in the centre of the field of view touch the Align button A popup window will appear to confirm the alignment Touch the Align button to confirm Nexus DSC Pro will produce a short beep if sounds are en...

Page 9: ...can be used as one of the alignment stars To achieve the best pointing accuracy on an Equatorial mount it is recommended that Polaris should never be used as one of the alignment stars Alignment stars...

Page 10: ...Nexus DSC Pro with SkySafari If your Nexus DSC Pro has the optional WiFi card then you can connect it to SkySafari Plus Pro running on iOS Android or Mac OS X The following steps describe how to set...

Page 11: ...telescope control panel can be activated by touching the Scope icon Then touch Connect If the telescope is still aimed at NGC55 then SkySafari will show the telescope cursor on the screen and NGC55 w...

Page 12: ...Printed in Australia...

Reviews: