background image

 
Nexus User Manual 

firmware version 2.X.X


14


Parameter 1 

Parameter 2 

Value 

Description 

Examples 

WiFi configuration 

CHANNEL 


0-14 

Specifies  the  WiFi  channel  to  be  used.  Please  note  that  the 
value of 0 should only be used when Nexus is setup to operate 
in infrastructure mode. 

set CHANNEL 7<cr> 
get CHANNEL<cr> 

DHCP 


0,1 

Specifies whether to use DHCP: 0 – disabled, 1 – enabled 

set DHCP 0<cr> 
get DHCP<cr> 

IPADDRESS 


xxx.xxx.xxx.xxx 

Specifies the IP address to be used. The IP address will only be 
used when DHCP is disabled. 

set IPADDRESS 169.254.1.1<cr> 

IPMASK 


xxx.xxx.xxx.xxx 

Specifies the IP mask. 

set IPMASK 255.255.0.0<cr> 

NTYPE 


0 - infrastructure 
7 – Access Point 

Specifies the network mode to be used by Nexus. 


PASSWORD 


up to 32 bytes 

Specifies the password to be used to connect to a WiFi network.  set PASSWORD Pass123<cr> 

get PASWORD<cr> 

SSID 


up to 64 bytes 

Specifies SSID  

set SSID MyNexus<cr> 
get SSID<cr> 

TRANSPOWER 


1÷12 

Specifies  the  transmission  power  to  be  used  by  the  WiFi 
module. Please note that the value of 1 specifies the minimum 
power and the battery will last longer at that level.  


Physical Port 

 
USB 

baudrate 

9600÷230400 

Sets the baud rate to be used on the port specified. The value 
specified is in bits per second. 

set PORTI baudrate 19200<cr> 
get PORTII baudrate<cr> 

databits 

8,9 

Sets the number of data bits. 

set PORTII databits 8<cr> 
get PORTI databits<cr> 

parity 

0, 1, 2 

Sets the parity to be used on the ports specified: 
0 – none 
1 – odd 
2 – even 

set PORTII parity 0<cr> 
get PORTI parity<cr> 

protocol 

0÷2 

Specifies  the  communication  protocol  to  be  connected  to  the 
physical port 
0 - Astro Devices communication protocol 
1 - SkyCommander communication protocol 
2 - ServoCat communication protocol 

set PORTI protocol 1<cr> 
get PORTI protocol<cr> 

stopbits 

1,2 

Specifies the number of stop bits. 

set PORTI stopbits 8<cr> 
get PORTII stopbits<cr> 

Summary of Contents for Nexus-II

Page 1: ...USER MANUAL Nexus STATUS CHARGE POWER II...

Page 2: ...This includes low levels as well as high DO NOT leave Nexus II where it is in direct sunlight or in an enclosed space such as a car that can become extremely hot very rapidly Do not drop or subject th...

Page 3: ...Supports extended Ouranos Bbox Sky Commander and LX200 communication protocols Handles TTL quadrature optical encoders with practically unlimited number of pulses per second Dual power source internal...

Page 4: ...ied voltage range Nexus has internal over current protection but it is safer to use it with the power source specified The USB port can be used to charge your portable computing device and Nexus II ca...

Page 5: ...ocket The power adapter should be capable of supplying at least 1 5A at 5V otherwise it will take much longer to fully charge the battery in Nexus II Connect the power adapter to Nexus II and plug the...

Page 6: ...is pointing Please refer to the user manual of the planetarium software for details on performing the alignment procedure Please note that the connection to a telescope mounted on an equatorial mount...

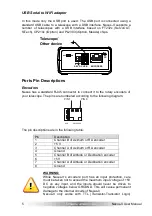
Page 7: ...e following diagram The pin descriptions are in the following table Pin Description 1 Channel B of Azimuth or RA encoder 2 5 V 3 Channel A of Azimuth or RA encoder 4 Ground 5 Channel B of Altitude or...

Page 8: ...of the back of your Nexus II The SSID can be changed using the configuration utility The default IP address of your Nexus is 10 0 0 1 Note The WiFi Configuration setup may differ based on the brand o...

Page 9: ...you to reset them Turn Nexus OFF Press and hold the Factory Setting button Turn Nexus II ON the status LED will start flashing Release the button The WiFi settings are restored as soon as the status...

Page 10: ...quadrature encoders They can be optical capacitive or magnetic encoders Any of them can be used as long as they provide TTL level quadrature output Q Does Nexus II use external power when external is...

Page 11: ...outputs and powered with 5V The following table lists just some of suppliers selling encoders or telescope encoder kits Supplier Hardware Country Website Astro Devices Encoders Telescope encoder kits...

Page 12: ...nical Support You can find the latest version of the manual and firmware in the support section of our website Please feel free to e mail us should you require further technical assistance Technical S...

Page 13: ...comply with the limits for a Class B digital device pursuant to Part 15 of the FCC Rules These limits are designed to provide reasonable protection against harmful interference in a residential insta...

Page 14: ...ng directives and standards therein Directives WEEE Waste from Electrical and Electronic Equipment 2002 96 EC Radio Equipment Telecommunications Terminal Equipment R TTE 1999 5 EC RoHS Restriction of...

Page 15: ...2000 if Nexus is used with ServoCat A0_45 123_78 245 cr Y success E error T_ 0 90 cr Initial telescope alignment at 0 degrees horizontal or at 90 degrees vertical AI_0 cr Y success E error O Release...

Page 16: ...et PASWORD cr SSID up to 64 bytes Specifies SSID set SSID MyNexus cr get SSID cr TRANSPOWER 1 12 Specifies the transmission power to be used by the WiFi module Please note that the value of 1 specifie...

Page 17: ...es the azimuth RA encoder resolution The default value is set to 10000 The value specified is in ticks per revolution Please note that both commands AZENCRES and RAENCRES set the same value set AZENCR...

Page 18: ...computer It includes computers running Windows Linux or Mac OS SSID Service Set Identifier is the name of a wireless local area network WLAN Standby mode is when the Nexus is passively waiting for a...

Page 19: ......

Page 20: ...Printed in Australia...

Reviews: