background image


3

3


10bit Image data 


3.1. 10bit Image data 

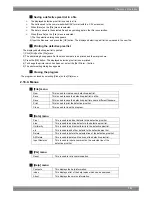
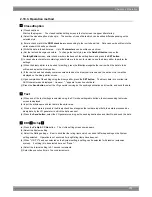
10bit image data of the yacht barber who shows in the figure below is appended to SP-8848.   

The resolution becomes 1920x1080. 


Caution 

A copyright of yacht harbor of an upper figure belongs to "corporate judicial

person Institute of Image Information and Television Engineers".


115

Summary of Contents for SP-8848

Page 1: ...Portable signal generator programming software SP 8848 Instruction Manual Ver 2 6...

Page 2: ......

Page 3: ...Portable signal generator programming software SP 8848 Instruction Manual 2007 2 Ver 2 6 ASTRODESIGN Inc...

Page 4: ......

Page 5: ...se 9 2 3 Closing VGBase 11 2 4 Configuration settings 11 2 4 1 Startup method 11 2 4 2 Window screen and description 11 2 5 Creating and editing the program data 16 2 5 1 Startup method 16 2 5 2 Windo...

Page 6: ...etting the port number and IP address 87 2 13 1 Startup method 87 2 13 2 Window screen and description 87 2 13 3 Operation methods 88 2 13 4 General IP address classes 88 2 14 Color difference coeffic...

Page 7: ...ta transmission tool 105 2 18 1 Startup method 105 2 18 2 Window screen displays and descriptions 105 2 18 3 Operation method 113 Chapter 3 10bit Image data 115 3 1 10bit Image data 115 Chapter 4 Erro...

Page 8: ...8 For details on specific setting items settings or other such aspects refer to the SP 8848 help or the instruction manual of the VG concerned After reading through this manual keep it in a safe place...

Page 9: ...ely in their own files Data management can easily be exercised by such features as the list display sort function and naming function 1 3 Software installation This section describes how to install th...

Page 10: ...ectory specified by the user Click the Browse button and set the directory 4 Select the Install button The file installation dialog screen now appears and installation begins 5 The setup is now comple...

Page 11: ...the following dialog box appears referring to the fact that Microsoft has not officially certified its use Press the Continue button 1 3 3 Uninstallation method In Windows select Start Settings Contro...

Page 12: ...bmp UXGA bmp OptPtn mc g1_test mc g8_test mc window mc ptn_test mc 256_col mc CbarGray mc IMG1 m c Crosst90 mc CheckWin mc 10_step mc cs_cr_ch mc cs_cr_gr mc DispAdj mc G rayCirc mc RGBW_bar mc smpte...

Page 13: ...tDoc text describing how to create the optional patterns make_OPT txt Help help files hlp ADEdit hlp GrpEdit hlp PrgEdit hlp CnfgEdit hlp CharEdit hlp VbmCvt hlp VGBase hlp LpEdit hlp OptEdit hlp make...

Page 14: ...ny result including direct result and indirect result after user deletes the registry data manually 1 3 7 Usage as Multiple Users When using SP 8848 by Multiple Users please install it as below 1 Inst...

Page 15: ...Chapter 1 About the SP 8848 7 The below screen is shown 4 By pressing Repair button SP 8848 is re installed 5 When repair work is done SP 8848 can be used...

Page 16: ...8...

Page 17: ...GBase 1 Select Start Programs SP 8848 VGBase When connecting with VG 848 849 835 859 and 830 SP reads the version number of VG when SP starts If the version is before 2 00 the message appears When mes...

Page 18: ...oad File file selection dialog box appears It does not appear when the layout data is not going to be used Select the Sample lot file in the Data directory default C Astro SP 8848 Data and click the O...

Page 19: ...e configuration settings 2 4 2 Window screen and description Environment page The directory containing the data files can be set on this page Model Name The VG model name is indicated here Data Dir Th...

Page 20: ...button first Click Close to close the configuration setting program Interface page The parameters for communication with the VG unit can be set on this page Select the communication method here Select...

Page 21: ...communication data size fixed at 8 bits Parity Even Odd or None is selected as the parity setting here Stop Bits 1 1 5 or 2 bits are selected as the Stop Bits setting here When VG LAN has been select...

Page 22: ...such as the one shown below appears Name The VG name is displayed here IP Address The IP address is displayed here When PC has been selected as the communication method Memory Card Drive The drive to...

Page 23: ...page The display mode settings of the VG can be changed on this page Display Direct Display or Group Display can be selected here as the display mode When the Group Display mode has been selected the...

Page 24: ...f VGBase to start up the Program Editor When the editor starts up the timing data setting screen appears as the default display 2 5 2 Window screens and description Common setting screen Tool buttons...

Page 25: ...s executed without its being registered in the VG Load When the button is clicked the program data is loaded Save When the Save button is clicked the program data is saved in the file and any existing...

Page 26: ...software Filename Program data No VGInt850 prg 850 VGInt999 prg 999 When while loading the data of an old model the data of setting items featured with the VG 848 but not with the old model has been l...

Page 27: ...er appearing in No The name of the program data can be set by inputting it into Program Name of the NAME program data name setting tab on the pattern data setting screen Receiving the program data 1 S...

Page 28: ...H TIMING data and milliseconds msec H or Hz as the units for the vertical timing V TIMING data The check box enabling the unit to be input changes Setting the fixed mode A fixed mode is provided for D...

Page 29: ...99 999 sec 0 to 4096 dot 1 dot increments HD start HD width 0 000 to 99 999 sec 0 to 4096 dot 1 dot increments H Blanking Calculated automatically 1 dot increments Vertical timing data V Total 0 000 t...

Page 30: ...screen Output condition data setting screen Setting the data Select the applicable radio buttons Where an edit box is provided align the mouse cursor with the data to be changed and click the mouse T...

Page 31: ...set here as the color difference table number RGB Y B Y R Y Either RGB or Y B Y R Y is set here as the color difference setting DVI Mode Either Single or Dual is selected here as the DVI output settin...

Page 32: ...ng Select Multi Pattern or Single Pattern as the Mode setting Multi Pattern is the default NAME R G B and INV can be set at the same time for any of the patterns When Multi Pattern is selected The OPT...

Page 33: ...dow OPTI Optional pattern 1 OPT2 Optional pattern 2 R Red output G Green output B Blue output INV Inversion Pattern settings CHARA Character pattern This button is used to set the character pattern Co...

Page 34: ...ers the actual screen center will be one dot to the right and one line below the center An error results when 0 is set for both H and V Mode Specification as a number of lines line or dot intervals do...

Page 35: ...actual screen center will be one dot to the right and one line below the center An error results when 0 is set for both H and V Mode Specification as a number of lines line or dot intervals dot is se...

Page 36: ...t the circle pattern The number of circles etc can be set Format This is selected on the basis of the data which has been set Aspect The aspect ratio of the monitor is set here The ratio is considered...

Page 37: ...sor is selected here Flicker The flicker setting is selected here Position PosDisp The method of displaying the cursor position is selected here Step The cursor movement step is selected here Color Th...

Page 38: ...terval setting is used for both color bar and gray scale Mode The interval setting increment specified as a percentage or dot number is selected here Interval The horizontal H width and vertical V wid...

Page 39: ...cted here Repeat The color values from 0 to repeat are set here when level values are to be used repeatedly Interval The interval between the shades of gray is set here When the analog mode or Tri Syn...

Page 40: ...the burst pattern Format The drawing start point is selected here Step The increment for the thickness of the vertical lines is selected here Interval The number of vertical lines of the same thicknes...

Page 41: ...s effective if it is set in 4Level and 16Level Then each set screen is displayed Flicker Level button Setting screen of Window 4Level Flicker and Window 16 Level Flicker is displayed When the analog m...

Page 42: ...flicker level is set 0 to 255 Close The Window 4Level Flicker setting screen is ended and it returns to the Window setting screen 8bit or 10bit can be selected in VG 835 The level can be set between 0...

Page 43: ...v Level The flicker level is set 0 to 255 Close The Window 16Level Flicker setting screen is ended and it returns to the Window setting screen 8bit or 10bit can be selected in VG 835 The level can be...

Page 44: ...e optional patterns When an optional pattern is set no other patterns can be superimposed onto it Option 1 OPT1 The hexadecimal code of the optional pattern is set here Option 2 OPT2 The hexadecimal c...

Page 45: ...e name of the program data displayed A new program data name can be set by inputting the name into Program Name of the program data name setting tab on the pattern data setting screen and saving it or...

Page 46: ...lor The RGB values are set here When the TTL mode has been selected as the output condition Mode setting TTL Color The TTL color values are set here Background ON or OFF is selected here Background Co...

Page 47: ...uring the coordination of 30 fps 60 field NTSC signals with 24 fps films when converting regular movies and other film sources into video signals The first frame of the film is converted into the equi...

Page 48: ...number of steps from 0 to 4095 dots is set here H Step4 The number of steps from 0 to 4095 dots is set here V Step2 The number of steps from 0 to 4095 dots is set here V Step3 The number of steps fro...

Page 49: ...t Right Up Down LeftUp RightUp RightDown Moving H Repeat 1 to 15 V Repeat 1 to 15 H Step 1 to 4096 dots V Step 1 to 4096 dots H Step2 0 to 4096 dot V Step2 0 to 4096 dot H Step3 0 to 4096 dot V Step3...

Page 50: ...the Sweep Mode setting Frequency The frequency is set in the LEFT and RIGHT fields Any frequency from 100 to 20 000 Hz can be set in each field The settings are performed in 100 Hz increments Level Th...

Page 51: ...Chapter 2 Operation 43 HDMI data setting screen A setting screen is a thing at the time of VG 849 selection...

Page 52: ...4kHz or 192kHz Audio Width Set the audio bit width Select from 16bit 20bit or 24bit Audio Internal Sweep Set the internal Sweep Select from OFF or Freq Audio Internal L R Level Set the audio output le...

Page 53: ...Chapter 2 Operation 45 InfoFrame data setting screen A setting screen is a thing at the time of VG 849 selection...

Page 54: ...om Bar Set the Bottom Bar Select between 1 and 65535 End of Left Bar Set the Left Bar Select between 1 and 65535 Start of Right Bar Set the Right Bar Select between 1 and 65535 SPD ON OFF Select ON or...

Page 55: ...elect ON or OFF of InfoFrameMPEG Type Display the Type of InfoFrameMPEG Version Set the version of InfoFrameMPEG One version is fixed BitRate Set the BitRate within the range of 0 to 4294967295 4294M9...

Page 56: ...p Please make a selection from 0 1 2 or 3 When ACP Type is set to DVD Audio it can be selected Copy Number Copy Number setup Please make a selection from 0 1 2 3 4 5 6 or 7 When Copy Permission is set...

Page 57: ...se make a selection from either 0 or 1 ISRC Status ISRC Status setup Please make a selection from Starting Intermediate or Ending Validity Information Validity Information setup Please make a selectio...

Page 58: ...When either value is changed the other set value is changed TX Destination To which device the command is transmitted is set Set the value from 0 to F Op Code Set Op Code of the command Set the value...

Page 59: ...or setting the actual aspect ratio AFD Aspect For setting CodeFrame of the AFD which is defined by the EIA CEA 861B standard AFD Type For setting the number of the AFD which is defined by the EIA CEA...

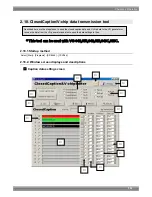
Page 60: ...sedCaption V chip V chip V chip data is set up Please refer to a 2 18 ClosedCaption V chip data transmission tool for details ClosedCaption Caption data is set up Please refer to a 2 18 ClosedCaption...

Page 61: ...the output Line Set the teletext data transmission mode 4line Four lines are set as the mode for transmitting the teletext data Display lines Field1 20 21 Filed2 333 334 8line Eight lines are set as t...

Page 62: ...ntents 100 Index Page 101 Test Page 102 Newsflash 103 Subtitle 200 Character Set English 201 Character Set German 202 Character Set Swedish Finnish Hungarian 203 Character Set Italian 204 Character Se...

Page 63: ...Chapter 2 Operation 55 Macrovision data setting screen Macrovision Mode Mode The output mode of a Macrovision is set up The modes which can be set up for every setting timing differ...

Page 64: ...STB Type 2 DVD STB Type 3 VHS USA NTSC M VHS US obs OFF DVD STB Type 1 DVD STB Type 2 DVD STB Type 3 VHS Japan 1 NTSC J VHS Japan 2 OFF NTSC 443 DVD STB OFF PAL 60 DVD STB OFF PAL M DVD STB OFF DVD S...

Page 65: ...t Y C output or RGB output signals Timing When a timing system other than one supported by the IA 575 has been selected it is possible to specify the timing system which are to be output from the IA 5...

Page 66: ...e the editing area This is used to enlarge what is displayed inside the editing area This is used to reduce what is displayed inside the editing area All Clear This button is used to clear the entire...

Page 67: ...t to ON if the right button of the mouse is clicked and to OFF if the left button is clicked 3 To clear the entire character created in the editing area click the All Clear button 4 To undo the last o...

Page 68: ...is now started 4 The received character is displayed in the editing area The code shown at Code now changes to that of the received character Characters can be received from old VG model but they cann...

Page 69: ...nd edited edited group data can be sent to the VG and registered on the panel ROM or memory card and group data from the VG can be received Different program display screens are displayed depending on...

Page 70: ...e Group group data list If the layout has been set The number of the group data registered in the layout is displayed at No If the layout has not been set No is cleared 2 Creating and editing the grou...

Page 71: ...2 Set the group number 1 to 99 3 Click the OK button The reception of the group data is now started The number of the received group data now replaces the previous number appearing in No When program...

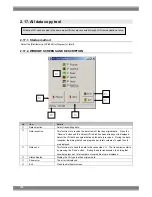
Page 72: ...dow screen and description No Item name Details Neme The name of the auto display data is set here Auto Display The auto display data which has been set is displayed here All Clear Clear These buttons...

Page 73: ...is now set Alternatively use the mouse to click the No field of the auto display data list where the program data number is to be input The number can now be keyed in In registering the auto display...

Page 74: ...etails on how the items on this dialog box are set refer to the instruction manual for Windows or for the printer which will be used 7 Registering the program The program data files in the data direct...

Page 75: ...BM files 2 9 1 Startup method Click the Image button of VGBase to start up the Image Converter 2 9 2 Window screen and description No Item name Details No The number of the image data registered in th...

Page 76: ...pported When data is set in either the number or the code the corresponding data will be set in the other The number of the sent VBM data now replaces the previous number appearing in No 3 Click the O...

Page 77: ...t The VG optional patterns can be created and edited edited optional pattern source codes can be compiled optional pattern data can be sent to the VG and registered on the memory card and optional pat...

Page 78: ...bit and Window plane it takes certain amount of time to display Simulation Window Resolution Input screen By pressing Exec button the Resolution Input screen is displayed No Item Description Resolutio...

Page 79: ...isplayed by each plane such as 8 bit Window 1 bit and Mix Output screen Simulated pattern is displayed Compile screen Message for compiling is displayed VBM data izing button The pattern that is displ...

Page 80: ...layed source code is saved in the file Click the Save button The data is saved in the selected file and any existing data in that file is overwritten Click the Save As button The data is saved in a ne...

Page 81: ...e printer setting dialog box appears Proceed with the printer settings For details on how the items on this dialog box are set refer to the instruction manual for Windows or for the printer which will...

Page 82: ...n window Execute Image If compile fails black screen is displayed 3 After confirming the pattern is displayed on the simulation screen click To VBM button The file saving screen like below is displaye...

Page 83: ...of 8 bit plane is assigned to 1 bit plane and Window plane 1 8 bit 1 bit and Window plane are displayed simultaneously Palette No Setting color 0 1 2 3 253 8 bit plane palette 254 1 bit plane color 25...

Page 84: ...ion setup It also explains how to change the IP addresses of the connected VGs 2 11 1 Startup method Click the Monitor button of VGBase to start up the Monitor 2 11 2 Window screen and description Mon...

Page 85: ...indicating that the VG is functioning normally VG Error indicating that trouble has occurred in the VG and Network Error indicating that trouble has occurred in the network 2 Changing an IP address 1...

Page 86: ...going to be used and Use Layout File when they are going to be used When No Info is selected operation returns to VGBase straight away In this case the layout data cannot be edited When Use Layout Fi...

Page 87: ...Layout data list The program data which has been registered is displayed here Data folder The folder of the registered program data is selected The folder that can be selected by set VG is different D...

Page 88: ...VGInt VGInt2_848 VG 859 Program VGInt VGInt2_849 VGInt3_849 VG 830 Program VGInt VGInt2_848 VG 835 Program VGInt VGInt2_835 VG 835 A Program VGInt VGInt2_835 VG 857 Program VGInt VGInt2_835 Other VG P...

Page 89: ...Group tab No Item Details Layout Name See same item in program tab section Layout data list See same item in program tab section Data file list See same item in program tab section Set See same item...

Page 90: ...No Item Details Layout Name See same item in program tab section Layout data list See same item in program tab section Data file list See same item in program tab section Set See same item in program...

Page 91: ...Image tab No Item Details Layout Name See same item in program tab section Layout data list See same item in program tab section Data file list See same item in program tab section Set See same item...

Page 92: ...o Item Details Layout Name See same item in program tab section Layout data list See same item in program tab section Data file list See same item in program tab section Set See same item in program t...

Page 93: ...ata is saved in a new file When the data is to be used temporarily When the edited layout data is to be tested or when the layout data is to be used temporarily in the editing programs started up from...

Page 94: ...their pre reception contents will remain unchanged Therefore to create new layout data by data reception the first step to be taken is to specify a new file by performing the steps for selecting a lay...

Page 95: ...2 Window screen and description No Item Details Port No The number of the VG s port is set here Serial settings Com port The port number is selected here Speed The transfer baud rate is set here Data...

Page 96: ...ollowed by combinations of numbers from 0 to 255 Use of this class of IP address enables up to 16 million computers to be connected by a single network Class B 172 16 0 0 to 172 31 255 255 The number...

Page 97: ...ent data Save Click this to save the color difference coefficient data in a file and overwrite any existing data in that file in the process Save As Click this to save the color difference coefficient...

Page 98: ...ata The color difference coefficient data is saved in the VG 1 Click Send on the VG menu The send dialog box appears 2 Set the number of the data table 3 Select the OK button The color difference coef...

Page 99: ...print the displayed data Close This is used to close the program VG menu Send to VG This is used to send the color difference coefficient data being edited to the VG Receive from VG This is used to r...

Page 100: ...t DDC data of the programmable video signal generator hereafter abbreviated to VG The program enables the DDC data of a DDC compatible monitor to be send received and edited in Windows 2 15 1 Startup...

Page 101: ...s being edited to the monitor Receive Click this to receive the DDC data from the monitor Verify Click this to compare the DDC data being edited against the data stored in the monitor s ROM Print Clic...

Page 102: ...s the OK button Next the block selection dialog box appears 4 Select the block whose data is to be loaded and press the OK button 5 The DDC data in the specified block is loaded and displayed Editing...

Page 103: ...itor ROM The DDC data is loaded from the monitor ROM and the DDC data now being edited is checked against it 1 When Verify on the VG menu is selected or the button among the tool buttons is clicked th...

Page 104: ...ete a block Copy Block This is used to copy a block Move Block This is used to move a block Change Block Type This is used to change the block type VG menu Menu command Description of function Send to...

Page 105: ...be inserted Click Insert up Block on the Edit menu Inserting a block after the current block Click the block immediately above the position where the block is to be inserted Click Insert down Block on...

Page 106: ...bes how to move the VG s cursor pattern just as would be done using a mouse and save the coordinates of defective pixels and other data in files 2 16 1 Startup method Select Start Programs SP 8848 Cur...

Page 107: ...essing the arrow buttons Comment A comment can be entered for the whole defect list here Position cursor pattern position The current cursor pattern coordinates are displayed here When these coordinat...

Page 108: ...matching these states is displayed In addition the cursor pattern position changes to the center coordinates and the properties change to the default values Moving the cursor pattern The coordinates c...

Page 109: ...m The program is closed by selecting Close on the File menu 2 16 4 Menus File menu New This is used to create a new defective pixel list Save This is used to save the defective pixel list in a file Sa...

Page 110: ...ve button and IP address VG which has been already set is displayed Select the VG that has original data and the data is received During the data reception the dialog that shows progress bar total num...

Page 111: ...Only checked data is transmitted 4 Data reception Data is received from arbitrary VG 1 Press the Receive button 2 Selection screen of IP address VG is displayed The IP address that has been set in Con...

Page 112: ...255 255 Class B 5 VG5 192 168 16 60 Class C In this case the IP address that is set in No 1 is Class C the data is transmitted only to VG1 VG2 and VG5 whose IP address is set as Class C The data is no...

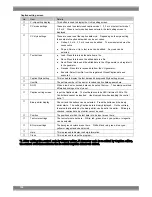
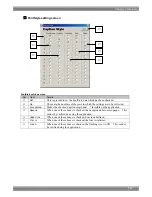
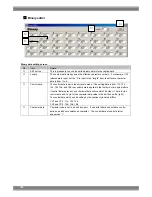
Page 113: ...9C 2 18 1 Startup method Select Start Programs SP 8848 CCVEdit 2 18 2 Window screen displays and descriptions Caption data setting screen Described here are the steps taken to send the closed caption...

Page 114: ...ttern number of the sent or received caption data appears here ROW When a row box is checked data can be set on that row The selection method differs depending on the style set Caption setting screen...

Page 115: ...akes the checked Caption oreground Invisible on the application Foreground When one of these boxes is checked the background becomes opaque This cannot be verified due using the application Opaque Und...

Page 116: ...the setting data is from 11h 12h 13h 19h 1Ah and 1Bh the control data is applied to the first byte of two bytes letters If control data is present one character data will consist of 2 bytes 1 byte for...

Page 117: ...Chapter 2 Operation 109 Text data setting screen...

Page 118: ...text data appears here ArticleName The article name appears here Text Input the Text data The text data should be ASCII letters of 20h to 7Fh Control data cannot be inputted Use binary editor when in...

Page 119: ...Chapter 2 Operation 111 V chip setting screen...

Page 120: ...PP G PG PG 13 R NC 17 X U S TV TV Y TV Y7 TV G TV PG TV 14 TV MA English E C C8 G PG 14 18 French E G 8ans 13ans 16ans 18ans This is where the U S TV extension system is selected None FV V S L or D ca...

Page 121: ...editor screen i Upon completion of the editing using the binary editor press the SET button The binary data is converted into ASCII characters and displayed However appears for each control data j Pr...

Page 122: ...114...

Page 123: ...of the yacht barber who shows in the figure below is appended to SP 8848 The resolution becomes 1920x1080 Caution A copyright of yacht harbor of an upper figure belongs to corporate judicial person I...

Page 124: ...116...

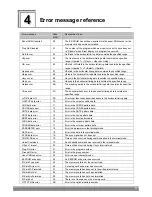
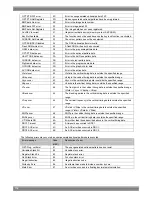
Page 125: ...ming data OUTPUT data error 10 Error in the output condition data CHR data error 11 Error in the CHARA pattern data CROSS data error 12 Error in the CROSS pattern data DOTS data error 13 Error in the...

Page 126: ...ata is outside the specified range Vbp over 43 Vbackp in the vertical timing data is outside the specified range Vfp over 44 The front porch in the vertical timing data is outside the specified range...

Page 127: ...on The contents of this manual are subject to change without prior notice due to improvements The manufacturer will not be liable for any effects caused by incorrect operation All inquiries concerning...

Reviews: