background image

9

ENGLISH

Use of the Oven

1

Select a temperature and a cooking func-
tion.

2

Set the controls in position

to switch off

the oven.

3

Subsequently, the indicator that was
flashing will light, indicating that the oven
will switch itself off automatically.

4

The clock will then show the current time. 

5

Select a temperature and cooking function.

6

When the set time has elapsed, the oven
will disconnect, an alarm will sound and the
indicator will begin to flash. 

7

Press any button to switch off the alarm,
reconnecting the oven. 

8

Set the controls in the position

to switch

off the oven.

Programming the end of cooking time for the
oven

1

Press the MODE button until the indicator
above the

symbol begins to flash.

2

Select the time that cooking is to finish,
pressing the “+” or “-“ buttons.

3

Subsequently, the indicator that was
flashing is lit, indicating that the oven will
switch itself off automatically. 

4

The clock will then show the current time. 

5

Select a temperature and a cooking
function.

6

When the programmed time is reached, the
oven will disconnect, an alarm will sound
and the indicator will begin to flash. 

7

Press any button to switch off the alarm and
the oven will reconnect. 

8

Set the controls to the position

to switch

off the oven.

This function may be used even though you are
already cooking in your oven. To do so, follow
the instructions given except Nº 5.

Programming the duration and automatic
stop

1

Press the MODE button until the indicator
above the

symbol begins to flash.

2

Select the length of cooking time pressing
the “+” or “-“ buttons.

Electronic programing clock

Setting the time on the clock

On connecting the oven, you will notice that
12:00 appears on the clock and that a light
begins to flash above the

symbol. Pressing

the “+” and “-“ buttons the correct time can be
set on the clock, which is subsequently stored
and the flashing light goes out.

Manual use

After setting the correct time, the oven is ready
for use. Select a temperature and a cooking
function.

To switch off the oven, set the controls to the
position

.

Warning function

1

Press the MODE button until the signal
above the

symbol begins to flash.

2

Choose the time when you want the alarm
to sound, pressing the “+” or “-“ buttons.

3

Subsequently, the light will remain on
indicating that the alarm is programmed. 

4

At the end of the programmed time, an
alarm will sound and the light will begin to
flash. 

5

Press any button to turn off the alarm and
the screen shows the current time again. 

Programming the cooking time

1

Press the MODE button until the indicator
above the

symbol begins to flash. 

2

Select the length of time, pressing the “+”
or “-“ buttons.

Summary of Contents for EB 1000 E

Page 1: ...EB 1000 E EB 3000 E EB 4000 E EB 6000 E ...

Page 2: ...and odours to escape from inside After cooling clean the oven and the accessories During the first use fumes and odours may occur and the kitchen should therefore be well ventilated Ecological Packaging The packaging materials are completely re cyclable and can be used again Check with your local authority on the regulations for disposing of this material CAUTION The symbol on the product or on it...

Page 3: ... oven when it is installed within kitchen units Important Safety Instructions Do not store oils fats or inflammable materials inside the oven as it could be dangerous if the oven is switched on Do not lean or sit on the open door of the oven as it could damage the door and be dangerous for you Do not cover the bottom of the oven with aluminium foil as it could affect cooking and damage the interio...

Page 4: ... going to the food and it goes out when the set temperature is reached 3 Cooker indicator light It indicates that one or more of electric hotplates are on 4 Function selector 5 Temperature selector 6 Control knobs for the hob Models EH1000E EH3000E Models EB4000E EB6000E Models EH4000E EH6000E 2 4 5 3 2 5 4 6 6 6 6 1 2 4 2 1 4 3 5 6 6 6 6 5 ...

Page 5: ...ce browning Ideal for grills Special for large volume pieces such as poultry game etc It is recommended to put the item on a rack with a tray beneath to collect the stock and juices Caution While using the Grill MaxiGrill or MaxiGrill with fan the door must be kept closed Turbo The fan distributes the heat produced by an element located at the rear of the oven Due to the uniform heat distribution ...

Page 6: ... position to switch off the oven This function may be used even though you are already cooking in your oven To do so follow the instructions given except Nº 5 Programming the duration and automatic stop 1 Press the MODE button until the indicator above the symbol begins to flash 2 Select the length of cooking time pressing the or buttons Electronic programing clock Setting the time on the clock On...

Page 7: ...ll begin to flash 11 Press any button to switch off the alarm and the oven will reconnect 12 Set the controls to the position to switch of the oven Caution Pressing the MODE button the display on the screen shows any function programmed It can be changed by pressing the or buttons On selecting the desired function the indicator above the corresponding signal will light In the event of a power cut ...

Page 8: ...cy class on a scale of A more efficient to G less efficient Heating function Conventional Forced air convection A A A A Energiever brauch Konventionelle Beheizung Umluft Heißluft Energy consumption Conventional Forced air convection 0 76 Kwh 0 79 Kwh 0 84 Kwh 0 79 Kwh 0 87 Kwh 0 79 Kwh 0 84 Kwh Netto volumen liter Usable volume litres 58 53 53 52 Typ Klein Mittel Groß Size Small Medium Large Kochz...

Page 9: ... Shallow oven dish Pasty Vegetable Pie Tray Shallow dish Baked potatoes Tray Pizza Quiche Quiche Mould Grid Vegetable Pastry Shallow dish 1 5 1 1 5 1 1 5 3 0 35 1 2 2 3 180 200 170 190 190 210 190 210 180 200 190 210 180 200 45 50 170 190 35 40 45 50 160 180 30 35 35 40 170 190 30 35 55 60 2 170 190 45 50 170 190 50 55 60 65 3 180 200 50 55 20 25 0 65 2 170 190 15 20 45 50 2 160 180 45 50 Stuffed ...

Page 10: ...2 180 200 30 35 15 20 1 3 160 180 10 15 20 25 1 3 180 200 15 20 Salmon in greased paper Tray 180 200 20 25 1 3 170 190 15 20 Trout Tray 190 210 20 25 1 2 180 200 15 20 Hake Tray 190 210 25 30 1 5 3 180 200 20 25 180 200 20 25 Red Bream Tray 180 200 30 35 1 5 3 170 190 25 30 FISH Weight Tray Position Cooking Mode Temperat Time Receptacle ...

Page 11: ...0 55 35 40 3 160 180 30 35 170 190 30 35 40 45 1 3 160 180 30 35 170 190 30 35 50 55 1 5 3 170 190 45 50 35 40 1 3 170 190 30 35 180 200 35 40 Fillet Steak Pastry Tray 180 200 35 40 1 3 160 180 30 35 Suckling Pig Tray Rabbit Tray 180 200 60 65 190 210 75 85 2 3 170 190 65 75 180 200 80 85 1 5 3 160 180 45 50 170 190 45 50 MEAT Weight Tray Position Cooking Temperat Time Receptacle ...

Page 12: ... 5 3 150 170 15 20 15 20 0 25 3 170 180 15 20 25 30 0 5 2 150 170 25 30 35 40 1 3 170 190 30 35 180 200 Baked bananas Casserole dish 15 20 0 5 3 170 190 10 15 170 190 Puff pastry biscuits Tray 20 25 0 25 2 170 190 20 25 180 200 Plum Cake Cake Mould 60 65 0 5 2 160 180 50 55 170 190 Apple Pie Tray 50 55 1 2 160 180 45 50 170 190 Cheesecake Cheescake Mould 45 50 1 2 170 190 35 40 180 200 CAKES AND D...

Page 13: ...aning system self cleaning This system eliminates small grease residues during cooking at high temperatures If grease residues remain after cooking these can be eliminated by operating the oven empty at 200ºC for one hour Use of the Fold down Grill Depending on Model To clean the upper part of the oven Wait until the oven is cold Cleaning the Inside of the Oven Turn the screw A and lower the grill...

Page 14: ...bolt C which releases the flat catalytic panels 4 To disassemble the back panel remove screw D 5 Proceed in reverse order to re assemble Caution For your own safety never switch the oven on without the back panel that protects the fan Clean the outside of the oven and the accessories with warm soapy water or with a mild detergent Cleaning the Oven Exterior and Accessories B C D ...

Page 15: ... to simplify its cleaning To do so 1 Open the door fully 2 Completely turn the two clips E 3 Close the door until it inserts into the two clips Cleaning the Oven Door 4 Take hold of the door on both sides Pull the oven door forward until it is totally free from the hinges F To re assemble the door proceed in reverse order E F F Dismantling Assembly Instructions for the interior glass 1 Open the ov...

Page 16: ...o the door C The glass is fixed to the door by pressing B C Caution To change the bulb first ensure that the oven is disconnected from the power supply Unscrew the lens from the lamp holder Exchange the bulb and replace the lens The replacement bulb must be temperature resistant to 300ºC These can be ordered from the Technical Service Department Changing the Oven Bulb ...

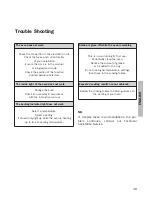
Page 17: ...es not work Change the bulb Check its assembly in accordance with the instruction manual The heating indicator light does not work Select a temperature Select a setting It should only light up while the oven is heating up to its set working temperature Smoke is given off while the oven is working This is normal during its first use Periodically clean the oven Reduce the amount of grease or oil add...

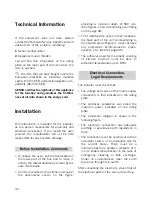
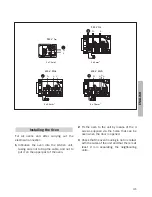
Page 18: ... cycles of the mains supply correspond to that indicated on the rating plate The electrical installation can stand the maximum power indicated on the rating plate The connection diagram is shown in the following figure The electrical connection has adequate earthing in accordance with regulations in force The connection must be carried out with an omnipolar switch of an adequate size for the curre...

Page 19: ...f the oven Installing the Oven 2 Fix the oven to the unit by means of the 4 screws supplied via the holes that can be seen when the door is opened 3 Check that the oven housing is not in contact with the sides of the unit and that there is at least 2 mm separating the neighbouring units 3 x 4mm2 3 x 1 5mm2 4 x 2 5mm2 5 x 1 5mm2 N L 230 V 1 230 V 1 N L N L3 L1 400 V 3N L2 N L2 L1 400 V 2N ...

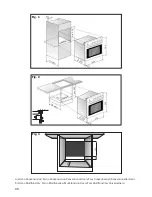
Page 20: ... min 580 22 595 595 min 600 Mín 40 4 9 0 320 160 Fig 3 Fig 1 Fig 2 a 510 b 540 a Horno Convencional Forno Convencional Conventional Oven Four Conventionnel Konventioneller Herd b Horno Multifunción Forno Multifunções Multi function Oven Four Multifonction Universalherd ...

Reviews: