Understand Science with the fascinating and fully operational cardboard kits by AstroMedia
The Stardial The Orrery The Solar Projector The Steam Engine
and many, many more .....
Visit our website www.AstroMediaShop.co.uk for more kits, optical components, and interesting gadgets.
AstroMedia UK
✵
Landell
✵
Brick Kiln Lane
✵
Ingham, Norwich
✵
NR12 9SX
✵
Phone: 07864 912372
✵
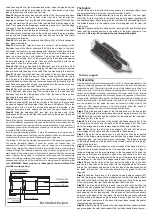
the markings and butt firmly up against the tabs of the right hand support
without any gaps. The buttress support should cover the glue markings on
the side support and the pointer on the triangle should line up with the
lowest point of the axle bearing. Glue the buttress support into this position.
Step 57
Repeat with the front and rear parts of the left-hand side buttress
support [K3] and [K4]. They are mirror images of the right hand side but
otherwise identical. Glue into place on the left-hand side support.
The Eyepiece Storage Holders
Because only one eyepiece at a time is used, you need some place to store
the other eyepiece along with the cover for the eyepiece connector.
Step 58
Fold all the grooves of the neck of the eyepiece connector cover
[B4] to the back and glue it to form a hexagonal pipe. Then glue the tabs of
the neck to the eyepiece connector cover [B5]. Slide the finished cover into
the eyepiece connector to protect the secondary mirror from dust.
Step 59
Remove the right eyepiece holder [L1] and fold all folds to the back
except for the small tab with the screws which folds to the front. Hold it with
the chamfered end of the tabs uppermost and glue the tab with the screw
heads to the appropriate mark on the right hand support. The tab at the
other end is glued to the buttress support.
Step 60
Repeat with the other eyepiece holder [L2] on the other side.
Step 61
Now carefully place the axles of your telescope into the axle
bearings of the supports. Do not disturb the paper-clips on the mirror holder.
The end of the body with the main mirror should be at the open side of the
mounting support and the eyepiece should be slanted on top just like the
colour cover picture of the kit. If you have determined after several
observations with the eyepieces that the basic adjustment of the main
mirror has given you a sufficiently good image you can skip the next section
on “fine adjustment” and proceed straight to the final assembly in Step 65.
Fine Adjustment – Optional
When magnified, planets appear as small discs but stars remain points of
light, however much you magnify them. The quality of a telescope is shown
by the appearance of these points of light and one can use them to optimise
the image of this telescope, of course only within the technical limits of a
cardboard construction. If you are not happy with the result of the basic
adjustment of the telescope, in particular with the view of a star or other far
distant points of light, you can try to improve it with the following steps. You
will need a steady hand and a lot of patience, because the finer the
adjustment, the smaller the corrections that are needed, and sometimes it
will be necessary to adjust the adjustment of an adjustment...
Step 62
To achieve the optimal adjustment of the telescope you have to
point it at a star; only it is difficult to make the adjustments in the dark. In
order to work in daylight you need an artificial star in the form of a
Christmas tree bauble or similar hanging up about 40m away with a dark
background for best results. If you look at the ball with the Sun behind you,
you see the Sun
ʼ
s reflection in the surface of the ball as a point of light. You
don
ʼ
t need the sun filter to look at this because the reflection is so small.
Step 63
Point the telescope at the Christmas tree bauble with the 28mm
eyepiece to start with and get the point of light in the centre of the field of
view. Check whether it remains a point of light after carefully focussing the
eyepiece. If the light is smeared out to one side then the main mirror must
be adjusted very slightly to correct this and obtain the best point. Check that
you are happy with the results from the other eyepiece.
Step 64
In order to be absolutely sure you can check the telescope again at
night by observing a star or distant point of light. Do not forget however that
you can not expect quite the same image quality from a hand-built card-
board telescope with acrylic lenses as you would expect from a much more
expensive factory-made optical precision instrument.
Final Assembly
After completion of the basic or fine adjustment, the mirrors can be
permanently fixed and the last card pieces glued on.
Step 65
Glue the secondary mirror holder [D1] in its final position. Do this
by removing one of the 4 paper clips, lifting the tab and applying glue
underneath it and then fixing the tab back with the paperclip. Check again
as in Step 29 to make sure the image through the eyepiece connector is still
in the middle of the secondary mirror in case any slight adjustments are
needed to the tab before the glue dries. Repeat this for the remaining three
tabs.
Step 66
Remove the body opening cap [D2] and fold the tabs to the back.
Fit it over the opening of the main body and glue the tabs to the outside of
the tube directly in front of the secondary mirror.
Step 67
Glue the tabs of the main mirror holder into place. Release one tab
at a time and glue it into place, replacing the paper clip until dry. If you want
you can glue the tab with two spots of glue only so that, if necessary, you
can replace the main mirror or re-adjust its position later. Check through the
eyepiece that everything is still in place and then fix the next but one tab in
the same way. Repeat for the next but one again and then fix the remaining
three tabs. Allow to dry thoroughly.
Step 68
Remove the body end cap [E3] and fold the tabs to the back.
Check once more that the mirror is in the right position and then cut off the
adjusting handles protruding from the body. Fit the end cap onto the end of
the main body and glue the tabs to the outside of the tube behind the main
mirror. Again you can use spots of glue so that you can remove it later if
required.
Congratulations! You are now ready for “First Light” as astronomers
call their first observations with a new instrument.
We wish you many interesting hours with your home-built reflecting
telescope. Perhaps this is only the first step towards a bigger instrument.
Please let us know of any interesting experiences that you may have during
construction or use that we may possibly incorporate into future designs or
publish on the internet. We look forward to hearing from you.
Tips for using your Reflecting Telescope
1) The image of a mirror telescope is inverted but you can still use
it to look at terrestrial objects. Use the sights to line up the
object and focus it with the eyepiece.
2) To observe sunspots you
must use
the sun filter (Article No.
210.NSF). Do not use the sights to point the telescope at the
sun but move the telescope body until the shadow of the rear
sight completely covers the front sight. The number of sunspots
follows a regular cycle of about 11 years. The last maximum of
solar activity was in 2014.
3) The most rewarding object for night time study is undoubtedly
the moon. The craters can be best seen with a waxing or
waning moon in the vicinity of the “shadow line” where the
sunlight grazes the moon
ʼ
s surface, creating pronounced
shadows.
4) With careful adjustment of the mirror you can also see Jupiter
ʼ
s
moons and indications of Saturn
ʼ
s ring.


