background image

5-4

Chapter 5: Support DVD & System Recovery

System Recovery

Using Hard Disk Partition 
(Eee PC 900HA model only)

The Recovery Partition includes an image of the operating system, 
drivers, and utilities installed on your Eee PC at the factory. The 
Recovery Partition provides a comprehensive recovery solution that 
quickly restores your Eee PC’s software to its original working state, 
provided that your hard disk drive is in good working order. Before 
using the Recovery Partition, copy your data files to floppy disks or 
to a network drive and make note of any customized configuration 
settings (such as network settings).

Disable 

Boot Booster

 in BIOS setup before your perform system 

recovery from USB flash disk, external optical drive or hidden 
partition. Refer to the end of this chapter for details.

About the Recovery Partition

The Recovery Partition is a space reserved on your hard disk drive 
used to restore the operating system, drivers, and utilities installed 
on your Eee PC at the factory.

Using the Recovery Partition:

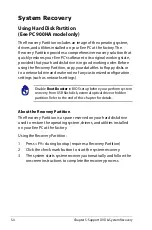
1.  Press <F9> during bootup (requires a Recovery Partition)
2.  Click the check mark button to start the system recovery.
3.  The system starts system recovery automatically and follow the 

onscreen instructions to complete the recovery process. 

Summary of Contents for 900HA - Eee PC - Atom 1.6 GHz

Page 1: ...Eee PCUser s Guide Windows XP Edition Eee PC 900HD Series Eee PC 900HA Series September 2008 E4229 ...

Page 2: ...he Parts Top Side 2 2 Bottom Side 2 5 Right Side 2 7 Left Side 2 8 Rear Side 2 9 Chapter 3 Getting Started Power System 3 2 Using AC Power 3 2 Using Battery Power 3 3 Battery Care 3 5 Power Mode 3 5 Touchpad Usage 3 7 Single finger gesture input 3 7 Multi finger gesture input 3 8 Keyboard Usage 3 9 Special Function Keys 3 9 First time Startup 3 11 Desktop 3 14 ASUS EeePC Tray Utility 3 15 Enabling...

Page 3: ... Hybrid Engine Eee PC 900HA model only 4 14 Super Hybrid Engine Modes 4 14 Eee Storage 4 15 Chapter 5 Support DVD System Recovery Support DVD information 5 2 Running the support DVD 5 2 Drivers menu 5 3 Utilities menu 5 3 Contact 5 3 Other information 5 3 System Recovery 5 4 Using Hard Disk Partition Eee PC 900HA model only 5 4 Using the Support DVD 5 5 Boot Booster 5 7 Appendix Declarations and S...

Page 4: ...iv Table of Contents ...

Page 5: ...About This User s Manual Notes for This Manual Safety Precautions Preparing Your Eee PC 1 Introducing the Eee PC ...

Page 6: ...2 Knowing the Parts Provides information on the Eee PC s components 3 Getting Started Provides information on getting started with the Eee PC 4 Using the Eee PC Provides information on using the Eee PC s utilities 5 Support DVD System Recovery Gives you information on the support DVD and system recovery 6 Appendix Provides you safety statements The actual bundled applications differ by models and ...

Page 7: ...be followed for safe operation IMPORTANT Vital information that must be followed to prevent damage to data components or persons Notes for This Manual A few notes and warnings are used throughout this guide allowing you to complete certain tasks safely and effectively These notes have different degrees of importance as follows ...

Page 8: ...ter and remove any extra moisture with a dry cloth DO NOT expose to or use near liquids rain or moisture DO NOT use the modem during electrical storms DO NOT expose to dirty or dusty environments DO NOT operate during a gas leak Battery safety warning DO NOT throw the battery in fire DO NOT short circuit the contacts DO NOT disassemble the battery DO NOT expose to strong magnetic or electrical fie...

Page 9: ...NOT throw the Eee PC in municipal waste This product has been designed to enable proper reuse of parts and recycling The symbol of the crossed out wheeled bin indicates that the product electrical electronic equipment and mercury containing button cell battery should not be placed in municipal waste Check local regulations for disposal of electronic products Incorrect installation of battery may c...

Page 10: ...ge your battery pack and any optional battery packs before going on long trips Remember that the power adapter charges the battery pack as long as it is plugged into the computer and an AC power source Be aware that it takes much longer to charge the battery pack when the Eee PC is in use Airplane Precautions Contact your airline if you want to use the Eee PC on the airplane Most airlines have res...

Page 11: ...PC may come with either a two or three prong plug depending on territory If a three prong plug is provided you must use a grounded AC outlet or use a properly grounded adapter to ensure safe operation of the Eee PC Remember to fully charge the battery 8 hours or more before first use and whenever it is depleted to prolong battery life The battery reaches its maximum capacity after a few full charg...

Page 12: ...er 1 Introducing the Eee PC 3 Open the display panel 4 Turn ON the Eee PC When you open the display panel do not force it down to the table or else the hinges may break Never lift the Eee PC by the display panel ...

Page 13: ...Top Side Bottom Side Right Side Left Side Rear Side 2 Knowing the Parts ...

Page 14: ...2 2 Chapter 2 Knowing the Parts Top Side Refer to the following illustration to identify the components on this side of the Eee PC The keyboard differs for each territory 3 4 2 1 6 7 5 ...

Page 15: ...on the eyes Use a soft cloth without chemical liquids use plain water if necessary to clean the display panel Power Switch The power switch allows powering ON and OFF the Eee PC and recovering from STR Press the switch once to turn ON and hold it to turn OFF the Eee PC The power switch only works when the display panel is opened Keyboard The keyboard provides keys with comfortable travel depth at ...

Page 16: ... Blinking Slowly Green Blinking Slowly Battery charge is less than 10 Orange Blinking Quickly Green Blinking Quickly Standby Mode Powered OFF AC Mode Battery Mode Battery charge is between 100 80 Orange ON Off Battery charge is between 80 10 Orange Blinking Slowly Off Battery charge is less than 10 Orange Blinking Quickly Off 7 The Battery Charge Indicator will not light when the battery is remove...

Page 17: ...el The bottom of the Eee PC can get very hot Be careful when handling the Eee PC while it is in operation or recently been in operation High temperatures are normal during charging or operation DO NOT use on soft surfaces such as beds or sofas which may block the vents DO NOT PUT THE Eee PC ON YOUR LAP OR OTHER PARTS OF THE BODY TO AVOID INJURY FROM THE HEAT 2 1 3 5 4 6 6 ...

Page 18: ...ock Manual The manual battery lock is used to keep the battery pack secured Move the manual lock to the unlocked position to insert or remove the battery pack Move the manual lock to the locked position after inserting the battery pack Hard Disk Memory Compartment The hard disk drive and memory are secured in a dedicated compartment Reset Button Emergency In case your operating system cannot prope...

Page 19: ...s up to 12Mbits sec USB 1 1 and 480Mbits sec USB 2 0 USB allows many devices to run simultaneously on a single computer with some peripherals acting as additional plug in sites or hubs Also the USB supports hot swapping function Display Monitor Output The 15 pin D sub monitor port supports a standard VGA compatible device such as a monitor or projector to allow viewing on a larger external display...

Page 20: ... as keyboards pointing devices cameras and storage devices connected in a series up to 12Mbits sec USB 1 1 and 480Mbits sec USB 2 0 USB allows many devices to run simultaneously on a single computer with some peripherals acting as additional plug in sites or hubs Also it supports hot swapping function Microphone Jack The microphone jack is designed to connect the microphone used for Skype voice na...

Page 21: ...tery time varies by usage and by the specifications for this Eee PC The battery pack cannot be disassembled and must be purchased as a single unit Power DC Input The supplied power adapter converts AC power to DC power for use with this jack Power supplied through this jack supplies power to the Eee PC and charges the internal battery pack To prevent damage to the Eee PC and battery pack always us...

Page 22: ...2 10 Chapter 2 Knowing the Parts ...

Page 23: ...Power System Touchpad Usage Keyboard Usage First time Startup Operating Mode Shutdown 3 Getting Started ...

Page 24: ...ts without setting switches or using power converters Different countries may require an adapter to connect the provided US standard AC power cord to a different standard Most hotels will provide universal outlets to support different power cords as well as voltages It is always best to ask an experienced traveler about AC outlet voltages before travelling With the AC power cord connected to the A...

Page 25: ... to work with a removable battery pack The battery pack consists of a set of battery cells housed together A fully charged pack will provides your Eee PC a few hours of working power but the actual figure varies depending on your general work habits the CPU system memory size and the size of the display panel Additional battery packs are optional and can be purchased separately through an Eee PC r...

Page 26: ...he Eee PC The output voltage of this adapter is 12Vdc 3A Never attempt to remove the battery pack while the Eee PC is turned ON as this may result in the loss of working data Installing and Removing the Battery Pack Your Eee PC may not have its battery pack installed If not use the following procedures to install the battery pack To install the battery pack To remove the battery pack 1 3 2 1 2 3 1...

Page 27: ...ke into account that the Eee PC s internal temperature is higher than the outside temperature Any temperatures above or below this range will shorten the life of the battery But in any case the battery pack s usage time will eventually decrease and a new battery pack must be purchased from an authorized dealer for this Eee PC Because batteries also have a shelf life it is not recommended to buy ex...

Page 28: ... additional ways to shutdown and reset your Eee PC Shutdown Hold the power button until the system shuts down DO NOT use emergency shutdown reset while data is being written or read doing so can result in loss or destruction of your data Use a pin or a straightened paper clip to press the reset button Reset Press the reset button ...

Page 29: ...following 2 illustrations produce the same results Double clicking Double tapping This is a common skill for launching a program directly from the corresponding icon you select Move the pointer over the icon you wish to execute press the left button or tap the pad twice in rapid succession and the system launches the corresponding program If the interval between the clicks or taps is too long the ...

Page 30: ...er to the desired location then release the button Or you can simply double tap on the item and hold while dragging the item with your fingertip The following illustrations produce the same results Multi finger gesture input Two finger scrolling Use two fingertips to slide up or down on the touchpad to scroll a window up or down If your display window includes several sub windows move the pointer ...

Page 31: ... hot key locations do not match the manual zzZ Icon F1 Places the Eee PC in suspend mode Save to RAM Radio Tower F2 Wireless Models Only Toggles the internal wireless LAN ON or OFF with an on screen display When enabled the corresponding wireless indicator will light Sun Down Icon F3 Decreases the display brightness Sun Up Icon F4 Increases the display brightness LCD Monitor Icons F5 Toggles betwe...

Page 32: ...arger portion of the keyboard for cell navigation or Prt Sc Ins Toggles the Print Screen key to capture the contents of entire desktop Pg Up Press to scroll up in documents or the web browser Pg Dn Press to scroll down in documents or the web browser Home Press to move the pointer to the beginning of the line End Press to move the pointer to the end of the line Windows icon Displays the start menu...

Page 33: ...d lead you through setting up your preferences and some basic information Follow the wizard instructions to finish the initialization 1 The Welcome message appears Click Next to continue 2 Select you system settings by specifying the region you are in the language you use and the keyboard type you use Click Next to continue ...

Page 34: ...3 12 Chapter 3 Getting Started 3 Select the time zone you are in and click Next to continue 4 Read the end user license agreement and click Yes I accept Click Next to continue ...

Page 35: ...n Automatic Updates now to get the latest important updates and click Next to continue 6 Type your computer s name in the Computer name box and click Next to continue 7 Follow the onscreen instructions to register with Microsoft and finish the initialization ...

Page 36: ...o launch the corresponding applications and enter the specified folders Some applications would form minimized icons in the Notification area Displays the start menu Displays the time Adjusts the display settings Display the USB connection Adjusts system volume Displays the network connection status ...

Page 37: ...on easily Enabling and Disabling Devices To disable or enable devices 1 Right click the ASUS EeePC Tray Utility icon in the Notification area and the utility shows the available options Disable WLAN Turns on and off the wireless LAN connection Disable Camera Enable or disable the built in camera 2 Select an option to turn it on or off based on your needs The unavailable options are dimmed ...

Page 38: ...reen when you select LCD Compress Mode When you select LCD 1024 x 768 move the pointer to scroll up and down the screen Scroll down to see the bottom of the screen Scroll up to see the top of the screen The CRT related options are unavailable when there is no connected external monitors Some applications such as Windows Media Player may not be compatible with the LCD Compress Mode When watching vi...

Page 39: ...US Eee PC 3 17 Shutdown Do the following instructions to turn down your Eee PC 1 Click the start button to display the start menu 2 Click Turn Off Computer 1 2 3 Select Turn Off to power off your Eee PC 3 ...

Page 40: ...3 18 Chapter 3 Getting Started ...

Page 41: ...Network Connection ASUS Update Super Hybrid Engine Eee PC 900HA model only Eee Storage 4 Using the Eee PC ...

Page 42: ...r a password 2 Select the wireless access point you want to connect to from the list and click Connect to build the connection If you cannot find the desired access point click Refresh network list in the left pane and search in the list again If the wireless connection icon does not show on the taskbar Activate the wireless LAN function by pressing Fn F2 before configuring a wireless network conn...

Page 43: ... a connection has been established the connection is shown on the list 5 You can see the wireless network icon in the Notification area The wireless connection icon disappears when you Press Fn F2 to disable the WLAN function ...

Page 44: ...e illustration below is the example of your Eee PC connected to a network hub or switch for use with the built in Ethernet controller Connect to network before enjoying all the network services and functions in Eee PC Using a dynamic IP 1 Right click the network icon with a yellow warning triangle in the Notification area and select Open Network Connections Local Area Network Network hub or switch...

Page 45: ...ASUS Eee PC 4 5 3 Highlight Internet Protocol TCP IP and click Properties 4 Click Obtain an IP address automatically and click OK 2 Right click Local Area Connection and select Properties ...

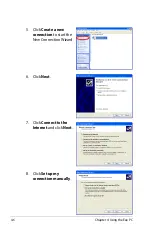
Page 46: ...4 6 Chapter 4 Using the Eee PC 5 Click Create a new connection to start the New Connection Wizard 6 Click Next 7 Click Connect to the Internet and click Next 8 Click Set up my connection manually ...

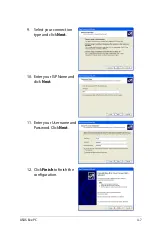
Page 47: ...ASUS Eee PC 4 7 9 Select your connection type and click Next 10 Enter your ISP Name and click Next 11 Enter your User name and Password Click Next 12 Click Finish to finish the configuration ...

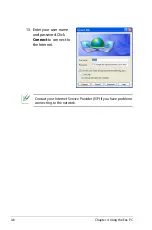
Page 48: ...4 8 Chapter 4 Using the Eee PC 13 Enter your user name and password Click Connect to connect to the Internet Contact your Internet Service Provider ISP if you have problems connecting to the network ...

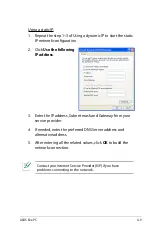
Page 49: ...ddress Subnet mask and Gateway from your service provider 4 If needed enter the preferred DNS Server address and alternative address 5 After entering all the related values click OK to build the network connection 2 Click Use the following IP address Contact your Internet Service Provider ISP if you have problems connecting to the network ...

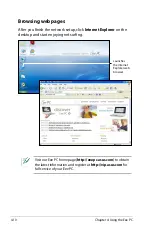
Page 50: ... network setup click Internet Explorer on the desktop and start enjoying net surfing Launches the Internet Explorer web browser Visit our Eee PC homepage http eeepc asus com to obtain the latest information and register at http vip asus com for full service of your Eee PC ...

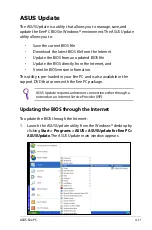
Page 51: ...y from the Internet and View the BIOS version information This utility is pre loaded in your Eee PC and is also available in the support DVD that comes with the Eee PC package ASUS Update requires an Internet connection either through a network or an Internet Service Provider ISP Updating the BIOS through the Internet To update the BIOS through the Internet 1 Launch the ASUS Update utility from th...

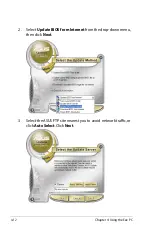
Page 52: ...4 12 Chapter 4 Using the Eee PC 2 Select Update BIOS from Internet from the drop down menu then click Next 3 Select the ASUS FTP site nearest you to avoid network traffic or click Auto Select Click Next ...

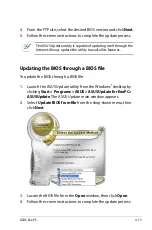
Page 53: ... avail all its features Updating the BIOS through a BIOS file To update the BIOS through a BIOS file 1 Launch the ASUS Update utility from the Windows desktop by clicking Start Programs ASUS ASUSUpdate for EeePC ASUSUpdate The ASUS Update main window appears 2 Select Update BIOS from file from the drop down menu then click Next 3 Locate the BIOS file from the Open window then click Open 4 Follow t...

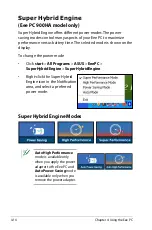
Page 54: ... selected mode is shown on the display To change the power mode Click start All Programs ASUS EeePC SuperHybridEngine SuperHybridEngine Right click the Super Hybrid Engine icon in the Notification area and select a preferred power mode Super Hybrid Engine Modes Auto High Performance mode is available only when you apply the power adapter to the Eee PC and Auto Power Saving mode is available only w...

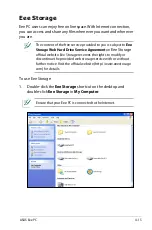
Page 55: ...storage service with or without further notice Visit the official website http www eeestorage com for details Eee Storage Eee PC users can enjoy free online space With Internet connection you can access and share any files whenever you want and wherever you are Ensure that your Eee PC is connected to the Internet To use Eee Storage 1 Double click the Eee Storage shortcut on the desktop and double ...

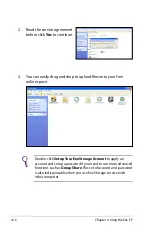
Page 56: ...assword if you need to use more advanced functions such as Group Share This set of account and password is also indispensable when you use Eee Storage service with other computer 3 You can easily drag and drop to upload files onto your free online space 2 Read the service agreement before click Yes to continue ...

Page 57: ...Support DVD System Recovery Boot Booster 5 Support DVD System Recovery ...

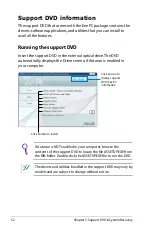
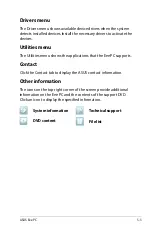
Page 58: ...ents of the support DVD to locate the file ASSETUP EXE from the BIN folder Double click the ASSETUP EXE file to run the DVD Click an item to install Running the support DVD Insert the support DVD in the external optical drive The DVD automatically displays the Drivers menu if Autorun is enabled in your computer Click an icon to display support DVD Eee PC information The drivers and utilities bundl...

Page 59: ...e Utilities menu shows the applications that the Eee PC supports Contact Click the Contact tab to display the ASUS contact information Other information The icons on the top right corner of the screen provide additional information on the Eee PC and the contents of the support DVD Click an icon to display the specified information File list Technical support DVD content System information ...

Page 60: ...k drive and make note of any customized configuration settings such as network settings Disable Boot Booster in BIOS setup before your perform system recovery from USB flash disk external optical drive or hidden partition Refer to the end of this chapter for details About the Recovery Partition The Recovery Partition is a space reserved on your hard disk drive used to restore the operating system ...

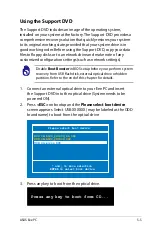
Page 61: ...al drive Press any key to boot from CD Disable Boot Booster in BIOS setup before your perform system recovery from USB flash disk external optical drive or hidden partition Refer to the end of this chapter for details Using the Support DVD The Support DVD includes an image of the operating system installed on your system at the factory The Support DVD provides a comprehensive recovery solution tha...

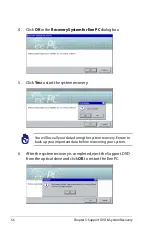
Page 62: ...covery Ensure to back up your important data before recovering your system 4 Click OK in the Recovery System for Eee PC dialog box 5 Click Yes to start the system recovery 6 After the system recovery is completed eject the Support DVD from the optical drive and click OK to restart the Eee PC ...

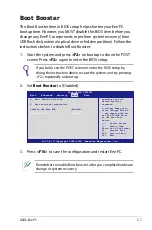
Page 63: ...Y Main Advanced Security Boot Exit Boot Device Priority Boot Settings Configuration OnBoard LAN Boot ROM Enabled Boot Booster Disabled Select Screen Select Item Enter Go to Sub Screen F1 General Help F10 Save and Exit ESC Exit Specifies the Boot Device Priority sequence A virtual floppy disk drive Floppy Drive B may appear when you set the CD ROM drive as the first boot device 3 Press F10 to save ...

Page 64: ...5 8 Chapter 5 Support DVD System Recovery ...
Page 65: ...Declarations and Safety Statements Copyright Information Limitation of Liability Service and Support A Appendix ...

Page 66: ...is no guarantee that interference will not occur in a particular installation If this equipment does cause harmful interference to radio or television reception which can be determined by turning the equipment off and on the user is encouraged to try to correct the interference by one or more of the following measures Reorient or relocate the receiving antenna Increase the separation between the e...

Page 67: ...n uncontrolled environment To maintain compliance with FCC RF exposure compliance requirements please avoid direct contact to the transmitting antenna during transmitting End users must follow the specific operating instructions for satisfying RF exposure compliance Eee PC 900HD series Eee PC 900HA series Max SAR Measurement 1g Max SAR Measurement 1g 802 11b SAR Value 0 039 W kg 802 11b SAR Value ...

Page 68: ...orth for an uncontrolled environment To maintain compliance with IC RF exposure compliance requirements please avoid direct contact to the transmitting antenna during transmitting End users must follow the specific operating instructions for satisfying RF exposure compliance Operation is subject to the following two conditions This device may not cause interference and This device must accept any ...

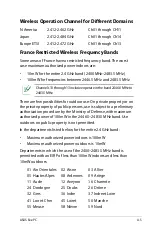
Page 69: ...te property or on the private property of public persons use is subject to a preliminary authorization procedure by the Ministry of Defense with maximum authorized power of 100mW in the 2446 5 2483 5 MHz band Use outdoors on public property is not permitted In the departments listed below for the entire 2 4 GHz band Maximum authorized power indoors is 100mW Maximum authorized power outdoors is 10m...

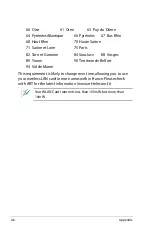
Page 70: ...aris 82 Tarn et Garonne 84 Vaucluse 88 Vosges 89 Yonne 90 Territoire de Belfort 94 Val de Marne This requirement is likely to change over time allowing you to use your wireless LAN card in more areas within France Please check with ART for the latest information www art telecom fr Your WLAN Card transmits less than 100mW but more than 10mW ...

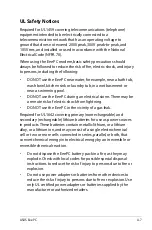
Page 71: ...k of electric shock from lightning DO NOT use the Eee PC in the vicinity of a gas leak Required for UL 1642 covering primary nonrechargeable and secondary rechargeable lithium batteries for use as power sources in products These batteries contain metallic lithium or a lithium alloy or a lithium ion and may consist of a single electrochemical cell or two or more cells connected in series parallel o...

Page 72: ...roved power cords greater than or equal to H05VV F 3G 0 75mm2 or H05VV F 2G 0 75mm2 This symbol of the crossed out wheeled bin indicates that the product electrical electronic equipment and mercury containing button cell battery should not be placed in municipal waste Check local regulations for disposal of electronic products ...

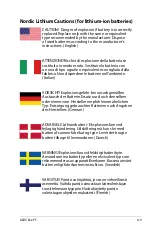
Page 73: ...stausch der Batterie Ersatz nur durch denselben oder einem vom Hersteller empfohlenem ähnlichen Typ Entsorgung gebrauchter Batterien nach Angaben des Herstellers German ADVARSELI Lithiumbatteri Eksplosionsfare ved fejlagtig håndtering Udskiftning må kun ske med batteri af samme fabrikat og type Levér det brugte batteri tilbage til leverandøren Danish VARNING Explosionsfara vid felaktigt batteribyt...

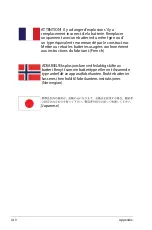
Page 74: ...type équivalent recommandé par le constructeur Mettre au rebut les batteries usagées conformément aux instructions du fabricant French ADVARSEL Eksplosjonsfare ved feilaktig skifte av batteri Benytt samme batteritype eller en tilsvarende type anbefalt av apparatfabrikanten Brukte batterier kasseres i henhold til fabrikantens instruksjoner Norwegian Japanese ...

Page 75: ...NTIAL DAMAGES INCLUDING DAMAGES FOR LOSS OF PROFITS LOSS OF BUSINESS LOSS OF USE OR DATA INTERRUPTION OF BUSINESS AND THE LIKE EVEN IF ASUS HAS BEEN ADVISED OF THE POSSIBILITY OF SUCH DAMAGES ARISING FROM ANY DEFECT OR ERROR IN THIS MANUAL OR PRODUCT Products and corporate names appearing in this manual may or may not be registered trademarks or copyrights of their respective companies and are use...

Page 76: ...act price of each product ASUS will only be responsible for or indemnify you for loss damages or claims based in contract tort or infringement under this Warranty Statement This limit also applies to ASUS suppliers and its reseller It is the maximum for which ASUS its suppliers and your reseller are collectively responsible UNDER NO CIRCUMSTANCES IS ASUS LIABLE FOR ANY OF THE FOLLOWING 1 THIRD PAR...

Reviews: