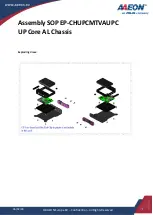
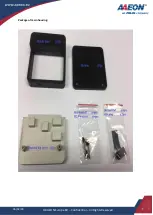
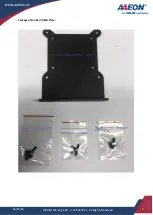
background image


©AAEON Europe BV – Confidential – All Rights Reserved


06/02/18 

Assembly SOP EP-CHUPCMTVAUPC 
UP Core AL Chassis


Exploding View: 


Summary of Contents for Aaeon UP Core AL

Page 1: ...1 AAEON Europe BV Confidential All Rights Reserved 06 02 18 Assembly SOP EP CHUPCMTVAUPC UP Core AL Chassis Exploding View ...

Page 2: ...ink top cover 1pc Middle base 1pc Bottom 1pc Thermal Pad 4pcs VESA Mount Din Rail Plate 1pc M2 5 6 screws 4pcs M2 5 8 screws 4pcs Hex Standoff 4pcs Din rail screws kit M3 6 1pcs M3 8 2pc Vesa screws Pan screw M3 8 4pcs SMA plug 1pcs Not included with the kit you may need to prepare UP Core board Din Rail Clip 20mm ...

Page 3: ...3 AAEON Europe BV Confidential All Rights Reserved 06 02 18 Package of main housing ...

Page 4: ...4 AAEON Europe BV Confidential All Rights Reserved 06 02 18 Package of Din Rail VESA Plate ...

Page 5: ... to start with the assembly of your UP Core Metal Housing start by first removing the heatsink from the motherboard The following link provides a overview on how to remove the heatsink https wiki up community org How_to_remove_heatsink The picture below shows the result of the heatsink removal ...

Page 6: ...ope BV Confidential All Rights Reserved 06 02 18 2 Place the heatsink top cover upside down and stick the thermal pads on the four blocks with the blue films facing up 3 Peel of the blue films of the thermal pads ...

Page 7: ... Europe BV Confidential All Rights Reserved 06 02 18 4 Re assemble the heatsink top cover with the middle base first 5 Carefully place the UP Core board on the 4 studs and press the board softly into its place ...

Page 8: ... BV Confidential All Rights Reserved 06 02 18 6 Fasten the UP Core Board to the top cover with the hex standoffs through the thread nuts 7 Place the bottom base on the middle base and fasten it with the M2 5 6 screws ...

Page 9: ...9 AAEON Europe BV Confidential All Rights Reserved 06 02 18 8 Check if the sides exactly match the IO sides 9 The finished chassis ...

Page 10: ...6 02 18 Optional Assembly main housing with Din Rail VESA Plate 1 In case you will use the VESA Plate you will need to replace the M2 5 6 screws mounted in the housing and replace them for M2 5 8 screws which are in the Package of the Din Rail VESA Plate ...

Page 11: ...m x 75mm on the back of your PC monitor 2 In case you will use the din rail place it at the side of the plate and use two M3 8 screws right and left and one M3 6 middle screws to fix the din rail on the metal plate The Din Rail Clip 20mm EP CHDINRNM12RC is not included in the package you can purchase this in the UP SHOP ...

Reviews: