1U Rackmount Kit Installation Guide
5
1.
Attach the Spacers and Ears
The 1U server has side holes to accommodate the spacers and
mounting ears.
1. Align a mounting ear with the holes on a front corner of the
chassis.
2. Secure the mounting ear using two screws.
3. Follow steps 1 and 2 to attach the other mounting ear.
4. Align the holes of a spacer with a group of four holes on the
side of the chassis.
5. Secure the spacer by driving two screws on the two inner holes.
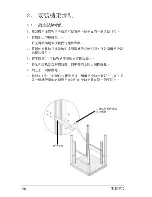
Mounting
Ear
Spacer
6. Follow steps 4 and 5 to attach the other three spacers.
Inner Holes for a
Spacer
NOTES
The outer holes on the spacer are for securing the chassis rails.
See
“2. Attach the Chassis Rails.”
Skip steps 4 to 6 if the spacers come installed on the chassis.
Summary of Contents for AP1400R
Page 1: ...1U Rackmount Kit Installation Guide Installation Guide 1U Rackmount A631 English ...
Page 2: ...2 English Content English 3 11 19 27 ...
Page 11: ...11 Rack Installation ...
Page 12: ...12 ...
Page 13: ...13 ...
Page 14: ...14 ...
Page 15: ...15 ...
Page 16: ...16 ...
Page 17: ...17 ...
Page 18: ...18 ...
Page 19: ......
Page 20: ...20 ...
Page 21: ...21 ...
Page 22: ...22 ...
Page 23: ...23 ...
Page 24: ...24 ...
Page 25: ...25 ...
Page 26: ...26 ...
Page 27: ...27 Rack Installation ...
Page 28: ...28 ...
Page 29: ...29 ...
Page 30: ...30 ...
Page 31: ...31 ...
Page 32: ...32 ...
Page 33: ...33 ...
Page 34: ...34 ...
Page 35: ...35 R MEMO ...


