background image

29

IV. Hardware Setup

IV

. Hardware Setup

AP 3000 Hardware Reference Guide

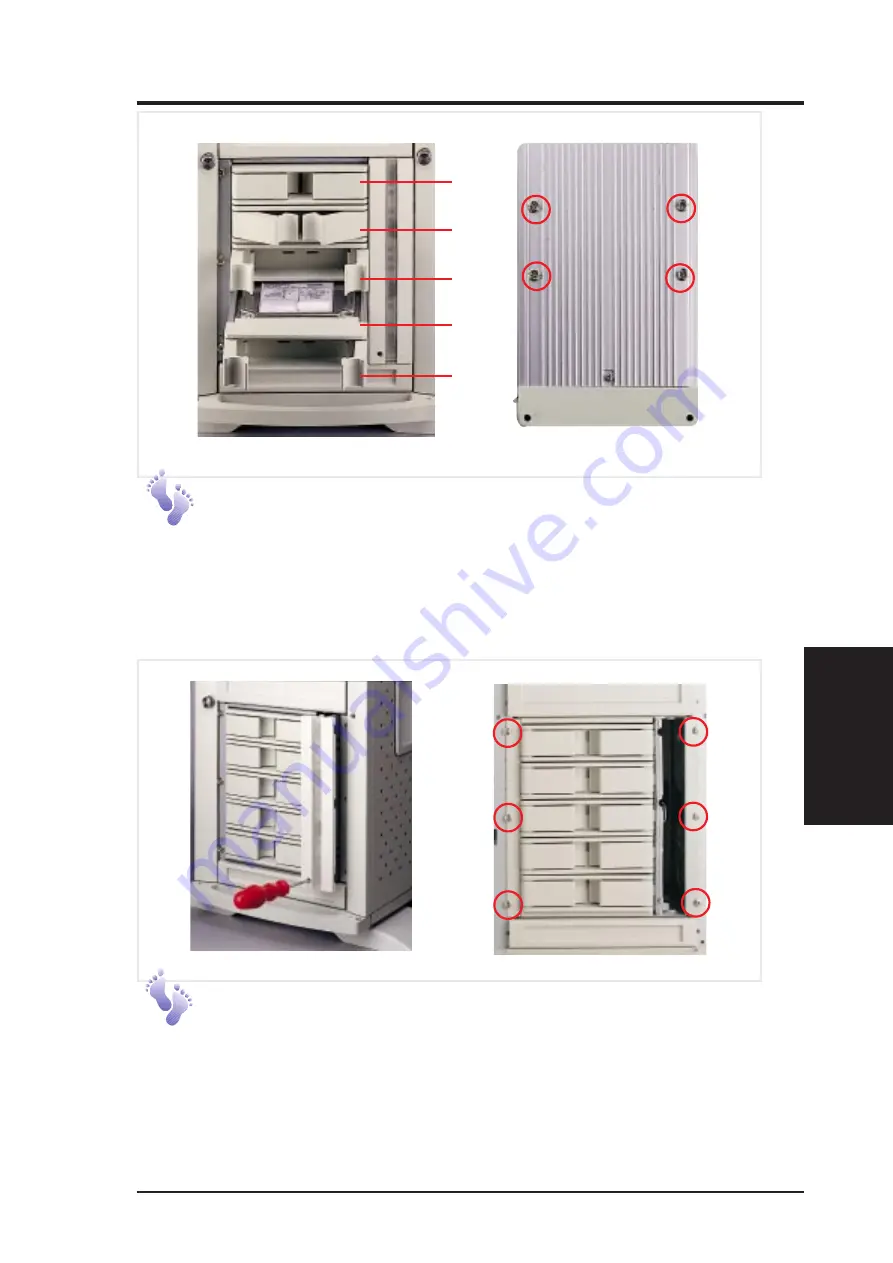
Hot-Swap Bay

Hot-Swap Bay

To remove the hot-swap bay, release the front cooling fans first by
pressing the eject mechanism with a small screwdriver. Remove the
six retaining screws as circled above and then the entire hot-swap
bay can be slid out of the chassis.

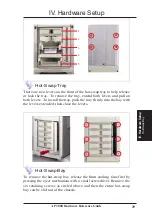
Hot-Swap Tray

There are two levers on the front of the hot-swap tray to help release
or lock the tray.  To remove the tray, extend both levers and pull on
both levers.  To install the tray, push the tray firmly into the bay with
the levers extended, then close the levers.

1

2

3

4

5

Summary of Contents for AP3000

Page 1: ...AP3000 Dual Pentium II Server Platform Hardware Reference Guide ...

Page 2: ...ademarks or copyrights of their respective companies and are used only for identification or explanation and to the owners benefit without intent to infringe Adobe and Acrobat are registered trademarks of Adobe Systems Incorporated Adaptec AHA EZ SCSI and AIC is a registered trademark of Adaptec Inc Sound Blaster SB16 AWE32 AWE64D and SB LINK are trademarks of CreativeTechnology Ltd Intel LANDesk ...

Page 3: ...ftp asus com tw pub ASUS ASUS COMPUTER INTERNATIONAL America Marketing Address 6737 Mowry Avenue Mowry Business Center Building 2 Newark CA 94560 USA Fax 1 510 608 4555 Email info usa asus com tw Technical Support Fax 1 510 608 4555 BBS 1 510 739 3774 Email tsd usa asus com tw WWW www asus com FTP ftp asus com tw pub ASUS ASUS COMPUTER GmbH Europe Marketing Address Harkort Str 25 40880 Ratingen BR...

Page 4: ...t Panel 17 Opening the Left Panel 18 Chassis Circulation System 18 Fan Modules 18 4 2 Rear Cooling Fan Control Board 19 Rear Cooling Fan Control Board Settings 19 4 3 Motherboard 20 Motherboard Spacers 20 Install the Baseboard 20 Motherboard Screws 20 Device Cables 21 Cable Connections 21 4 4 Central Processing Unit CPU 22 Install Retention Mechanisms 22 Install Retention Mechanism Brace Bars 22 I...

Page 5: ...Front Cooling Fans 30 Front Cooling Fan Control Board 31 Hard Disk Drive Message Board 31 4 11 SCSI Backplane 32 4 12 SCSI ID Setting 33 SCSI ID Dip Switches 33 4 13 Expansion Card Guide 34 Securing Expansion Card Guide 34 4 14 SCSI Termination 35 4 15 Power Supply 35 Power Supply Mounting 35 Power Supply Information 36 4 16 Power Supply Requirement 37 Power Supply Requirement Calculation Table 37...

Page 6: ...ticular installation If this equipment does cause harmful interference to radio or television reception which can be determined by turning the equip ment off and on the user is encouraged to try to correct the interference by one or more of the following measures Re orient or relocate the receiving antenna Increase the separation between the equipment and receiver Connect the equipment to an outle...

Page 7: ... main section which gives descriptions of each server component III Getting Started This section gives information on getting started with the server IV Hardware Setup This section gives information on setting up the server V Appendix This section gives you additional information to help plan your server Symbols To complete certain tasks safely and completely you should be aware of a few symbols u...

Page 8: ...ideline as to the necessary components for a server Standard components Motherboard XG DLS Chassis AS 30 Power Supply ATX Processor CPU Pentium II XeonTM Memory Modules 8 16 32 64 128 256 512MB SDRAM Hard Drive Ultra2 Ultra wide Floppy Drive 1 44MB CD ROM Drive 40X Expansion Cards Ethernet Graphics Modem SCSI Terminator Passive terminator for 68pin SCSI cables User s Manuals CD ROM SCSI Motherboar...

Page 9: ...interconnect targeted at 3D graphical display applications Using AGP will also free up a PCI slot Adaptec SCSI Chipset Features Adaptec AIC 7896 dual channel Ul tra2 SCSI chipset that supports any combination of 50 pin narrow or 68 pin wide ultra2 devices through the onboard 50 pin and 68 pin SCSI connectors Device Bays Support one floppy one CD ROM two additional fixed devices and five hot swap S...

Page 10: ...ep paper clips screws and staples away from connectors slots sockets and cir cuitry Before opening the chassis panels make sure all power cables are unplugged Avoid dust humidity and temperature extremes Place the server on a stable surface If the power supply is broken do not try to fix it by yourself Contact an authorized dealer It is recommanded that you wear gloves when assem bling or dissembl...

Page 11: ...ed with a three wire power cable and plug for the user s safety Use the power cable in conjunction with a properly grounded electrical outlet to avoid electrical shock CAUTION Motherboards adapters and disk drives are sensitive to static electricity discharge These devices are wrapped in antistatic bags to prevent this damage Take the following precautions If you have an antistatic wrist strap ava...

Page 12: ...12 AP 3000 Hardware Reference Guide This page was intentionally left blank ...

Page 13: ... 8 Side Panel Handle 9 Side Panel Screw 10 Metal Door Lock 11 Hot Swap Tray 12 Hard Drive Fan Module 13 Chassis Stabilizers 2 1 Server Front Side The front side of the server is provided to show the front exterior compo nents of this server The chassis is made of strong rust resistant metal and covered with a protective ivory surfacing Server Front Side 1 2 4 6 3 7 9 8 5 10 11 13 12 Front Side ...

Page 14: ... Power Supply Fan 4 AC Power In Connector 5 PS 2 Keyboard PS 2 Mouse 6 USB Ports 1 and 2 7 Serial Port COM1 8 Parallel Port 9 Serial Port COM2 10 RJ45 Port LAN 11 Rear Fan Module 12 RAID Controller Optional 13 Chassis Stabilizer 2 2 Server Back Side Server Back Side 2 1 4 3 5 6 7 10 9 12 11 13 8 Back Side ...

Page 15: ... Components II Components Back Side Back Side II Components Server Left Side 1 Power Supply 2 Motherboard 3 Chassis Intrusion Switch 4 Chassis Stabilizer shown recessed 5 Expansion Card Guide 6 Rear Fans Left Side 2 3 Server Left Side 2 6 1 4 3 5 ...

Page 16: ...nd corner of the front panel The upper one is the power LED and the lower one is the hard drive access LED When the system is booted the power LED is green When the hard drive is being accessed the hard drive access LED is green LEDs When installing Windows NT 4 0 use the Windows NT installa tion disks Installing from the CD will require you to pre install SCSI drivers by pressing F6 before setup ...

Page 17: ...top panel before removing the left panel The side panels are secured by two large thumb screws on the front of the server which can be turned with your fingers Removing the Right Panel To remove the right panel the front door must be removed by pushing down on the hinge spring Opening the Chassis 4 1 Opening the Chassis This section gives descriptions of how to install and remove components When s...

Page 18: ...ont door must be removed first Pulling the panel forward Chassis Circulation System The chassis air circulation system is comprised of two 3 inch 8 cm fans The fan modules are held by two screws and four latches on the inside rear of the chassis To take out the fans remove the screws Fan Modules There are four screws used to secure the fan into the indi vidual frames To replace the fan remove the ...

Page 19: ...FF ON 3 ON OFF OFF 4 OFF ON ON 5 OFF ON OFF 6 OFF OFF ON 7 OFF OFF OFF 8 Rear Fans Fan Control Settings Fan Power Connectors Power Input Connector Fan Reserved Fan Connectors Fan Status Signal Connector Reserved Connector The rear fans are controlled and monitored by a control board The fan control board requires power input from the power supply which allows the individual fans to obtain their po...

Page 20: ...erboard Screws Place nine screws in the areas circled on the motherboard The four screws used with the motherboard spacers are longer than the others See page 22 for samples Be careful not to over tighten the screws Doing so may damage your motherboard Motherboard 4 3 Motherboard You can remove the extended expansion card guide before installing or re moving the motherboard All screws are necessar...

Page 21: ...t the cables from contacting with the fans and other devices Make sure that all cables are properly secured 68 pin SCSI Cable 68 pin SCSI Cable CD ROM Drive Cable Power Switch 68 pin SCSI Cable Floppy Disk Drive Cable CD ROM Drive Cable Power LED HDD LED Chassis Intrusion Connector Cable Cable Connections The cables connect to the motherboard as shown The motherboard includes onboard SCSI with 68 ...

Page 22: ...ts when holding the motherboard with the ATX connectors to the left Place the retention mechanisms holes over the screws and the Slot2 Screw four captive nuts onto the screws as circled in the picture on the right Do not place the other captive nuts yet Two Dots Single Dot The motherboard has two connectors for processor retention modules One retention module can have one Xeon processor installed ...

Page 23: ...s in order to allow safe removal of the processor The lifters clamp on to the cartridge on the two holes at the top of each corner For the lock bar there is a left and a right side The left side has a single dot and the right side has two dots when holding the motherboard with the ATX connectors to the left Single Dot Install Retention Mechanism Cap The cap must go in from the left side first with...

Page 24: ...t be connected to the motherboard for the chassis intrusion detection to work The moth erboard will signal theASMAsoftware when the side panel is opened The connection diagram is given here Chassis Intrusion Switch To prevent misconnection one pin is removed from the motherboard s chassis intrusion connector Motherboard s Chassis Intrusion Connector from the two Chassis Intrusion Switches 5VSB Cha...

Page 25: ...raphics adapter to provide hardware 3D acceleration and free up an extra PCI slot Contact Make sure that the total amperage of your installed expansion cards does not exceed the system power specification CAUTION Chassis Intrusion Connector Chassis Intrusion Connector The two chassis intrusion switches are connected to the motherboard s chassis intru sion connector through a single connector Expan...

Page 26: ... most bay along with the power button A CD ROM can fit into either the second third or fourth bay from the top Ametal clip on each side of the device tray secures the tray in place Press inward to release the clips The tray slides in or out on the side rails Fixed Storage Devices Fixed Storage Device Tray There are six screws provided as circled for mounting a 4 inch device such as a floppy or har...

Page 27: ...r Clips The device bay panel is held by two plastic clips on each side Press these clips in with a screwdriver to release Fixed Storage Devices Storage Device Spacers A floppy drive spacer is used to cover the floppy drive and power button Astandard storage device spacer is used to cover the CD ROM tape drive or additional CD ROMs You should purchase an extra spacer for each storage device Floppy ...

Page 28: ...ier only for a single SCSI hard disk drive IMPORTANT Maximum uptime in a server requires devices that can be easily replaced or swapped The main hard drives are mounted in internal hot swap trays for easy replacement TheAP3000 hot swap bay has two different models Five tray hot swap bay and three tray hot swap bay The 1 0 inch SCA hot swap bay can accommodate five 1 0 inch hard disk drives The 1 6...

Page 29: ...mall screwdriver Remove the six retaining screws as circled above and then the entire hot swap bay can be slid out of the chassis Hot Swap Tray There are two levers on the front of the hot swap tray to help release or lock the tray To remove the tray extend both levers and pull on both levers To install the tray push the tray firmly into the bay with the levers extended then close the levers 1 2 3...

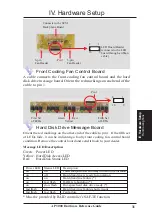
Page 30: ...e The front cooling fans main purpose is to cool the hard disk drives These fans can be removed by using a small screw driver to push the eject mechanism in the fan module The eject mechanism is behind a small hole as circled below There are two individual 2 1 4 inch 6cm fans secured by four screws on each fan The ASMA software will report an error message when any of these two fans malfunctions F...

Page 31: ... set of LEDs fails it can be indicating a faulty front cooling fan control board condition Remove the control board and send it back to your dealer Message LED Description Green Power LED Yellow Hard Disk Access LED Red Hard Disk Status LED Front Cooling Fans Power LED Status LED Description off off PowersubsystemOKand readyforhard drive insertion on off Hard disk drive is ready for operation on o...

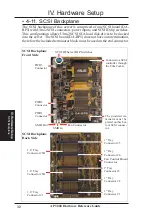
Page 32: ...e included terminator block must be used on the end connector 4 11 SCSI Backplane SCSI Backplane 1 Tray Connector 1 1 Tray Connector 5 1 Tray Connector 4 1 Tray Connector 3 1 Tray Connector 2 SCSI Backplane Back Side 1 6 Tray Connector 1 1 6 Tray Connector 3B 1 6 Tray Connector 5B Fan Control Board Connector SCSI Backplane Front Side PWR1 Connector PWR2 Connector PWR3 Connector SCSI ID Select DIP ...

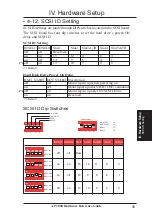
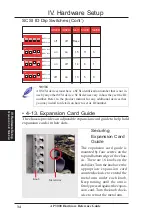
Page 33: ...RT on RMT_START off SCSI ID settings are made through DIP switches located on the SCSI board The SCSI board has four dip switches to set the hard drive s power ON delay and SCSI ID SCSI ID Dip Switches 4 12 SCSI ID Setting SCSI ID Setting Default IDSEL1 IDSEL0 Slot1 Slot2 Slot3A 3B Slot4 Slot5A 5B off off Reserved on on 15 12 11 8 3 on off 14 9 6 4 1 off on 13 10 5 2 0 SCSI ID Setting Default RMT_...

Page 34: ...ces must have a SCSI identification number that is not in use by any other SCSI device SCSI devices vary in how they set the ID number Refer to the product manual for any additional devices that you may install for details on how to set its ID number NOTE Securing Expansion Card Guide The expansion card guide is mounted by four screws on the top and bottom edge of the chas sis There are 18 knobs o...

Page 35: ...ounting and unmounting the power supply must be done from the inside Four screws are used to secure the power supply to the chassis back side SCSI Power Terminating the SCSI bus chain is necessary for SCSI devices to work properly Ultra2 devices do not have termination jumpers and must be ter minated using a terminator on the SCSI cable which means you cannot connect a device on the last connector...

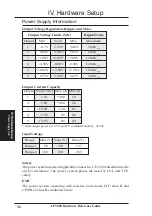
Page 36: ...ts FCC class B and CISPR 22 class B conducted limits Power Supply Info Output Voltage Limits Vdc Ripple Noise Output Min Nom Max Maximum 1 3 17V 3 30V 3 46V 50mVp p 2 4 80V 5 00V 5 25V 50mVp p 3 11 40V 12 00V 12 60V 120mVp p 4 4 50V 5 00V 5 50V 120mVp p 5 10 92V 12 00V 13 20V 120mVp p 6 4 75V 5 00V 5 25V 50mVp p Total output power for 3 3V and 5V combined shall be 210W Power Supply Information Out...

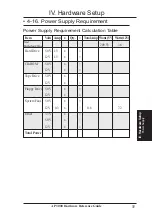
Page 37: ...Supply Requirement Calculation Table Item Volts Amp x Qty TotalAmp Watts 5V Watts 12V 209 55 3 6 Hard Drive 5 0V 1 3 x 12V 1 5 x CD ROM 5 0V x 12V x Tape Drive 5 0V x 12V x Floppy Drive 5 0V x 12V x System Fans 5 0V x 12V 0 3 x 0 6 7 2 Other 3 3V x 5 0V x 12V x Total Power Total MotherboardPower Power Supply ...

Page 38: ...38 AP 3000 Hardware Reference Guide This page was intentionally left blank ...

Page 39: ...evices may be connected to the motherboard three connectors at one time NOTE Atotal of 15 Ultra2 SCSI devices ID0 ID15 may be connected to the 68 pin Ultra2 connector on the motherboard If connecting Fast Ultra devices with Ultra2 devices on the Ul tra2 connector the entire SCSI bus will be limited to the Ultra SCSI conditions listed above Mixing SCSI devices is highly not recommended A total of 8...

Page 40: ...ed in memory Currently there are socket 7 slot 1 and slot 2 CPUs Intel Pentium Processors fit on socket 7 Intel Pentium II fit on slot 1 and Intel Xeon fit on slot 2 FDISK Fixed Disk Setup Program An MS DOS program used to partition the hard disk drive FDISK is re quired to setup a new non RAID hard disk drive before formatting and in stalling an operating system IDE Integrated Drive Electronics I...

Page 41: ... can be set up to provide mirroring for fault tolerance parity for data guarding or striping for data distribution over several drives for in creased performance A RAID card is required to setup a RAID system RAM Random Access Memory There are several different types of RAM such as DRAM Dynamic RAM EDO DRAM Extended Data Out DRAM SDRAM Synchronous DRAM ROM Read Only Memory ROM is nonvolatile memor...

Page 42: ... This page was intentionally left blank 42 AP3000 Hardware Reference Guide ...

Reviews: