background image

AX-125/145 SIP VoIP Router  Quick Installation Guide

20

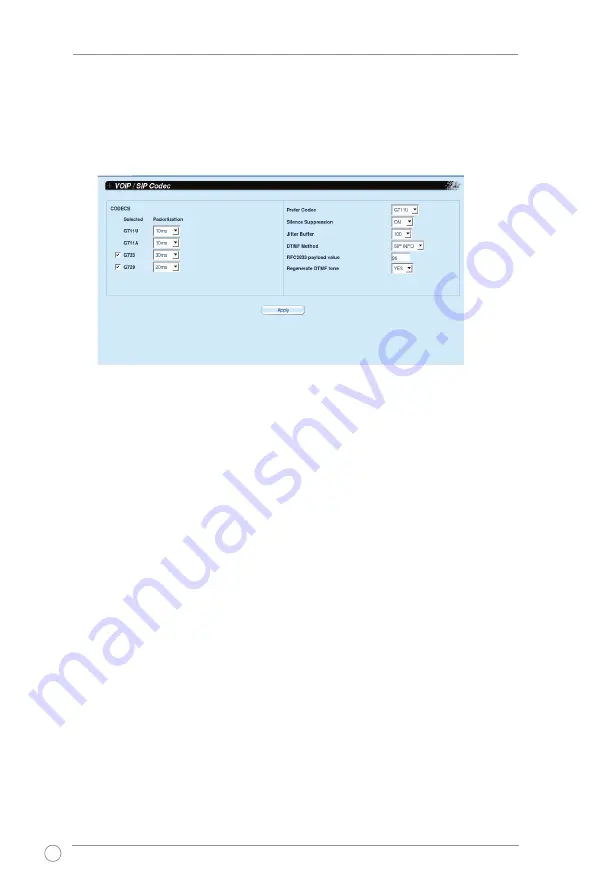
3.4.4   Codec

To set Codecs

1.  From the menu, click 

VoIP -> Codec

2.  Configure these settings:

  • 

Codecs

: Select the voice codec type for the VoIP call function, AX-125/145 

supports the most popular G.723 and G.729 low bit rate codec and its payload 

setting. The basic time unit for 1 packet of G.723 is 30ms, for G.729 is 10ms. 

You can adjust the packetization time to assign the payload size of each packet 

frame.

  • 

Prefer codec

: Choose your preferred codec for SIP capability negotiation.

  • 

Silence suppression

: Enable/Disable the silence suppression function. If 

set to  “

Enable

”, no packet is sent out when there are no voice/audio activities. 

This function is useful when your internet access bandwidth is limited.

  • 

Jitter Buffer

: When the voice quality is bad, increasing this value increases 

voice quality, but also delays voice transmission.

  • 

DTMF method

: AX-125/145 supports the most popular DTMF transferring 

methods: 

RFC2833

Info

, and 

in-band audio

.

  • 

RFC2833 payload value

: Assign the payload value for RFC2833 DTMF 

transferring.

  • 

Regenerate DTMF

: If enabled, the DTMF that receives from the network will 

play on the phone set, otherwise, it will not play. This option is effective only 

when you choose 

RFC2833

 or Info in 

DTMF

 method.

3.   When done, click 

Apply 

to save the Codec settings.

Summary of Contents for AX-125

Page 1: ...Quick Installation Guide AX 125 145 QE3344 August 2007 SIP VoIP Router ...

Page 2: ...eral fax 1 510 608 4555 Web site address usa asus com Technical support General support 1 502 933 8713 Support fax 1 502 995 0883 Online support http vip asus com eservice techserv aspx ASUS COMPUTER GmbH Germany Austria Company address Harkort Str 25 D 40880 Ratingen Germany General tel 49 2102 95990 Web site address www asus com de General fax 49 2102 959911 Online contact www asus com de sales ...

Page 3: ... panel features 4 2 2 Rear panel features 5 2 3 Hardware connection 6 2 4 Reset Reboot button 6 2 5 LAN IP Assignment 7 3 Configuration Guide 9 3 1 Entering the AX 125 145 s GUI 9 3 2 Configuration options 10 3 3 LAN 14 3 4 VoIP 16 3 5 Firewall 21 3 6 NAT 24 3 7 Traffic control 27 3 8 Management 30 4 SIP Operation Guide 33 4 1 IVR operation 33 4 2 Call Service Features 33 4 3 PSTN Access 34 4 4 LE...

Page 4: ...s SIP V2 RFC3261 compliant Supports DHCP client DHCP server PPPoE DNS HTTP 5 xRJ45 ports WAN x 1 LAN x 4 support easy to use NAT Firewall functions AX 125 3 x RJ11 jacks support two FXS port and one bypass mode FXO port AX 145 5 x RJ11 jacks support four FXS port and one bypass mode FXO port Support most popular vocoders G 711u A G 723 1 G 729AB with 32ms tail length line echo cancellation G 168 s...

Page 5: ...ackage Contents You should find the following items in theAX 125 145 package AX 125 145 x 1 RJ45 ethernet cable x 1 RJ11 phone cable x 1 5V 3ADC power adaptor x 1 Quick installation guide NOTE If any item is damaged or missing contact your dealer or retailer ...

Page 6: ... RJ45 connection detected RJ45 traffic activity 3 LAN Green LED on Green LED blinking RJ45 connection detected RJ45 traffic activity 4 FXO Green LED on Green LED blinking FXO off the hook in use Ring voltage detected on FXO 5 FXS Green LED on FXS off the hook in use R AX125 2 1 4 3 2 1 R AX145 2 1 4 3 2 1 4 3 AX 125 front panel AX 145 front panel 1 2 4 3 5 5 Reset Reboot button Reset Reboot button...

Page 7: ... adapter to a power source 2 Phone1 Phone4 RJ 11 port Connects the device to an analog phone set 3 Line RJ11 port Connects the LINE port of AX 125 145 to a phone network or PSTN line 4 WAN RJ 45 port Connects the device to an ADSL modem or an IP sharer 5 LAN1 LAN4 RJ 45 port Connects the device to a PC Notebook or other devices to share broadband service 1 2 1 2 3 3 4 4 5 5 ...

Page 8: ...2 Use another Cat 5 Ethernet cable to connect your PC or Notebook to the LAN port of AX 125 145 3 Use a phone cable to connect a phone set to the PHONE port of AX 125 145 4 Optional If necessary use another phone cable to connect the LINE port ofAX 125 145 to a Public SwitchedTelephone Network PSTN jack 5 Connect the power adapter to the DC port ofAX 125 145 to a power source PSTN Internet NAT Rou...

Page 9: ... reboot To reboot the device short press and quickly release the Reset Reboot button using a sharp pointed object such as a pen 2 5 LAN IP Assignment By default the AX 125 145 LAN IP address is set to 192 168 1 1 with subnet mask 255 255 255 0 You can change the LAN IP address for AX 125 145 via the WEB GUI or the Interactive Voice Response IVR Assigning LAN IP via IVR To assign LAN IP via IVR 1 O...

Page 10: ...55 255 0 A single takes you back to the Main Menu Setting up your IP address To obtain an IP address automatically Basically setting your Network Interface to Obtain an IP address automatically enables you to obtain an IP address via the DHCP protocol Otherwise you must configure your Network Interface manually To configure an IP address manually To set your IP address manually you need to know th...

Page 11: ...ion settings enter the information in the TCP IP Properties in your Network Properties To enter the AX 125 145 s GUI enter the Gateway IP in a web browser In this example the Gateway IP is http 192 168 1 1 Refer to 3 Configuration Guide for more details on using the AX 125 145 s GUI ...

Page 12: ...Entering the AX 125 145 s GUI To enter the AX 125 145 s GUI follow these steps Default settings User name admin Password admin EntertheGatewayIPinawebbrowser In this example enter http 192 168 1 1 After logging in the ASUS AX 125 145 s default page is displayed The default page displays the system s status information as well quick links to configure the main features of AX 125 145 2 1 3 ...

Page 13: ...oIP call function Firewall Allows you to enable disable the basic firewall functions such as DOS attack filtering port scan detection and ICMP echo reply NAT Allows you to configure the Network Address Translation NAT function settings such as IP share DMZ host port redirect and port trigger Traffic Control Enables you to configure the allowable upload download bandwidth during an active VoIP call...

Page 14: ...r the MAC address 1 From the menu click WAN Setting The WAN Setup screen is displayed 2 Select the access type you want to configure There are three 3 access types DHCP client Static IP and PPPoE WARNING The WAN access type MUST be configured correctly If you are not sure how to configure the WAN parameters contact your Internet Service Provider ISP for your WAN details 3 When done click Apply to ...

Page 15: ...r Quick Installation Guide 13 3 2 2 VLAN Tag To enable the AX 125 145 VLAN Tag function 1 From the menu click WAN VLAN Tag and check on the service Enable button 2 Enter the VLAN ID and priority code 4 When finished click Apply ...

Page 16: ...k on the service Enable button 2 Select the DDNS service type from the drop down list The AX 125 145 supports these six 6 DDNS services DynDNS www dyndns org ChangeIP www changeip com easyDNS www easydns com No Ip www no ip com euroDNS www eurodns com DtDNS www dtdns com 3 Enter the Domain Name User Name and Password for the Service type To register your domain name visit the website of one of the...

Page 17: ...2 When done click Apply 3 3 2 DHCP Server To enable DHCP service 1 Click LAN DHCP Server The DHCP server screen is displayed 3 Check the service Enable button Enter the neccessary information such as IP range and lease time for the DHCP server 4 Click Apply when done Enable the DHCP server function only if there is no other DHCP server in your network environment ...

Page 18: ...atically inserts the first DNS IP you defined to all DHCP clients request You can define the DNS IP information in the DHCP Server configuration page Refer to 3 3 2 DHCP Server for details Redirect all DNS query to us When you choose this option all DNS query packets are redirected from all devices connected in LAN to AX 125 145 DNS 4 When done click Apply 3 3 4 uPnP The AX 125 145 supports Univer...

Page 19: ...P port You can assign the port range allowed to be used for SIP RTP packets This function could be useful when there is a router connected between AX 125 145 and the Internet access or you want to control ports usage of the Internet environment IVR language You can choose the IVR voice prompt language type Currently Chinese and English are supported DNS Query Timeout It sets the DNS query timeout ...

Page 20: ...n it reached this time interval Domain name Enter the domain realm for SIP registration if the SIP server requests this parameter Outbound proxy address Port If your SIP server provider use Outbound proxy to relay SIP packets enter the outbound proxy server IP address or domain name and the port number it uses Phone number Display name These parameters are provided by your Internet Telephony Servi...

Page 21: ...on codes There are six 6 commonly used function codes Blind Transfer Attend Transfer Conference Trunk Access Code Phone Book Prefix and Speed Dial Prefix Trunk Access Code refers to the code for accessing the FXO port PSTN line NOTE AX 125 145 has some pre defined default call function services Refer to Chapter 4 SIP Operation Guide for more details If you want to use the call functions you have t...

Page 22: ...le Disable the silence suppression function If set to Enable no packet is sent out when there are no voice audio activities This function is useful when your internet access bandwidth is limited Jitter Buffer When the voice quality is bad increasing this value increases voice quality but also delays voice transmission DTMF method AX 125 145 supports the most popular DTMF transferring methods RFC28...

Page 23: ...d with the VoIP Access Digits Under this mode connect to PSTN all phone numbers prefixed with the VoIP Access Digits will go through the VoIP connection Caller ID type From the dropdown list select the caller ID signal generation type Keep alive timer A non zero value in this field will activate the keep alive packet sending to SIP server with specified time duration periodically Keep alive is use...

Page 24: ...wall Setting The Firewall Settings screen is displayed 2 Check the options you want to enable 3 When done click Apply Quick dial key Choose or as the ending of a dialing key The DTMF code detection will be stopped when this key is pressed Enable quick dial key as dial number If you select yes either or will be sent out as part of your dial number If no is selected then the quick dial key will be r...

Page 25: ...e to enable the ACL Log function 3 When LAN to WAN ACL is enabled you can choose the Default Policy as either Allow or Drop to work with the exception rules you have defined Refer to To add an exception rule for more details If the Default Policy is Allow the exception rules will drop packets If the Default Policy is Drop the exception rules will allow packets to pass through 4 When done click App...

Page 26: ...is displayed For defining a complex ACL rule you need to specify the following Protocol type for the exception rule Source Address information which pertains to packets source from your device in LAN environment Destination Address which pertains to the device located outside the WAN and where the packets will go to Time Duration which pertains to the specific valid time and date for the ACL rule ...

Page 27: ...re IP sharing is always enabled in AX 125 145 DMZ host Enable to direct service to the host located in the specified LAN IP address The default service packets of AX 125 145 includes http port 80 and SIP contact port 5060 RTP port defined in VoIP Setting page All the service packets will be routed to the DMZ host except the system default packets listed above ALG option Enable or disable SIP H 323...

Page 28: ...irect The Port Redirect screen is displayed 2 In Port Redirect check Enable and then click Apply 3 Click the Add Rule button for a detailed setup The screen shown below is displayed In the Redirect IP Port field enter the IP address and port to redirect to Specify the Service to be Redirected either through choosing from the Well known drop down list or defining the Custom protocol and port After ...

Page 29: ...ort Trigger screen is displayed 2 In the Trigger field check Enable 3 In the Time Out field specify the time out value for session validation check Click Apply when done 4 For a detailed setup click the Add Rule button to define an exception rule The screen shown below is displayed Enter the necessary information and click Add Now when done ...

Page 30: ...lect Simple Mode set the allowable maximum Upload and Download bandwidth for non VoIP traffic during an active VoIP call 4 When done click Apply 3 6 4 Session Idle Timeout The ASUS AX 125 145 allows you to control the session idle time If you make a connection to a server through the AX 125 145 the established connection will timeout if there is no packet transmission during the defined Timeout Va...

Page 31: ... value the QoS behavior may appear strange and will not match your expectations Voice prior option Assign the allowed percentage of maximum bandwidth to be used for non VoIP traffics All the allowed user defined rule bandwidth traffic will be multiplied with this percentage value to come out with the real allowable bandwidth for use Undefined traffic option The Undefined traffic means the packets ...

Page 32: ...ned Traffic use Full Bandwidth No Add 2 user define rules for HTTP and SMTP U xxK DxxK means bandwidth for upload and download The data in No VoIP calls column indicates the real bandwidth for each services when there is no VoIP activity The data in the VoIP calls is in progress column indicates the bandwidth under active VoIP call s The above table shows the percentage value assigned to each para...

Page 33: ...tory default settings restoring or keeping backup of the AX 125 145 system s configuration and keeping records of log events 3 8 1 Time To configure Time 1 From the menu click Management Time The Time settings screen is displayed 2 Enter the Simple Network Time Protocol SNTP server IP or domain If SNTP service is not available you can manually set up the time 3 When done click Apply 3 8 2 Administ...

Page 34: ...u need to enter the account name and password for web authentication 3 When done click Apply to save the settings 3 8 3 Firmware upgrade To upgrade the firmware 1 From the menu click Management Firmware Upgrade The Firmware Upgrade screen is displayed 2 Browse for the firmware file 3 When done click Apply WARNING Do not turn off the AX 125 145 or disconnect the Ethernet cable while the device is u...

Page 35: ...45 allows you to restore the device to its factory default settings and to backup or restore the system s configuration To do this click Management Configuration 3 9 5 Log ASUS AX 125 145 keeps track of users activities through its Log function To check the users logs click Management Log ...

Page 36: ...edefined phone book number PSTN access code 90 Switch the phone set connected to FXO RJ11 port of the PSTN line It will automatically switch back to VoIP after the phone is put down Call Pickup 78n Pick up the incoming call of another party on AX125 145 The value n indicates the predefined phone number of the other party on AX125 145 4 SIP Operation Guide 4 1 IVR operation You can pick up the phon...

Page 37: ...t is interpreted as a VoIP call and is sent to the SIP server If you have connected the FXO to the PSTN line of the AX 125 145 then you can use the PSTN access code The default code is 90 and this is configurable in the web GUI To transfer a call 1 Blind Transfer Transferring a call to a third party without notifying the recipient Press the Flash key and dial 98nnnn nnnn is the recipient s number ...

Page 38: ...left sequence Table 3 LED Indicator LED Light pattern Status 1 Power On Of Power On Off 2 WAN Green LED on Green LED blinking RJ45 connection detected RJ45 traffic activity 3 6 LAN1 4 Green LED on Green LED blinking RJ45 connection detected RJ45 traffic activity 7 FXO Green LED on FXO off the hook in use 8 9 FXS1 2 Green LED on FXO off the hook in use 10 11 FXS3 4 Green LED on FXS off the hook in ...

Page 39: ...vity problems The device does not appear to be performing any network related functions For Ethernet devices ensure that the Ethernet connection is secure and the Ethernet cable quality is good Try pinging the device s IP address from any Unix or Windows machine connected to the same network Type ping www xxx yyy zzz Enter where www xxx yyy zzz is the IP address of the unit Symptom The device s We...

Page 40: ... Symptom I forgot the IP address of the device and hence cannot reach it via my web browser You can use IVR to check or reconfigure LAN IP For details on using the IVR function refer to 2 5 LAN IP Assignment Set up your PC Ethernet to DHCP client mode and connect to AX 125 145 s LAN port to get a valid IP and open a browser with the AX 125 145 gateway IP For more details refer to 3 Configuration G...

Reviews:

Related manuals for AX-125