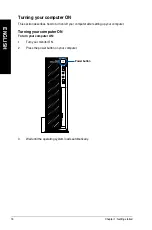
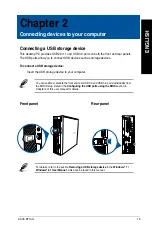
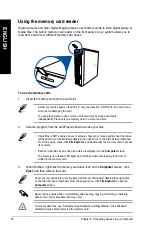
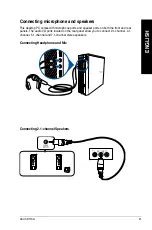
background image

4

Chapter : Connecting devices to your computer

EN

GL

IS

H

EN

GL

IS

H

Summary of Contents for BT1AG

Page 1: ...Desktop PC User Manual BT1AG SD260 ...

Page 2: ...ULAR PURPOSE IN NO EVENT SHALL ASUS ITS DIRECTORS OFFICERS EMPLOYEES OR AGENTS BE LIABLE FOR ANY INDIRECT SPECIAL INCIDENTAL OR CONSEQUENTIAL DAMAGES INCLUDING DAMAGES FOR LOSS OF PROFITS LOSS OF BUSINESS LOSS OF USE OR DATA INTERRUPTION OF BUSINESS AND THE LIKE EVEN IF ASUS HAS BEEN ADVISED OF THE POSSIBILITY OF SUCH DAMAGES ARISING FROM ANY DEFECT OR ERROR IN THIS MANUAL OR PRODUCT SPECIFICATION...

Page 3: ...phone and speakers 21 Chapter 3 Using your computer Proper posture when using your Desktop PC 25 Using the optical drive 26 Configuring the USB ports using the BIOS 27 Configuring the HDD security setting using the BIOS 28 Chapter 4 Connecting to the Internet Wired connection 29 Chapter 5 Troubleshooting Troubleshooting 31 Appendix Windows 7 Windows 8 1 User Manual Chapter 1 Using Windows 7 Starti...

Page 4: ...rd shortcuts 58 Turning your Desktop PC OFF 59 Putting your Desktop PC to sleep 59 Entering the BIOS Setup 60 Chapter 3 Other Windows 7 Windows 8 1 functions Removing a USB storage device 61 Configuring the screen resolution settings 62 Configuring the Internet connection settings 63 Recovering your system 72 ASUS contact information ASUS contact information 77 ...

Page 5: ...nterference in a residential installation This equipment generates uses and can radiate radio frequency energy and if not installed and used in accordance with manufacturer s instructions may cause harmful interference to radio communications However there is no guarantee that interference will not occur in a particular installation If this equipment does cause harmful interference to radio or tel...

Page 6: ...l numérique de la Classe B respecte toutes les exigences du Règlement sur le matériel brouilleur du Canada Cet appareil est conforme aux normes CNR exemptes de licence d Industrie Canada Le fonctionnement est soumis aux deux conditions suivantes 1 cet appareil ne doit pas provoquer d interférences et 2 cet appareil doit accepter toute interférence y compris celles susceptibles de provoquer un fonc...

Page 7: ... the FCC radio frequency exposure limits Nevertheless it is advised to use the wireless equipment in such a manner that the potential for human contact during normal operation is minimized FCC Bluetooth Wireless Compliance The antenna used with this transmitter must not be colocated or operated in conjunction with any other antenna or transmitter subject to the conditions of the FCC Grant Bluetoot...

Page 8: ...environments with ambient temperatures between 0 C 32 F and 35 C 95 F DO NOT cover the vents on the Desktop PC to prevent the system from getting overheated DO NOT use damaged power cords accessories or other peripherals To prevent electrical shock hazard disconnect the power cable from the electrical outlet before relocating the system Seek professional assistance before using an adapter or exten...

Page 9: ... task IMPORTANT Instructions that you MUST follow to complete a task Where to find more information Refer to the following sources for additional information and for product and software updates ASUS websites The ASUS website provides updated information on ASUS hardware and software products Refer to the ASUS website www asus com ASUS Local Technical Support Visit ASUS website at http support asu...

Page 10: ...ve are for reference only Actual product specifications may vary with different models ASUS Desktop PC Keyboard x1 Mouse x1 Power adapter x1 Power cord x1 Support DVD x1 Recovery DVD x1 Optional Desktop stand x1 Installation Guide x1 Warranty card x1 Mouse pad x1 Antenna optional x1 Quick Start Guide ASUS Desktop PC ...

Page 11: ...me Thank you for purchasing the ASUS Desktop PC The ASUS Desktop PC provides cutting edge performance uncompromised reliability and user centric utilities All these values are encapsulated in a stunningly futuristic and stylish system casing Read the ASUS Warranty Card before setting up your ASUS Desktop PC ASUS BT1AG 11 Chapter 1 Getting started ...

Page 12: ...orage only We strongly recommend that you connect USB 3 0 devices to USB 3 0 ports for a faster and better performance for your USB 3 0 devices 3 Microphone port This port connects to a microphone 4 Headphone port This port connects to a headphone or speaker 5 HDD LED This LED lights up when the hard disk drive operates 6 Slim type optical disk drive bay Slim type optical disk drive bay is for sli...

Page 13: ...slot This slot is used to secure the desktop PC using a Kensington compatible PC security cable 6 LAN RJ 45 port This port allows Gigabit connection to a Local Area Network LAN through a network hub LAN port LED indications Activity Link LED Speed LED Status Description Status Description OFF No link OFF 10Mbps connection ORANGE Linked ORANGE 100Mbps connection BLINKING Data activity GREEN 1Gbps c...

Page 14: ...0 devices 16 USB 2 0 ports These Universal Serial Bus 2 0 USB 2 0 ports connect to USB 2 0 devices such as a mouse printer scanner camera PDA and others 17 PS 2 Keyboard Mouse Combo port purple green This port is for a PS 2 keyboard or mouse 18 Wireless antenna jack Optional This jack is used to connect the supplied wireless antenna to enhance wireless signal reception 8 Microphone port pink This ...

Page 15: ...y always use the included desktop stand Secure the desktop chassis in place on the desktop stand using two screws The desktop stand is designed to prevent the chassis from falling over and the vent holes from being blocked Overheating may occur if the desktop is positioned vertically without using the desktop stand ENGLISH ASUS BT1AG 15 ENGLISH ...

Page 16: ... display output port To connect an external monitor using the onboard display output ports 1 Connect a monitor to the VGA port or a DVI I monitor to the DVI I port or an HDMI monitor to the HDMI port on the rear panel of your computer 2 Plug the monitor to a power source Connecting a USB keyboard and a USB mouse Connect a USB keyboard and a USB mouse to the USB ports on the rear panel of your comp...

Page 17: ...adapter specifications Input 100 240VAC 50 60Hz 2 0A Output 19VDC 6 32A To connect the power adapter and power cord to the desktop PC 1 Connect the power cord to the power adapter 2 Plug the power adapter into a 100V 240V power source 3 Connect the power connector to the rear panel of your computer ENGLISH ASUS BT1AG 17 ENGLISH ...

Page 18: ...ff your computer after setting up your computer Turning your computer ON To turn your computer ON 1 Turn your monitor ON 2 Press the power button on your computer 3 Wait until the operating system loads automatically Power button 18 Chapter 1 Getting started ENGLISH ...

Page 19: ...to your computer You can enable or disable the front and rear USB 2 0 and USB 3 0 ports individually from the BIOS Setup Refer to the Configuring the USB ports using the BIOS section in Chapter 3 of this user manual for details Front panel For details refer to the section Removing a USB storage device in the Windows 7 Windows 8 1 User Manual which can be found in this manual ENGLISH ASUS BT1AG 19 ...

Page 20: ...menu click File Explorer and double click the memory card to access its contents Each card slot has its own drive icon which is displayed on the Computer screen The memory card reader LED lights up and blinks when data is being read from or written to the memory card A memory card is keyed so that it fits in only one direction DO NOT force a card into a slot to avoid damaging the card You can plac...

Page 21: ... speaker ports on both the front and rear panels The audio I O ports located on the rear panel allow you to connect 2 1 channel 4 1 channel 5 1 channel and 7 1 channel stereo speakers Connecting Headphone and Mic Connecting 2 1 channel Speakers LINE OUT ENGLISH ASUS BT1AG 21 ENGLISH ...

Page 22: ...Connecting 4 1 channel Speakers LINE OUT Connecting 5 1 channel Speakers LINE OUT 22 Chapter 2 Connecting devices to your computer ENGLISH ENGLISH ...

Page 23: ...Connecting 7 1 channel Speakers LINE OUT ENGLISH ASUS BT1AG 23 ENGLISH ...

Page 24: ...24 Chapter 2 Connecting devices to your computer ENGLISH ...

Page 25: ...ir to make sure that your knees are slightly higher than your hips to relax the backs of your thighs If necessary use a footrest to raise the level of your knees Adjust the back of your chair so that the base of your spine is firmly supported and angled slightly backward Sit upright with your knees elbows and hips at an approximately 90º angle when you are at the PC Place the monitor directly in f...

Page 26: ...over Right click the CD DVD drive icon on the Computer screen and click Eject To open the Computer screen on Windows 8 1 hover your mouse pointer over the lower left corner of Windows desktop then right click on the Start screen s thumbnail From the popup menu click File Explorer to open the Computer screen 2 Remove the disc from the disc tray If AutoPlay is NOT enabled in your computer to access ...

Page 27: ...rear USB 2 0 and 3 0 ports 1 Press Delete to enter the BIOS Setup at startup 2 From the BIOS Setup screen click Advanced USB Configuration USB Single Port Control 3 Select the USB port that you want to enable or disable 4 Press Enter to enable or disable the selected USB port 5 Click Exit and select Save Changes Reset to save the changes made Refer to Chapter 1 for the locations of the USB ports ...

Page 28: ...ve Changes Reset to save the changes made Take note of this password which you would need to access the HDD To change the password for your HDD from the BIOS Setup 1 Follow steps 1 and 2 of the previous section to open the HDD Password screen 2 Select the Set User Password item and press Enter 3 From the Enter Current Password box key in the current password then press Enter 4 From the Create New ...

Page 29: ... to a DSL cable modem Refer to the documentation that came with your DSL cable modem Modem RJ 45 cable 3 Turn on the DSL cable modem and your computer 4 Configure the necessary Internet connection settings Contact your network administrator for details or assistance in setting up your Internet connection For details refer to the section Configuring the Internet connection settings in the Windows 7...

Page 30: ...n on your computer 3 Configure the necessary Internet connection settings Contact your network administrator for details or assistance in setting up your Internet connection For details refer to the section Configuring the Internet connection settings in the Windows 7 Windows 8 1 User Manual which can be found in this manual RJ 45 cable LAN 30 Chapter 4 Connecting to the Internet ENGLISH ...

Page 31: ...he following based on the operating system On Windows 7 a Click Applications tab b Select the program that is not responding then click End Task On Windows 8 1 Under Task Manager in the Processes tab select the program that is not responding then click End Task If the keyboard is not responding press and hold the Power button on the top of your chassis until the computer shuts down Then press the ...

Page 32: ...ideo connector cable Check if your monitor is plugged to a power source properly Refer to the documentation that came with your monitor for more troubleshooting information When using multiple monitors only one monitor has display Ensure that the both monitors are powered on During POST only the monitor connected to the VGA port has display The dual display function works only under Windows When a...

Page 33: ...ur HDTV Adjust the screen resolution to fit your HDTV To change the screen resolution On Windows 7 1 Do any of the following to open the Screen Resolution setting screen Click Control Panel Appearance and Personalization Display Change display settings Right click anywhere on your Windows desktop When the pop up menu appears click Personalize Display Change display settings 2 Adjust the resolution...

Page 34: ...and drag the slider to adjust the volume Connect your speakers to another computer to test if the speakers arer working properly The DVD drive cannot read a disc Check if the disc is placed with the label side facing up Check if the disc is centered in the tray especially for the discs with non standard size or shape Check if the disc is scratched or damaged The DVD drive eject button is not respo...

Page 35: ...ttings Ensure that the power cord is unplugged from the power outlet Your computer is not turned on Press the power key on the front panel to ensure that your computer is turned on Your computer s power cord is not properly connected Ensure that the power cord is properly connected Use other compatible power cord PSU Power supply unit problems Contact the ASUS Service Center about installing anoth...

Page 36: ...connecting to another monitor LAN Problem Possible Cause Action Cannot access the Internet The LAN cable is not connected Connect the LAN cable to your computer LAN cable problems Ensure the LAN LED is on If not try another LAN cable If it still does not work contact the ASUS service center Your computer is not properly connected to a router or hub Ensure that your computer is properly connected t...

Page 37: ...stem speed is too slow Too many programs are running Close some of the programs Computer virus attack Use an anti virus software to scan for viruses and repair your computer Reinstall the operating system The system often hangs or freezes Hard disk drive failure Send the damaged hard disk drive to ASUS Service Center for servicing Replace with a new hard disk drive Memory module problems Replace w...

Page 38: ...d the latest BIOS versions Computer is too noisy when in use The CPU fan has been replaced Ensure that you are using a compatible or ASUS recommended CPU fan There is not enough air ventilation for the computer Ensure that your computer is working in an area with good air flow The system temperature is too high Update the BIOS If you know how to reinstall the motherboard try to clean the inner spa...

Page 39: ...ASUS Desktop PC Windows 7 Windows 8 1 User Manual E8623 First Edition August 2013 Copyright ASUSTeK Computer Inc All Rights Reserved Appendix Windows 7 Windows 8 1 User Manual ...

Page 40: ...40 ...

Page 41: ...in uniques names for the user name and computer name then click Next 5 Key in the necessary information to set up your password then click Next You may also click Next to skip this step without entering any information If you want to set up a password for your account later refer to the section Setting up a user account and password in this chapter 6 Carefully read the license terms Tick I accept ...

Page 42: ... menu contains information about some basic tasks such as personalizing Windows adding new users and transferring files to help you to familiarize yourself with using Windows 7 To use the Getting Started item 1 From the Windows taskbar click the Start icon to launch the Start menu 2 Select Getting Started The list of available tasks appears 3 Select the task that you want to do Using the taskbar T...

Page 43: ...hen select Unpin from this list Pinning programs on the Start menu or taskbar To pin programs on the Start menu or taskbar 1 From the Windows taskbar click the Start icon to launch the Start menu 2 Right click the item that you want to pin on the Start menu or taskbar 3 Select Pin to Taskbar or Pin to Start menu You may also right click on the icon of a running program on the taskbar then select P...

Page 44: ... to open it For more details refer to the section Using Windows Action Center in this chapter Customizing icons and notifications You may choose to display or hide the icons and notifications on the taskbar or on the notification area To customize icons and notifications 1 From the notification area click on the arrow icon 2 Click Customize 3 From the dropdown list select the behaviors for the ico...

Page 45: ...ider to select how you want to view the file folder You may also right click anywhere on the View pane click View and select the view type that you want Arranging your files To arrange your files 1 Launch Windows Explorer 2 From the Arrange by field click to display the dropdown list 3 Select your preferred arrangement type Sorting your files To sort your files 1 Launch Windows Explorer 2 Right cl...

Page 46: ...me choose as your backup mode If you select Let Windows choose Windows will not back up your programs FAT formatted files Recycle Bin files or temporary files that are 1GB or more 5 Follow the onscreen instructions to finish the process Restoring your system settings The Windows System Restore feature creates a restore point where the computer s system settings are stored at certain time and date ...

Page 47: ...e task that you want to do Using Windows Update Windows Update allows you to check and install the latest updates to enhance the security and performance of your computer Launching Windows Update To launch Windows Update 1 From the Windows taskbar click the Start icon to launch the Start menu 2 Select All Programs Windows Update 3 From the Windows Update screen click the task that you want to do S...

Page 48: ...ter from virus It is purchased separately You have a 30 day trial period after activating it To activate Trend Micro Internet Security 1 Run the Trend Micro Internet Security application 2 Carefully read the license terms Click Agree Activate 3 Input your e mail address and select your location Click Next 4 Click Finish to complete the activation Getting Windows Help and Support Windows Help and S...

Page 49: ...on your Desktop PC As other settings appear select your country or region app language keyboard layout and time zone then tap Next 3 Carefully read the License Terms then tap I Accept 4 Follow the onscreen instructions to configure the following basic items Personalize Connect Settings Your account 5 After configuring the basic items the Windows 8 1 tutorial appears Watch this to learn more about ...

Page 50: ... your user account It helps organize all the programs and applications you need in just one place You can press the Windows key to launch the Start screen from any apps Windows apps These are apps pinned on the Start screen and displayed on tiled format for easy access A screen resolution of 1024 x 768 pixels or higher is required to run Windows apps Some apps require signing in to your Microsoft ...

Page 51: ...n hotspots allow you to launch programs and access the settings of your Desktop PC The functions in these hotspots can be activated using your mouse Hotspots on a running app Hotspots on the Start screen Refer to the next page for the Hotspots functions ...

Page 52: ...Start screen NOTE You can also press the Windows key on your keyboard to go back to the Start screen From the Start screen Hover your mouse pointer on the lower left corner then tap to go back to that app top Hover your mouse pointer until it changes to a hand icon Drag then drop the app to a new location NOTE This hotspot function only works on a running app or when you want to use the Snap featu...

Page 53: ...in apps from the Start screen using the following steps To move an app drag and drop the app to a new location Resizing apps Right click the app to activate its settings bar then tap and select an app tile size Unpinning apps To unpin an app from the Start screen right click on the app to activate its settings bar then click Unpin from Start Closing apps Move your mouse pointer on the top side of ...

Page 54: ...to the Start screen or to the Desktop mode taskbar Launching the All Apps screen On the Start screen click From the Start screen press Tab then press Enter on your keyboard Pinning an app on the Start screen 1 Launch the All Apps screen 2 From the All Apps screen right click an app to display its settings bar 3 From the settings bar click Pin to Start ...

Page 55: ... and provide quick access for customizing the settings of your Desktop PC Launching the Charms bar When called out the Charms bar initially appears as a set of white icons The image above shows how the Charms bar looks like once activated Use your Desktop PC s mouse or keyboard to launch the Charms bar Move your mouse pointer on the upper or lower right corner of the screen Press C Charms bar ...

Page 56: ...ations via social networking sites or email Start This charm reverts the display back to the Start screen From the Start screen you can also use this to revert back to a recently opened app Devices This charm allows you to access and share files with the devices attached to your Desktop PC such as an external display or printer Settings This charm allows you to access the PC settings of your Deskt...

Page 57: ...ture Snap bar Using Snap To use Snap 1 Use your Desktop PC s mouse or keyboard to activate Snap onscreen Using your mouse a Click on an app to launch it b Hover the mouse pointer on the top side of your screen c Once the pointer changes to a hand icon drag and drop the app to the right or left side of the display panel Using your keyboard Launch an app then press left or right key to place the fir...

Page 58: ...unning app D Launches the desktop E Launches the Computer window on the desktop F Opens the File search pane H Opens the Share pane I Opens the Settings pane K Opens the Devices pane L Activates the Lock screen M Minimizes all currently active screens P Opens the Second screen pane Q Opens the Everywhere search pane R Opens the Run window U Opens Ease of Access Center W Opens the Settings search p...

Page 59: ... Do any of the following to shut down your Desktop PC From the Charms bar click Settings Power Shut down to do a normal shutdown From the login screen click Power Shutdown If your Desktop PC is unresponsive press and hold the power button for at least four 4 seconds until your Desktop PC turns off Putting your Desktop PC to sleep To put your Desktop PC on Sleep mode press the Power button once ...

Page 60: ...BIOS settings may result to instability or boot failure We strongly recommend that you change the BIOS settings only with the help of a trained service personnel Quickly enter the BIOS Windows 8 1 boot time is quite fast so we developed the following ways for you to quickly access the BIOS Press the power button for at least four seconds to shut down your Desktop PC then press the power button aga...

Page 61: ...ompatible devices 2 When the Safe to Remove Hardware message pops up remove the USB storage device from your computer DO NOT remove a USB storage device when data transfer is in progress Doing so may cause data loss or damage the USB storage device Windows 8 1 To remove a USB storage device on Windows 8 1 1 From the Start screen click Desktop to launch the Desktop Mode 2 Click from the taskbar the...

Page 62: ... This increases your desktop space Show desktop only on 1 2 Select this option to show desktop only on monitor 1 or monitor 2 Remove this display Select this options to remove the selected display 3 Click Apply or OK Click Keep Changes on the confirmation message Windows 8 1 To configure the screen resolution settings on Windows 8 1 1 Do any of the following to open the Screen Resolution setting s...

Page 63: ...our desktop space Show desktop only on 1 2 Select this option to show desktop only on monitor 1 or monitor 2 3 Click Apply or OK Click Keep Changes on the confirmation message Configuring the Internet connection settings Wired connection Windows 7 Configuring a dynamic IP PPPoE network connection To configure a dynamic IP PPPoE network connection 1 Go to Start Control Panel Network and Sharing Cen...

Page 64: ... the following IP address and key in IP address and Subnet mask 6 Select Obtain DNS server address automatically if you want the DNS server settings to be assigned automatically Otherwise select Use the following DNS server addresses and key in the Preferred and Alternate DNS server 7 Click OK when done Continue to the next steps if you are using PPPoE connection 8 Return to the Network and Sharin...

Page 65: ...band PPPoE and click Next 11 Enter your User name and Password and Connection name Click Connect 12 Click Close to finish the configuration 13 Click the network icon in the taskbar and click the connection you just created 14 Enter your user name and password Click Connect to connect to the Internet ...

Page 66: ... section 2 Click Use the following IP address 3 Enter the IP address Subnet mask and Gateway from your service provider 4 If needed enter the preferred DNS Server address and alternative address 5 When done click OK Windows 8 1 Configuring a dynamic IP PPPoE network connection To configure a dynamic IP PPPoE network connection 1 From the Start screen click Desktop to launch the Desktop mode ...

Page 67: ...ring Center 3 From the Open Network and Sharing Center screen click Change Adapter settings 4 Right click on your LAN and select Properties 5 Click Internet Protocol Version 4 TCP IPv4 and click Properties 6 Click Obtain an IP address automatically and click OK Continue to the next steps if you are using PPPoE connection ...

Page 68: ...ows 7 Windows 8 1 functions ENGLISH ENGLISH 8 Select Connect to the Internet and click Next 7 Return to the Network and Sharing Center and then click Set up a new connection or network 9 Select Broadband PPPoE and click Next ...

Page 69: ...created 13 Enter your user name and password Click Connect to connect to the Internet Configuring a static IP network connection To configure a static IP network connection 1 Repeat steps 1 to 4 of the previous section 2 Click Use the following IP address 3 Enter the IP address Subnet mask and Gateway from your service provider 4 If needed enter the preferred DNS Server address and alternative add...

Page 70: ... 3 You may need to key in the network security key for a secured wireless network then click OK 4 Wait while your computer is connecting to the wireless network 5 The wireless connection is established successfully The connection status is displayed and the network icon displays the connected status Windows 8 1 To connect to a Wi Fi network 1 Do any of the following to launch the Charms bar from t...

Page 71: ...ENGLISH ASUS Desktop PC 71 ENGLISH 2 From the Charms bar select Settings and click the network icon 3 Select the network that you want to connect to from the list 4 Click Connect ...

Page 72: ...nnot be restored if deleted Take your Desktop PC to an authorized ASUS service center if you have problems with the recovery process Using the system recovery partition 1 Press F9 during bootup 2 Highlight Windows Setup EMS Enabled and press Enter 3 From the Recover system to a partition screen click Next 4 Follow the onscreen instructions to complete the recovery process Visit the ASUS website at...

Page 73: ... up all your data before using this option To reset your PC 1 Press F9 during bootup 2 From the screen click Troubleshoot 3 Select Reset your PC 4 Click Next 5 Select Only the drive where the Windows is installed 6 Select Just remove my files 7 Click Reset The F9 recovery function is not applicable for downgrade versions of Windows 8 1 Refer to the Removing everything and reinstalling Windows sect...

Page 74: ... optical drive On the End User License Agreement EULA screen click Accept 3 Select Reset your PC 4 Click Next 5 Select Only the drive where the Windows is installed 6 Select Just remove my files 7 Click Reset Recovering from a system image file You can create a USB recovery drive and use this to recover your PC s settings Creating a USB recovery drive The USB storage device must have at least 16GB...

Page 75: ...ss is completed click Finish To create a USB recovery drive 1 Launch the Control Panel from the All Apps screen For details refer to Launching the All Apps screen under Working with Windows apps 2 From the Control Panel s System and Security click Find and fix problems 3 Click Recovery Create a recovery drive 4 Click Copy the recovery partition from the PC to the recovery drive and then click Next...

Page 76: ...n PC Settings Refer to the steps below to use this option Back up all your data before using this option This process may take a while to complete 1 Launch the Charm bar 2 Click Settings PC Settings Update and recovery Recovery 3 Scroll down to view the Remove everything and reinstall Windows option Under this option click Get Started 4 Follow the onscreen instructions to complete the reinstallati...

Page 77: ...rt fax 1 812 284 0883 Online support support asus com ASUS COMPUTER GmbH Germany and Austria Address Harkort Str 21 23 D 40880 Ratingen Germany Fax 49 2102 959911 Web site www asus de Online contact www asus de sales Technical Support Telephone Component 49 1805 010923 Telephone System Notebook Eee LCD 49 1805 010920 Support Fax 49 2102 9599 11 Online support support asus com EUR 0 14 minute from ...

Reviews: