background image

18  ASUS Desktop PC

Using the Media Center remote con-
trol 

(optional)

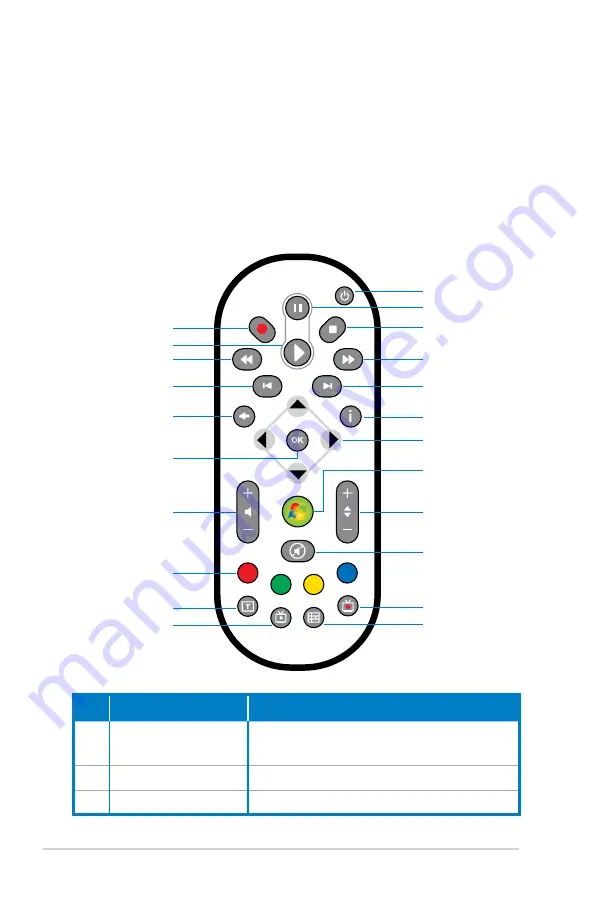
Use the remote to launch the Media Center program to play  
media files such as music and movies. You can also install an 
external TV box to watch TV and record TV programs.

Refer to the table below to familiarize yourself with the functions 
of the remote control buttons.

1
2
3

4

5

6

8

7

9

10

11
12

13

14

15

16

17

18

19

20

21

22

No. Button

Description

1.

Power 

Press to turn on/off the power of the 
screen and the speakers.

2. 

Pause

Press to pause a playback.

.

Stop

Press to stop playing a media file.

Summary of Contents for CS5120

Page 1: ...ASUS Desktop PC CS5120 CS5121 User Manual ...

Page 2: ...HANTABILITY OR FITNESS FOR A PARTICU LAR PURPOSE IN NO EVENT SHALL ASUS ITS DIRECTORS OFFICERS EMPLOYEES OR AGENTS BE LIABLE FOR ANY INDIRECT SPECIAL INCIDENTAL OR CONSE QUENTIAL DAMAGES INCLUDING DAMAGES FOR LOSS OF PROFITS LOSS OF BUSINESS LOSS OF USE OR DATA INTERRUPTION OF BUSINESS AND THE LIKE EVEN IF ASUS HAS BEEN ADVISED OF THE POSSIBILITY OF SUCH DAMAGES ARISING FROM ANY DEFECT OR ERROR IN...

Page 3: ...ton to turn on the system 13 Using your Desktop PC 14 Using the optical drive 14 Inserting a disc 14 Ejecting a disc 14 Setting up the audio system 15 Speaker configurations 15 Connecting to speakers 16 Configuring audio output settings 17 Using the Media Center remote control optional 18 Wireless network connection optional 20 Bluetooth connection optional 21 Recovering your system 23 Using the r...

Page 4: ...cause harmful interference to radio communications However there is no guarantee that interference will not occur in a particular installation If this equipment does cause harmful interference to radio or television reception which can be determined by turning the equipment off and on the user is encouraged to try to correct the interference by one or more of the following measures Reorient or rel...

Page 5: ...Corporation and other rights owners Use of this copyright protection technology must be authorized by Macrovision Corporation and is intended for home and other limited viewing uses only unless otherwise authorized by Macrovision Corporation Reverse engineering or disassembly is prohibited Safety information Your ASUS Desktop PC is designed and tested to meet the latest standards of safety for inf...

Page 6: ...t spill water or any other liquids on your system When the system is turned off a small amount of electrical current still flows Always unplug all power modem and network cables from the power outlets before cleaning the system If you encounter the following technical problems with the product unplug the power cord and contact a qualified service technician or your retailer The power cord or plug ...

Page 7: ...ic products NO DISASSEMBLY The warranty does not apply to the products that have been disassembled by users Notes for this manual To ensure that you perform certain tasks properly take note of the following symbols used throughout this manual WARNING Vital information that you MUST follow to prevent injury to yourself IMPORTANT Instructions that you MUST follow to complete a task TIP Tips and usef...

Page 8: ...Installation Manual x1 Anti slip pad x1 Warranty card x1 Remote control optional x1 If any item is damaged or missing contact your retailer The package contents may vary with different models Visit the ASUS website at http support asus com for any updates ASUS reserves the right to replace components or accessories to provide optimum serviceability Package contents ...

Page 9: ... in optical drive 2 Optical drive eject button 3 Slide the front panel cover open 4 Wireless network Bluetooth LED 5 Hard disk drive LED 6 Power button LED 7 Front panel cover continued on the next page 12 11 9 The gray areas contain front rear panel ports These ports and their locations may vary depending on the model of your system ...

Page 10: ...ra Headphone jack Plug a stereo or headphones into this jack Microphone jack Plug a microphone into this jack E SATA E SATA USB port Connects to USB or external SATA devices 9 Air vents Allows ventilation 10 Power input Supplies power 11 Kensington Lock port Secures the PC to a fixed object using Kensington compatible security products 12 VGA port Connects to a TV or monitor with different video o...

Page 11: ...e such as a digital camrecorder Optical S PDIF Out port Connects to an amplifier for digital audio output Coaxial S PDIF Out port 5 1 6 channel audio ports Connect to a 5 1 6 or 7 1 8 channel speaker system Refer to pages 15 and 16 for setup details 7 1 8 channel audio ports ...

Page 12: ...12 ASUS Desktop PC Setting up your Desktop PC Connecting devices Do not block or cover these openings Display Mouse Keyboard Network hub switch 7 1 8 channel speaker system ...

Page 13: ...ASUS Desktop PC 13 Pressing the power button to turn on the system Connecting the AC power adapter 1 2 3 ...

Page 14: ...ive Inserting a disc 1 Place the disc into the slot in optical drive with the label side facing your left 2 Slide the disc into the drive Ejecting a disc 1 While the system power is on press the eject button 2 Remove the disc from the opening Label side Data side ...

Page 15: ...speaker Side speakers are included in a more advanced system A subwoofer provides enhanced bass sounds 1 indicates a subwoofer For instance 7 1 channels refers to an eight speaker mode and uses two front speakers left right two rear speakers left right two side speakers left right a center speaker and a subwoofer Audio jack Speaker layout Headphones 2 stereo Left speaker right speaker 2 1 Left spe...

Page 16: ...ack Description Line In light blue connects to an analog audio source like a CD DVD player Line Out lime connects to a headset or front speakers Microphone pink connects to a microphone Center Subwoofer orange connects to a center speaker or a subwoofer Rear Out black connects to rear speakers Side Out gray connects to side speakers ...

Page 17: ... 4 Launch a media player application such as Windows Media Player or Power DVD The device you have configured serves as the default audio output device You must launch your media player application for the audio settings to take effect If you want to set up a recording device select Recording Devices in Step 1 and do what resembles Step 2 and 3 If you use an HDMI display with S PDIF audio output s...

Page 18: ...all an external TV box to watch TV and record TV programs Refer to the table below to familiarize yourself with the functions of the remote control buttons 1 2 3 4 5 6 8 7 9 10 11 12 13 14 15 16 17 18 19 20 21 22 No Button Description 1 Power Press to turn on off the power of the screen and the speakers 2 Pause Press to pause a playback 3 Stop Press to stop playing a media file ...

Page 19: ...ecorded TV programs 12 EPG Electronic Program Guide Press to display the electronic program guide screen 13 Live TV button Press to watch live TV programs 14 Shift Toggles between numerical and alphabetical input 15 Teletext buttons Available on European models only 16 Volume up down Press to increase decrease the volume 17 OK Press to confirm an action 18 Return Press to return to the previous pa...

Page 20: ...s network you want to connect to from the list In the Show field select Wireless if there are many networks in your area 3 Key in the security key or passphrase if necessary This screen does not appear if no security key is needed Wireless network connection optional To connect to a wireless network follow the instructions below ...

Page 21: ... Bluetooth enabled devices follow the instructions below 1 Double click the Bluetooth icon on the Windows taskbar to start the connection wizard 2 From the list select the Bluetooth device you want to connect to and click Next to continue If you do not see the device you want to connect to on the list click Refresh to search for it ...

Page 22: ...p is completed click Next to continue 3 Key in the password for the device if authentication is required 5 The device you are connecting to is shown 6 Click the New Connection button and follow steps 1 to 5 to add more Bluetooth devices ...

Page 23: ...ect Windows Setup EMS Enabled and press Enter Wait when the Windows is loading files message appears 4 Select where to install a new system Options are Recover system to a partition This option only deletes the partition you selected allows you to keep the other partitions and creates a new system partition as drive C Select a partition and click NEXT Recover system to entire HD This option delete...

Page 24: ...ickly recover your system 1 Turn on your ASUS Desktop PC and the ASUS logo appears Press F9 to enter the System Recovery 2 Windows is loading files is shown Wait until the Recovery CD DVD window appears 3 Follow the onscreen instructions to complete the recovery process After the system reboots display resolution and system settings are restored to their default values This recovery DVD is for ASU...

Page 25: ...e that you use memory modules that the system sup ports and that you install them properly on the sockets Check if your peripheral devices are compatible with the system Some USB storage devices for example are with different disk drive structure and enter sleep mode easily If the above steps do not solve the problem contact your retailer or perform system recovery using the supplied recovery DVD ...

Page 26: ...it that a CD DVD cannot be read from or written to Ensure that you use a disc compatible with the optical drive Check if you insert the disc properly or if there is any scratch on the disc Find out if the disc is write protected ...

Reviews: