


ASUS Desktop PC
59
ENGLISH
ENGLISH
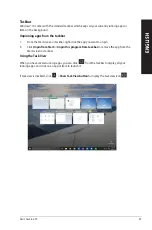
Taskbar
Windows® 10 comes with the standard taskbar, which keeps all your currently running apps or
items in the background.
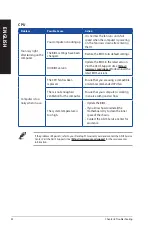
Unpinning apps from the taskbar
1.
From the Start screen or taskbar, right-click the app you want to unpin.
2. Click
Unpin from Start
or
Unpin this program from taskbar
to remove the app from the
Start screen or taskbar.
Using the Task View
When you have several running apps, you can click
from the taskbar to display all your
running apps, and click on an app or item to launch it.
If task view is disabled, click
>
Show Task View button
to display the task view icon
.
Summary of Contents for D300TA
Page 1: ...ASUS Desktop PC User Guide D300TA S300TA ...
Page 28: ...28 Chapter 2 Connecting devices to your computer ENGLISH ...
Page 53: ...ASUS Desktop PC 53 ENGLISH ...
Page 55: ......


