background image

ASUS Eee Pad

19

Making calls

•   Ensure that your MeMic is paired with your Eee Pad. For details, refer 

to the previous section 
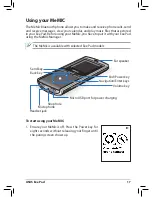
Using your MeMic

.

•   When making or receiving calls, you can also connect the bundled 

headset to your MeMic’s headphone port.

Making calls from the Dialer

To make a call from the Dialer:

1.  Turn on your MeMic.
2.  From the Home screen, tap 

.

3.  On the numeric pad, tap the numbers that you want to call. Your Eee Pad 

automatically shows the possible matches to your phone entry.

4.  Tap 

Call

 on your Eee Pad or press the Call key on your MeMic.

5.  Use your MeMic or connect the headset to your MeMic to talk to the other 

person on the line.

6.  To end the call, tap 

End

 on your Eee Pad or press the End key on your 

MeMic.

Making calls from Contacts

To make a call from Contacts:

1.  Turn on your MeMic.
2.  From the Home screen, tap 

.

3.  Tap  

  to display your Contacts list.

4.  From the list, tap the contact that you want to call and tap  

.  You may 

also press the Call key on your MeMic.

5.  Use your MeMic or connect the headset to your MeMic to talk to the other 

person on the line.

6.  To end the call, tap 

End

 on your Eee Pad or press the End key on your 

MeMic.

Summary of Contents for EEE PAD ME171

Page 1: ...ms You can send your Eee Pad through airport X ray machines But do not send your Eee Pad through airport magnetic detectors or expose it to magnetic wands Charging Your Batteries If you intend to use battery power be sure to fully charge your battery pack before going on long trips Remember that the power adapter charges the battery pack as long as it is plugged into the computer and an AC power s...

Page 2: ...Warning Zx 3 Warning To prevent possible damage do not listen to high volume levels for long periods ...

Page 3: ...ng a microSD card 10 Installing the SIM card 11 Turning your Eee Pad ON 11 Turning your Eee Pad OFF 11 The Home screen 12 Using the stylus 14 Using the touch gestures 15 Setting up your Google Account 16 Using your MeMIC 17 Making calls 19 Using Speed Dial 20 Answering calls 21 Using File Manager 22 Notices 23 ...

Page 4: ...is damaged or missing contact your retailer The power plug that comes with your Eee Pad may vary on country or region Eee Pad Stylus Capacitive Headset Power Plug USB Charger Micro USB cable UserManual MeMic Bluetooth Headset User Manual Warranty Card ...

Page 5: ...ASUS Eee Pad Your Eee Pad 4 10 6 5 7 8 11 12 13 14 16 9 5 15 1 3 2 ...

Page 6: ...r video conferencing voice narrations or simple audio recordings 5 Audio Speaker System The built in stereo speaker system allows you to hear audio without additional attachments Audio features are software controlled 6 Built in Rear Camera Use the built in camera for picture taking video recording video conferencing and other interactive applications 7 SIM Card slot on selected model Insert a SIM...

Page 7: ...ee Pad to shut down Press the Power button for four seconds and tap OK on shutdown confirmation message Forcing the system to shut down may result in data loss Please ensure that you back up all your important data regularly 11 Strap hole 12 Micro HDMI port Insert a Micro HDMI cable into this port to connect to a high definition multimedia interface HDMI device 13 Headphone Microphone Combo Jack T...

Page 8: ...sleep mode screen off or powered off 15 Reset button Using a paper clip press this button to reset the system to its factory default settings 16 Volume Key Press this button to increase or decrease the system volume Charging your Eee Pad Please peel the protective film off from the plug adaptor and USB cable before charging the Eee Pad to prevent risk or injury The power plug that comes with your ...

Page 9: ...e range between the wall outlet and this adapter is AC 100V 240V and the output voltage of this adapter is DC 5V 2A To prolong battery life fully charge the battery for up to 8 hours when using the Eee Pad for the first time and whenever the battery power is fully depleted ME171 can be charged via the USB port on the computer only when it is in sleep mode screen off or powered off Charging through...

Page 10: ...card slot at the Eee Pad s left side 2 Push the card all the way into the slot until it fits completely To remove the microSD card 1 Tap the microSD card icon at the bottom right corner and click the disconnection button to safely remove the microSD card 2 Press the card slightly until it ejects A microSD card fits only in one orientation and slides smoothly into the slot if inserted correctly DO ...

Page 11: ... to the lower part of the slot as shown 3 Push the SIM card until it locks in place To turn your Eee Pad ON Press and Hold the power button for four seconds Turning your Eee Pad OFF Putting your Eee Pad on sleep mode To put your Eee Pad on sleep mode When your Eee Pad is turned on press the Power button once to put it on sleep mode Shut down your Eee Pad before inserting the SIM card to ensure tha...

Page 12: ...t least eight seconds to force the system to shut down Shutting down your Eee Pad To shut down your Eee Pad Press the Power button for four seconds and tap OK on the shutdown confirmation message Forcing the system to shut down may lead to data loss Please ensure that you back up all your important data regularly The Home screen 6 1 2 3 4 5 7 8 9 10 11 12 ...

Page 13: ...he first time and tap to read your e mail messages in your Inbox folder 6 Tap any of the shortcut icons to launch an application or a function 7 Displays the notification area 8 Tap to capture a screenshot 9 Tap to display the history 10 Tap to go back to the Home screen 11 Tap to return to the previous screen 12 Tap to customize the weather widget settings including the location and update freque...

Page 14: ... write draw or select items on your Eee Pad Topreventinterferencetothetouchscreenoperation donotrestyour palm on the touch screen while using the stylus You can also use touch gestures in selecting items on the screen For more details refer to the next section Using the touch gestures ...

Page 15: ...in the Gallery Finger swipe Swipe your finger to the left to flip back and forth among different desktops or different images in the Gallery Using the touch gestures Touch gestures are movements that you make with your fingers to select items or navigate around your Eee Pad s touch panel Use light pressure when making a touch gesture Donotuseanyobjectsinplaceofyourfingersorstyluspentooperatethe to...

Page 16: ...e you turned on your Eee Pad follow these steps to set up your Google account 1 From the Home screen tap Apps on the top right corner 2 Tap Settings Accounts sync Add account 3 Tap Google accounts 4 Key in your e mail address and password then tap Sign in Wait for a few minutes until your Eee Pad connects to the Google server If you do not have an existing Google account create one on the Google w...

Page 17: ...MeMic you have to pair it with your Eee Pad using the MeMic Manager To start using your MeMIC 1 Ensure your MeMic is off Press the Power key for eight seconds without releasing your finger until the paring screen shows up Send key Back key End Power key Navigation Enter keys Volume key Micro USB port for power charging Strap hole Headset jack Ear speaker Microphone The MeMic is available with sele...

Page 18: ...eMic Manager Tap MeMic quick manual for more instructions on using your MeMic 2 From your Eee Pad s Home screen tap Apps on the top right corner 3 Tap MeMic to launch MeMic Manager If the Bluetooth function of your Eee Pad is turned off a message appears requesting for permission to turn on bluetooth and continue pairing ...

Page 19: ...our phone entry 4 Tap Call on your Eee Pad or press the Call key on your MeMic 5 Use your MeMic or connect the headset to your MeMic to talk to the other person on the line 6 To end the call tap End on your Eee Pad or press the End key on your MeMic Making calls from Contacts To make a call from Contacts 1 Turn on your MeMic 2 From the Home screen tap 3 Tap to display your Contacts list 4 From the...

Page 20: ...e 6 To end the call tap End on your Eee Pad or press the End key on your MeMic Using Speed Dial With your Eee Pad s Speed Dial function you can assign a number from1 to 9 to quickly and conveniently call your frequently called phone numbers Creating a Speed Dial entry To create a Speed Dial entry 1 From the Home screen tap 2 Tap Configure Speed dial 3 Tap the number that you want to assign as a sp...

Page 21: ...nect the headset to your MeMic to talk to the other person on the line 7 To end the call tap End on your Eee Pad or press the End key on your MeMic Answering calls To answer a call 1 Turn on your MeMic 2 To answer the call drag your stylus to the right on your Eee Pad or press the Call Key on your MeMic 3 Use your MeMic or connect the headset to your MeMic to talk to the other person on the line 4...

Page 22: ...2 Tap File Manager The list of all your files in the internal and removable storage devices in your Eee Pad are displayed 3 From the list tap a folder to view its contents Tap twice to view a file in your selected folder Removing the external storage devices Click the SD card or the USB device icon at the bottom right corner and click the disconnection button to safely remove the connected externa...

Page 23: ...bient temperatures between 0 C 32 F and 35 C 95 F Risk of xxplosion if battery is replaced by an incorrect type Dispose of used batteries according to the instructions REACH Complying with the REACH Registration Evaluation Authorisation and Restriction of Chemicals regulatory framework we published the chemical substances in our products at ASUS REACH website at http csr asus com english REACH htm...

Page 24: ...independent scientific organization ICNIRP and include safety margins designed to assure the protection of all persons regardless of age and health The guidelines use a unit of measurement known as the Specific Absorption Rate or SAR The ICNIRP SAR limits for mobile devices used by the general public are as follows Eee Pad MeMO 171 Max SAR Measurement 10g GSM 900 0 654 W kg GSM 1800 0 56 W kg WCDM...

Page 25: ... Power Safety Requirement Products with electrical current ratings up to 6A and weighing more than 3Kg mustuseapprovedpowercordsgreaterthanorequalto H05VV F 3G 0 75mm2 or H05VV F 2G 0 75mm2 Copyright Information Nopartofthismanual includingtheproductsandsoftwaredescribedinit may bereproduced transmitted transcribed storedinaretrievalsystem ortranPadd into any language in any form or by any means e...

Page 26: ... or any other actual and direct damages resulted from omission or failure of performing legal duties under this Warranty Statement up to the listed contract price of each product ASUS will only be responsible for or indemnify you for loss damages or claims based in contract tort or infringement under this Warranty Statement This limit also applies to ASUS suppliers and its reseller It is the maxim...

Reviews: