background image

Appendix

A-6

CE Mark Warning

CE marking for devices without wireless LAN/Bluetooth

The shipped version of this device complies with the requirements of the 
EEC directives 2004/108/EC “Electromagnetic compatibility” and 2006/95/
EC “Low voltage directive”.


CE marking for devices with wireless LAN/ Bluetooth

This equipment complies with the requirements of Directive 1999/5/EC of 
the European Parliament and Commission from 9 March, 1999 governing 
Radio and Telecommunications Equipment and mutual recognition of 
conformity.

Summary of Contents for Eee PC 1016 Series

Page 1: ...Eee PC User Manual Windows 7 Edition Eee PC 1016 Series E5772 ...

Page 2: ... Keyboard Usage 1 9 Special Function Keys 1 9 Touchpad Usage 1 11 Chapter 2 Getting Started Powering on your Eee PC 2 2 First time Startup 2 3 Desktop 2 5 Network Connection 2 6 Configuring a wireless network connection 2 6 Local Area Network 2 7 Browsing web pages 2 10 Chapter 3 Using the Eee PC ASUS Update 3 2 Updating the BIOS through the Internet 3 2 Updating the BIOS through a BIOS file 3 3 B...

Page 3: ...Statement A 3 Declaration of Conformity R TTE directive 1999 5 EC A 4 IC Radiation Exposure Statement for Canada A 4 CE Mark Warning A 6 Wireless Operation Channel for Different Domains A 7 France Restricted Wireless Frequency Bands A 7 UL Safety Notices A 8 Power Safety Requirement A 9 REACH Notice A 9 Global Environmental Regulation Compliance and Declaration A 10 Takeback Services A 10 Nordic L...

Page 4: ...ormation on system recovery 5 Appendix Gives you safety statements The actual bundled applications differ by models and territories There may be differences between your Eee PC and the pictures shown in this manual Please accept your Eee PC as being correct Notes for This Manual A few notes and warnings are used throughout this guide allowing you to complete certain tasks safely and effectively Th...

Page 5: ...sture with a dry cloth DO NOT leave the Eee PC on your lap or any part of the body to prevent discomfort or injury from heat exposure DO NOT expose to dirty or dusty environments DO NOT operate during a gas leak DO NOT expose to strong magnetic or electrical fields DO NOT expose to or use near liquids rain or moisture DO NOT use the modem during electrical storms DO NOT press or touch the display ...

Page 6: ...es that the battery should not be placed in municipal waste Transportation Precautions To prepare your Eee PC for transport you should turn it OFF and disconnect all external peripherals to prevent damage to the connectors The hard disk drive s head retracts when the power is turned OFF to prevent scratching of the hard disk surface during transport Therefore you should not transport your Eee PC w...

Page 7: ...ew full charging and discharging cycles Airplane Precautions Contact your airline if you want to use the Eee PC on the airplane Most airlines have restrictions for using electronic devices Most airlines allow electronic use only between and not during takeoffs and landings There are three main types of airport security devices X ray machines used on items placed on conveyor belts magnetic detector...

Page 8: ...viii Table of Contents ...

Page 9: ...Top Side Bottom Side Front Side Right Side Left Side Keyboard Usage Touchpad Usage 1 Chapter 1 Knowing the Parts ...

Page 10: ...the Parts 1 2 Top Side Refer to the diagram below to identify the components on this side of the Eee PC The top side may vary in appearance depending on models The keyboard differs for each territory 4 7 10 5 8 9 2 3 1 6 ...

Page 11: ... button this button functions as Shift F5 to enter the slideshow mode beginning with the slide you are viewing Wireless Bluetooth Button The wireless bluetooth button toggles the internal wireless LAN or Bluetooth ON or OFF When enabled the corresponding wireless bluetooth indicator lights up You can also press Fn F2 to toggle the internal wireless LAN or Bluetooth ON or OFF Power Switch Windows T...

Page 12: ...hout Adapter High battery power 95 100 Green ON Off Medium battery power 11 94 Orange ON Off Low battery power 0 10 Orange Blinking Orange Blinking Powered OFF Standby mode With Adapter Without Adapter High battery power 95 100 Green ON Off Medium battery power 11 94 Orange ON Off Low battery power 0 10 Orange Blinking Off Hard Disk Drive HDD Indicator The hard disk drive indicator blinks when dat...

Page 13: ...es are normal during charging or operation DO NOT use on soft surfaces such as sofas or beds which may block the vents DO NOT PUT THE Eee PC ON YOUR LAP OR OTHER PARTS OF THE BODY TO AVOID INJURY FROM THE HEAT Bottom Side Refer to the diagram below to identify the components on this side of the Eee PC The bottom side may vary in appearance depending on model 3 1 2 ...

Page 14: ... The battery lock secures the battery pack When the battery pack is properly installed it automatically locks in place To remove the battery pack slide the battery lock inward Memory Compartment The memory module is secured in a dedicated compartment 2 Front Side Refer to the diagram below to identify the components on this side of the Eee PC 1 Audio Speaker System Audio features are software cont...

Page 15: ...rt is compatible with USB 3 0 2 0 or USB 1 1 devices such as keyboards pointing devices cameras and storage devices connected in a series up to 4 8Gbits sec USB 3 0 480Mbits sec USB 2 0 and 12Mbits sec USB 1 1 Kensington Lock port The Kensington lock port allows the Eee PC to be secured using Kensington compatible security products These security products usually include a metal cable and lock tha...

Page 16: ...s the internal battery pack To prevent damage to the Eee PC and battery pack always use the supplied power adapter THE ADAPTER MAY BECOME WARM TO HOT WHEN IN USE BE SURE NOT TO COVER THE ADAPTER AND KEEP IT AWAY FROM YOUR BODY 15 pin D Sub Display Monitor Output USB Port 2 0 1 1 Air Vents The air vents allow cool air to enter and warm air to exit the Eee PC Ensure that paper books clothing cables ...

Page 17: ...al wireless LAN or Bluetooth on selected models ON or OFF with an on screen display When enabled the corresponding wireless indicator will light Touchpad F3 Toggles the touchpad ON OFF Resolution Selection F4 Press to adjust the display resolution Sun Down Icon F5 Decreases the display brightness Sun Up Icon F6 Increases the display brightness Crossed Screen Icon F7 Turns off the display backlight...

Page 18: ...f the keyboard for number entering Scr Lk Delete Toggles the Scroll Lock ON and OFF Allows you to use a larger portion of the keyboard for cell navigation Pg Up Press to scroll up in documents or the web browser Pg Dn Press to scroll down in documents or the web browser Home Press to move the pointer to the beginning of the line End Press to move the pointer to the end of the line Windows icon Dis...

Page 19: ...lustrations produce the same results Double clicking Double tapping This is a common skill for launching a program directly from the corresponding icon you select Move the pointer over the icon you wish to execute press the left button or tap the pad twice in rapid succession and the system launches the corresponding program If the interval between the clicks or taps is too long the operation will...

Page 20: ...ou wish You can move the pointer over the item you select and while keeping the left button depressed moving the pointer to the desired location then release the button Or you can simply double tap on the item and hold while dragging the item with your fingertip The following illustrations produce the same results ...

Page 21: ...Powering on your Eee PC First time Startup Desktop Network Connection 2 Chapter 2 Getting Started ...

Page 22: ...roved by the manufacturer or retailer for use with this model or else damage may occur to the Eee PC The input voltage range between the wall outlet and this adapter is AC 100V 240V Never attempt to remove the battery pack while the Eee PC is turned ON as this may result in the loss of working data Remember to fully charge the battery before first use and whenever it is depleted to prolong battery...

Page 23: ...and some basic information Follow the wizard instructions to finish the initialization 2 Select you system settings by specifying the region you are in the time zone you are in and the keyboard type you use Click Next to continue 1 Select the language you use Click Next to continue 4 Set a password for your user account if you want Click Next to continue 3 Type your user account name and your comp...

Page 24: ...continue 6 Click Use recommended settings to get the latest important updates 5 Read the end user license agreement and check the two boxs before I accept the license terms Click Next to continue 8 Connect to a wireless network and click Next to continue or click Skip to set up the wireless connection later ...

Page 25: ...unch the corresponding applications and enter the specified folders Some applications would form minimized icons in the Notification area The actual Desktop screen may vary according to different models 9 Select the network s location Click Next to continue 10 The initialization is finished ...

Page 26: ... the Notification area 2 Select the wireless access point you want to connect to from the list and click Connect to build the connection If you cannot find the desired access point click the Refresh icon on the upper right corner to refresh and search in the list again If the wireless network icon with an orange star does not show in the Notification area activate the wireless LAN function by pres...

Page 27: ...low Using a dynamic IP PPPoE network connection 1 Click the network icon with a yellow warning triangle in the Windows Notification area and select Open Network and Sharing Center 2 Click Change adapter settings in the left blue pane 3 Right click Local Area Connection and select Properties ...

Page 28: ...net Protocol Version 4 TCP IPv4 and click Properties 5 Click Obtain an IP address automatically and click OK 6 Return to the Network and Sharing Center and then click Set up a new connection or network Continue the following steps if using PPPoE ...

Page 29: ... and click Next 9 Enter your User name and Password and Connection name Click Connect 10 Click Close to finish the configuration 11 Click the network icon in the taskbar and click the connection you just created 12 Enter your user name and password Click Connect to connect to the Internet ...

Page 30: ...ice of your Eee PC Contact your Internet Service Provider ISP if you have problems connecting to the network Using a static IP 1 Repeat the step 1 4 of Using a dynamic IP to start the static IP network configuration 2 Click Use the following IP address 3 Enter the IP address Subnet mask and Gateway from your service provider 4 If needed enter the preferred DNS Server address and alternative addres...

Page 31: ...ASUS Update Bluetooth Connection Super Hybrid Engine Eee Docking Boingo Microsoft Office Trial 3 Chapter 3 Using the Eee PC ...

Page 32: ...irectly from the Internet and View the BIOS version information This utility is pre loaded in your Eee PC ASUS Update requires an Internet connection either through a network or an Internet Service Provider ISP Updating the BIOS through the Internet To update the BIOS through the Internet 1 Launch the ASUS Update utility from the Windows desktop by clicking Start All Programs ASUS ASUSUpdate for E...

Page 33: ...pen 4 Follow the screen instructions to complete the update process The ASUS Update utility is capable of updating itself through the Internet Always update the utility to avail all its features Updating the BIOS through a BIOS file To update the BIOS through a BIOS file 1 Launch the ASUS Update utility from the Windows desktop by clicking Start Programs ASUS ASUSUpdate for EeePC ASUSUpdate The AS...

Page 34: ...nnecting Bluetooth enabled devices Examples of Bluetooth enabled devices may be Notebook PCs Desktop PCs mobile phones and PDAs To connect to a Bluetooth enabled device 1 Press Fn F2 repeatedly until Bluetooth ON or WLAN Bluetooth ON is shown 2 From Control Panel go to Network and Internet Network and Sharing Center and then click Change adapter settings in the left blue pane 3 Right click Bluetoo...

Page 35: ...o look for new devices 5 Select a Bluetooth enabled device from the list and click Next 6 Enter the Bluetooth security code into your device and start pairing 7 The paired relationship is successfully built Click Close to finish the setting ...

Page 36: ...ed mode is shown on the display To change the power mode Press Fn Space Bar repeatedly to switch power modes Right click the Super Hybrid Engine icon in the Notification area and select a preferred power mode Super Hybrid Engine Modes Auto High Performance and Auto Power Saving mode are available only when applying or removing the power adapter If your external monitor functions abnormally in Powe...

Page 37: ...applications in Eee Docking may vary depending on models The names of the applications in Eee Docking are subject to change without notice Sharing Syncables Desktop DE on selected models This application offers you an easy way to organize or migrate your data in applications such as emails brower s My Favorite instant messenger s chat history between your Eee PC and other notebook PCs desktops E C...

Page 38: ...ee PC screen Docking Setting Docking Setting allows you to configure the appearance and the position of the Eee Docking tool bar PowerRecover on selected models You are able to back up your system partition to the local hard disk drive in your Eee PC or to a USB hard disk so that you could easily restore your Eee PC while any hardware or OS problem occurs Boingo on selected models Boingo gives you...

Page 39: ...Eee PC is connected to the Internet and double click Microsoft Office 60 Day Trial Online on the desktop 2 Click TRY NOW 3 Enter your E mail address and click SUBMIT 4 Copy your product key and click the link 5 Enter your product key and follow the onscreen instructions to finish the activation process before starting the free trial If you want to use other applications in the Microsoft Office Sui...

Page 40: ...Chapter 3 Using the Eee PC 3 10 ...

Page 41: ...System Recovery Boot Booster 4 Chapter 4 System Recovery ...

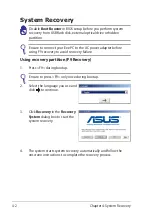
Page 42: ...power adapter before using F9 recovery to avoid recovery failure Using recovery partition F9 Recovery 1 Press F9 during bootup Ensure to press F9 only once during bootup 2 Select the language you use and click to continue 3 Click Recovery in the Recovery System dialog box to start the system recovery 4 The system starts system recovery automatically and follow the onscreen instructions to complete...

Page 43: ...evice for system recovery backup to your Eee PC 3 Select a desired USB storage device if more than one USB storage device is connected to your Eee PC and click Continue 4 All the data on the selected USB storage device will be cleared Click Continue to start the backup or click Back to backup your important data Back up the recovery files 1 Repeat the step 1 2 in the previous section You will lose...

Page 44: ...vice HDD SM ASUS PHISON SSD USB XXXXXXXX 5 Select a partition option and click Continue Partition options Recover system to a partition This option deletes all data on the system partition C and keeps the partition D unchanged Recover system to entire HD This option deletes all partitions from your hard disk drive and creates a new system partition as drive C and a data partition as drive D 6 Foll...

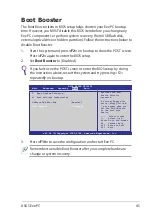
Page 45: ...egatrends Inc BIOS SETUP UTILITY Main Advanced Security Boot Exit Boot Device Priority Boot Settings Configuration OnBoard LAN Boot ROM Enabled Boot Booster Disabled Select Screen Select Item Enter Go to Sub Screen F1 General Help F10 Save and Exit ESC Exit Specifies the Boot Device Priority sequence A virtual floppy disk drive Floppy Drive B may appear when you set the CD ROM drive as the first b...

Page 46: ...Chapter 4 System Recovery 4 6 ...

Page 47: ...Declarations and Safety Statements Copyright Information Limitation of Liability Service and Support A Appendix ...

Page 48: ...is no guarantee that interference will not occur in a particular installation If this equipment does cause harmful interference to radio or television reception which can be determined by turning the equipment off and on the user is encouraged to try to correct the interference by one or more of the following measures Reorient or relocate the receiving antenna Increase the separation between the e...

Page 49: ...o Channels 1 through 11 in the 2 4GHz frequency by specified firmware controlled in the USA This equipment complies with FCC radiation exposure limits set forth for an uncontrolled environment To maintain compliance with FCC RF exposure compliance requirements please avoid direct contact to the transmitting antenna during transmitting End users must follow the specific operating instructions for s...

Page 50: ...lies with IC radiation exposure limits set forth for an uncontrolled environment To maintain compliance with IC RF exposure compliance requirements please avoid direct contact to the transmitting antenna during transmitting End users must follow the specific operating instructions for satisfying RF exposure compliance Operation is subject to the following two conditions This device may not cause i...

Page 51: ...0 802 11n 20M 0 038 0 038 802 11n 40M 0 039 0 038 This device and its antenna s must not be co located or operating in conjunction with any other antenna or transmitter Country Code selection feature to be disabled for products marketed to the US CANADA This Class B digital apparatus complies with Canadian ICES 003 Cet appareil numérique de la classe B est conforme à la norme NMB 003 du Canada ...

Page 52: ...EC directives 2004 108 EC Electromagnetic compatibility and 2006 95 EC Low voltage directive CE marking for devices with wireless LAN Bluetooth This equipment complies with the requirements of Directive 1999 5 EC of the European Parliament and Commission from 9 March 1999 governing Radio and Telecommunications Equipment and mutual recognition of conformity ...

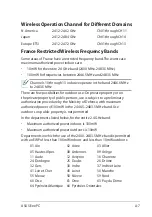
Page 53: ...te property of public persons use is subject to a preliminary authorization procedure by the Ministry of Defense with maximum authorized power of 100mW in the 2446 5 2483 5 MHz band Use outdoors on public property is not permitted In the departments listed below for the entire 2 4 GHz band Maximum authorized power indoors is 100mW Maximum authorized power outdoors is 10mW Departments in which the ...

Page 54: ...ed to be electrically connected to a telecommunication network that has an operating voltage to ground that does not exceed 200V peak 300V peak to peak and 105V rms and installed or used in accordance with the National Electrical Code NFPA 70 When using the Eee PC modem basic safety precautions should always be followed to reduce the risk of fire electric shock and injury to persons including the ...

Page 55: ... disposal instructions to reduce the risk of injury to persons due to fire or explosion Do not use power adapters or batteries from other devices to reduce the risk of injury to persons due to fire or explosion Use only UL certified power adapters or batteries supplied by the manufacturer or authorized retailers Power Safety Requirement Products with electrical current ratings up to 6A and weighin...

Page 56: ...english Compliance htm for information disclosure based on regulation requirements ASUS is complied with Japan JIS C 0950 Material Declarations EU REACH SVHC Korea RoHS Swiss Energy Laws Takeback Services ASUS recycling and takeback programs come from our commitment to the highest standards for protecting our environment We believe in providing solutions for our customers to be able to responsibly...

Page 57: ...ustausch der Batterie Ersatz nur durch denselben oder einem vom Hersteller empfohlenem ähnlichen Typ Entsorgung gebrauchter Batterien nach Angaben des Herstellers German ADVARSELI Lithiumbatteri Eksplosionsfare ved fejlagtig håndtering Udskiftning må kun ske med batteri af samme fabrikat og type Levér det brugte batteri tilbage til leverandøren Danish VARNING Explosionsfara vid felaktigt batteriby...

Page 58: ...gées conformément aux instructions du fabricant French ADVARSEL Eksplosjonsfare ved feilaktig skifte av batteri Benytt samme batteritype eller en tilsvarende type anbefalt av apparatfabrikanten Brukte batterier kasseres i henhold til fabrikantens instruksjoner Norwegian Japanese ВНИМАНИЕ При замене аккумулятора на аккумулятор иного типа возможно его возгорание Утилизируйте аккумулятор в соответств...

Page 59: ...NTIAL DAMAGES INCLUDING DAMAGES FOR LOSS OF PROFITS LOSS OF BUSINESS LOSS OF USE OR DATA INTERRUPTION OF BUSINESS AND THE LIKE EVEN IF ASUS HAS BEEN ADVISED OF THE POSSIBILITY OF SUCH DAMAGES ARISING FROM ANY DEFECT OR ERROR IN THIS MANUAL OR PRODUCT Products and corporate names appearing in this manual may or may not be registered trademarks or copyrights of their respective companies and are use...

Page 60: ...tract price of each product ASUS will only be responsible for or indemnify you for loss damages or claims based in contract tort or infringement under this Warranty Statement This limit also applies to ASUS suppliers and its reseller It is the maximum for which ASUS its suppliers and your reseller are collectively responsible UNDER NO CIRCUMSTANCES IS ASUS LIABLE FOR ANY OF THE FOLLOWING 1 THIRD P...

Page 61: ...ASUS Eee PC A 15 ...

Page 62: ...acturer ASUSTek COMPUTER INC Address City No 150 LI TE RD PEITOU TAIPEI 112 TAIWAN R O C Country TAIWAN Authorized Representative in Europe ASUS COMPUTER GmbH Address City HARKORT STR 21 23 40880 RATINGEN Country GERMANY ...

Reviews: