background image

NOTEBOOK PC

DRIVERS & UTILITIES

INSTALLATION & USER’S GUIDE

(WINDOWS 98)

Summary of Contents for L7

Page 1: ...NOTEBOOK PC DRIVERS UTILITIES INSTALLATION USER S GUIDE WINDOWS 98 ...

Page 2: ...L OR PRODUCT Products and corporate names appearing in this manual may or may not be registered trademarks or copyrights of their respective companies and are used only for identification or explanation and to the owners benefit without intent to infringe Windows and MS DOS are registered trademarks of Microsoft Corporation Adobe and Acrobat are registered trademarks of Adobe Systems Incorporated ...

Page 3: ...ew Operating System 7 Microsoft Windows 98 7 Support CD for Windows 98 8 YAMAHA Audio 9 YAMAHA Software optional 11 VGA Driver 13 Setting the Display 15 Control Panel 17 Lynx Display Properties 18 TouchPad 19 Fast IR Driver 21 PC cillin 23 Other Support CD Options 24 Alps Mouse Utility 25 ...

Page 4: ... floppy diskette type FORMATA S from the DOS prompt or useWindow s format from My Computer and check Copy system files You must copy FDISK EXE and other DOS utilities from the C WINDOWS COMMAND directory of Windows 95 or 98 Do not include AUTOEXEC BAT or CONFIG SYS system files on the boot disk because some utilities cannot be used with memory managers usually loaded through the AUTOEXEC BAT and C...

Page 5: ...ve is new and has never been formatted or used remember the ability to format a hard disk drive means that there is at least one partition You do not need to use this utility after formatting a hard disk drive Be careful not to remove existing partitions that you may need you will not be able to recover it 1 Boot from a system diskette with the FDISK EXE utility 2 Type FDISK from the A prompt then...

Page 6: ...image e g ls 0103a files If downloading from the internet you will have to UNZIP the files to the diskette 2 Type phlash mode 3 ls 0103a use the name of your new BIOS image file and press ENTER 3 The PHLASH utility will automatically update the BIOS When the BIOS has been successfully programmed you will be asked to press any key to restart the system If the system does not restart power OFF the N...

Page 7: ...figuration changes are necessary please refer to the documentation provided with the Windows 98 operating system Once Windows 98 is running you should use the Windows 98 CD ROM device driver instead of the DOS real mode CD ROM driver ADOS driver has poor performance poor memory management and may cause conflicts with other devices Removing the DOS real mode CD ROM driver Removing the device line o...

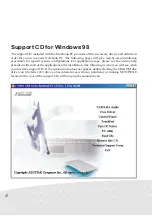
Page 8: ...r typical system configurations For application usage please see the on line help provided with each of the applications after installation The following is what you will see when you insert the support CD If the autorun menu does not appear double clicking the CD ROM disc drive icon the letter E drive on hard disk drives with two partitions or running SETUP EXE located in the root of the support ...

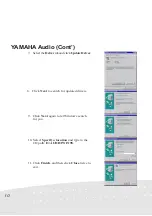
Page 9: ...dio You may skip this software if your audio drivers were pre configured at the time of purchase Installation Procedure 1 Insert the support CD You may exit the autorun screen 2 Right click on My Computer icon and choose Properties 3 Click the Device Manager tab 4 Under Sound video and game control lers select Gameport Joystick Click the plus sign or double click a component heading to expand the ...

Page 10: ...teDriver YAMAHA Audio Cont 11 Click Finish and then click Close twice to exit 10 Select Specify a location and type in the CD path E AUDIO WIN98 9 Click Next again to let Windows search for you 8 Click Next to search for updated drivers ...

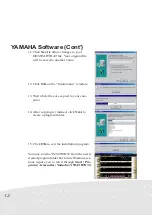
Page 11: ...sert the support CD 2 Click Browse this CD from the autorun menu 3 Double click the Audio and the Appli folders 4 Double click SETUP EXE in the Appli folder 5 Click Next on the Welcome screen 6 Click Typical on the Setup Options screen 7 Click Next or Browse to change the destination directory on the Choose Destination Location screen 9 Click Next to allow changes to your AUTOEXE BAT file Your ori...

Page 12: ...TATION32 from the newly created program folder but future Windows ses sions require you to run it through Start Pro grams Accessories Yamaha YSTATION32 15 Click OK to exit the installation program 14 After copying is finished click Next to create a program folder 12 Click OK on the Information window 13 Wait while files are copied to your com puter ...

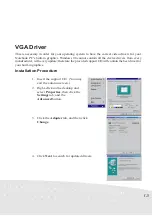
Page 13: ...der for your operating system to have the correct video drivers for your Notebook PC s built in graphics Windows 98 cannot contain all the device drivers from every manufacturer with every update therefore the provided support CD will contain the best driver for your built in graphics Installation Procedure 3 Click the Adapter tab and then click Change 4 Click Next to search for updated drivers ...

Page 14: ...n the CD path E VGA WIN98 5 Click Next again to let Windows search for you 7 Click Next when you see Windows driver file search for the device 8 You may be asked for the location of the driver again 9 Enter the location of the driver in the support CD E VGA WIN98 and then click OK VGA Driver Cont ...

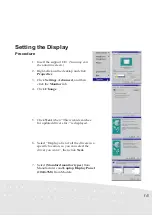
Page 15: ...he Monitor tab 4 Click Change Setting the Display Procedure 5 Click Next when This wizard searches for updated drivers for is displayed 6 Select Display a list of all the drivers in a specific location so you can select the driver you want then click Next 7 Select Standard monitor types from Manufacturers and Laptop Display Panel 1024x768 from Models ...

Page 16: ...s and click OK 10 Click OK if the Refresh Rate window appear and Yes to keep the setting 11 Do not restart your computer yet Click Apply and OK to return to Display Properties 9 Click Finish when Windows finds Silicon Motion Lynx 13 Click OK to resize your desktop and Yes to keep the setting You should restart your computer after all the display settings are configured ...

Page 17: ...rt CD 2 Click Control Panel on the support CD 3 Click Next on the Welcome screen Windows Task Bar 5 Click Finish when you see the Setup Complete notice 6 If you restart Windows an SMI icon will appear on the task bar each time Windows starts You may also run the Control Program manually through Start Programs Silicon Motion Control Programs 4 Click Next to accept the default program folder or choo...

Page 18: ...lows you to si multaneously display one appliation on the Note book PC and another application on an external monitor DualView Allowsyoutosimultaneouslyviewyour Notebook PC display and a portion of your screen up to the entire screen for display on an external monitor Lynx Tab Turns external display ON or OFF not used not used Turns Dual View ON or OFF See Edit Hot Keys Turns Notebook PC display p...

Page 19: ...e touchpad when working with some applications For detailed information on these enhancements please see theAlps Mouse Utility section later in this manual Installation Procedure 1 Insert the support CD You may exit the autorun screen 2 Right click on the My Computer icon and choose Properties 3 Click the Device Manager tab 4 Under Mouse double click the current device Click the plus sign or doubl...

Page 20: ...Click Next to search for updated drivers TouchPad Cont 8 Select Specify a location if necessary and type in the CD path E TOUCHPAD WIN98 9 Click Next when you see Windows driver file search for the device 10 Click Finish and then click Close twice to exit ...

Page 21: ...nfrared Controller Click the plus sign or double click a component heading to expand the component items 3 Click the Driver tab then double click Update Driver 4 Click Next select Display a list of all the drivers in a specific location so you can select the driver you want 5 Click Browse then specify the Infrared driver from your Driver Utility Support CD at E FIR WIN98 6 Click Next insert your W...

Page 22: ...nfrared Control ler PIO and click the Advanced tab 12 Change the Infrared Transceiver Value to IBM then click OK twice 13 Click Yes to restart your computer To use the the infrared port for wire less communication right click the in frared icon on the task bar and place check marks beside each option to en able the infrared port ...

Page 23: ...Follow the procedure below to install this software and use the on line help if you have any questions You may skip this software if you have your own anti virus software Installation Procedure 5 Click Next or choose another destination directory on the Choose Destination Location screen 4 Type in your name and company op tional and then click Next on the Regis tration screen 2 Click Next on the W...

Page 24: ...w the technical support form which is required when asking for technical support Exit Closes the autorun menu 8 Click Finish on the Setup Complete screen to exit the installation program 7 Click Start to create a Bootable Emergency Clean Disk Otherwise click Skip on the Create Emergency Clean Disk screen 6 Click Next for Express Install on the Choose Setup Type screen PC cillin Cont ...

Page 25: ...rom the autorun by clicking TouchPad Alps is a pointing device driver and utility for Windows systems that can be used on the Notebook PC TheAlps Mouse Utility can be used with the built inTouchpad point ing device as well as any externally connected PS 2 pointing devices USER S MANUAL ...

Page 26: ...9 Double Click Speed 29 Use Wheel Function 29 Options 29 Options Cont 30 Scroll Speed 30 Scroll Area 30 Tray Icon 30 Mouse Compatibility Mode 30 Motion 31 Acceleration 31 Speed 31 Pointer Trail 32 Orientation 32 Orientation Settings 32 Auto Jumps 33 Tapping 34 Tapping 35 Tapping Speed 35 Drag Lock Settings 35 Typing 35 ...

Page 27: ...nd Feedback 37 Easy Launcher 38 Application button s 38 Easy Launcher Properties 39 Shortcut List 39 New 39 Delete 39 Change 39 Up Down 40 Option 40 General controls 43 OK 43 Cancel 43 Apply 43 Default 43 Version Information 43 Frequently Asked Questions FAQ 44 Contents Cont ...

Page 28: ...Use this feature to adjust the button settings A preset function can be assigned to each button The picture of the device varies according to the device which the driver detects The third picture is for Both Buttons on your Notebook PC Touchpad or a two button mouse the Central Button for the middle button on a 3 button mouse and the Wheel Button for a mouse with a wheel NOTE The Internal Pointing...

Page 29: ... is registered the dolphin jumps through the hoop Use Wheel Function Check this if you want to use the wheel feature This check box is displayed only when a wheel mouse is used on your Notebook PC in place of your Touchpad NOTE The Internal Pointing Device in theAdvanced Menu of the BIOS Setup Utility must be set to Disabled to allow detection of a wheel mouse by the Mouse Utility If left Enabled ...

Page 30: ... the BIOS Setup Utility must be set to Disabled to allow detection of a wheel mouse by the Mouse Utility If left Enabled the Note book PC will treat all externally connected pointing devices as a standard 2 or 3 button mouse Tray Icon Check this to display the tray icon on the task bar Part of this Tray icon will change color when you touch the scrolling area Also you can display a menu by right c...

Page 31: ...vity defines how Windows scales the distance moved by the mouse and the distance moved on the screen Low Sensitivity settings can enable the user to position the cursor more precisely setting a high sensitivity results in a broader cursor coverage on the screen with relatively small movements of the pointing device The check box enables the user to lock or unlock the horizontal and vertical sensit...

Page 32: ...rs trailing the main cursor Orientation Motion Cont Use this feature to adjust the rotation of the mouse pointer Orientation Settings This feature is beneficial when the user finds it more efficient to hold or place the pointing device at an angle Click the Set Rotation button when the message Move the dolphin to the surface to set the orientation appears move the pointing device in the direction ...

Page 33: ... Jumps moves the cursor to a specified area of a window every time one is opened There are currently three different positions that the cursor can jump to with this function 1 Default Button 2 Control Menu Box top right hand corner of the Window 3 Center of the Window Motion Cont ...

Page 34: ...t the cursor remains in it s current location The dialog bitmap to the right of the check boxes show the location of the current auto Jumps and their associated priorities one being the highest three being the lowest NOTE This feature only moves a cursor to specific position it does not make click event This feature may not work on some application Tapping Use this feature to adjust the tap settin...

Page 35: ...ion that keeps the state of dragging even if the finger is separated from the operation side after drags by the Tapping When the drag lock function is used the drag lock check box is turned on NOTE When the drag lock check box is disabled the Auto Release cannot be set Auto Release The Drag Lock will release the cursor after a specified period of time which starts when the user raises his or her f...

Page 36: ... Function Check this if you want to use the scrolling function When this feature is enabled you can scroll by sliding your finger on the edge of Touchpad instead of moving the cursor onto the scroll bar Also you can use Zoom and Data Zoom by pressing the Ctrl key or Shift key while sliding you finger on the Touchpad Option Opens Options dialog box In this dialog you can change scrolling parameter ...

Page 37: ... the Sound Feedback settings by using Sound property sheet Events The operation to which the sound is allocated is displayed The speaker is displayed to show that the sound is set Name The sound set in the operation is displayed Click the down arrow on the name cell to see a list of the allocated sounds Browse It is possible to refer to the sound of an arbitrary folder It is possible to refer to o...

Page 38: ...rs click this button the currently activated window is minimized Close button When users click this button the currently activated window is closed Start button When users click this button the Windows start menu is displayed on the task bar Close Easy Launcher button When users click this button the Easy Launcher is closed NOTE The Easy Launcher can also be closed by clicking the close window but...

Page 39: ... cut list from desktop and the Explorer New The application program is added to the Easy Launcher Delete The application program is deleted from the Easy Launcher Change The Change Shortcut for Easy Launcher dialog box is opened and setting the application program can be changed Easy Launcher Cont Easy Launcher Properties Use this feature to adjust the Easy Launcher set tings ...

Page 40: ...indow location of the Easy Launcher is selected from Display center Pointer position or Previous position Icon button size The icon size of the Easy Launcher is selected from Standard buttons Small buttons or Large buttons Enable Auto close The Easy Launcher window is automatically closed after a fixed time when this check box is turned on Show Title Bar The display non display of the title bar is...

Page 41: ...t the need of starting the Paint Brush or similar application To start Easy Capture set the Easy Launcher to Left or Right Corner Assignment then tap the corner If 3 button mode is set it is also possible to start with one of the mouse buttons Starting Easy Capture will open an Easy Capture window which is described below With this window you can draw a picture or character and then paste them int...

Page 42: ...ize to be used in Easy Capture Large Medium and Small Width Pen Style Select the width of the line to be used from the list Color Pen Style Select the line color to be used from the list Option The Option for Easy Capture dialog box opens when this button is clicked In the option dialog box the Application Paste Key and the Preserve Previous Picture is set When Easy Capture cannot paste to the app...

Page 43: ...you have made Apply Click theApply button to save the changes which you have made without closing the Mouse Prop erties Default Click the Default button to return the current settings to the initial default values Version Information You can find version of Alps Pointing Device Driver files To display the About dialog box click ALPS logo on any Mouse Properties sheet to see About Alps Pointing dev...

Page 44: ...iles Q2 How do I use Tapping A2 Open Tapping property page and then select the Tapping check box Q3 I cannot see the Alps Pointing Device Driver Properties A3 Restart your Notebook PC If you connected an external PS 2 mouse disconnect it from your Notebook PC Q4 I cannot popup the Easy Launcher and the Easy Capture A4 If an external mouse is connected disconnect it Please confirm whether the Easy ...

Reviews: