3-38
Chapter 3: BIOS setup
Chapter 3
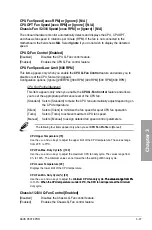
Chassis 1/2/3/4 Fan Speed Low Limit [600 RPM]
This item appears only when you enable the
Chassis 1/2/3/4 Q-Fan Control
feature and
allows you to disable or set the chassis fan warning speed.
Configuration options: [Ignore] [200 RPM] [300 RPM] [400 RPM] [500 RPM] [600 RPM]
Chassis 1/2/3/4 Fan Profile [Standard]
This item appears only when you enable the
Chassis Q-Fan Control
feature and
allows you to set the appropriate performance level of the chassis fan.
[Standard] Sets to [Standard] to make the chassis fan automatically adjust depending
on the chassis temperature.
[Silent]
Sets to [Silent] to minimize the fan speed for quiet chassis fan operation.
[Turbo]
Sets to [Turbo] to achieve maximum chassis fan speed.
[Manual] Sets to [Manual] to assign detailed fan speed control parameters.
The following four items appear only when you set
Chassis 1/2/3/4 Fan Profile
to
[Manual].
Chassis 1/2/3/4 Upper Temperature [70]
Use the <+> and <-> keys to adjust the upper limit of the CPU temperature. The values range
from 40�C to 90�C.
Chassis 1/2/3/4 Fan Max. Duty Cycle(%) [100]
Use the <+> and <-> keys to adjust the maximum chassis fan duty cycle. The values range from
60% to 100%. The minimum value can not lower than the setting of Min duty cycle.
Chassis 1/2/3/4 Lower Temperature [40]
Displays the lower limit of the chassis temperature.
Chassis 1/2/3/4 Fan Min. Duty Cycle(%) [60]
Use the <+> and <-> keys to adjust the minimum chassis fan duty cycle. The values range from
60% to 100%. When the chassis temperature is under 40�C, the chassis fan will operate at the
minimum duty cycle.
CPU Voltage, 3.3V Voltage, 5V Voltage, 12V Voltage
The onboard hardware monitor automatically detects the voltage output through the onboard
voltage regulators. Select
Ignore
if you do not want to detect this item.
Anti Surge Support [Enabled]
This item allows you to enable or disable the Anti Surge function.
Configuration options: [Disabled] [Enabled]
Summary of Contents for P9X79 PRO
Page 1: ...Motherboard P9X79 PRO ...
Page 20: ...1 8 Chapter 1 Product Introduction Chapter 1 ...
Page 58: ...2 38 Chapter 2 Hardware information Chapter 2 9 7 8 5 6 Triangle mark B A B A ...
Page 63: ...ASUS P9X79 PRO 2 43 Chapter 2 2 3 6 ATX Power connection 2 OR OR 1 ...
Page 64: ...2 44 Chapter 2 Hardware information Chapter 2 2 3 7 SATA device connection OR 2 OR 1 ...
Page 158: ...4 34 Chapter 4 Software support Chapter 4 ...
Page 166: ...5 8 Chapter 5 Multiple GPU technology support Chapter 5 ...

