4-8
Chapter 4: Software support
Chapter 4
4.3.3
DIGI+ Power Control
DIGI+ Power Control allows you to adjust VRM voltage and frequency modulation to enhance
reliability and stability. It also provides the highest power efficiency, generating less heat to
longer component lifespan and minimize power loss.
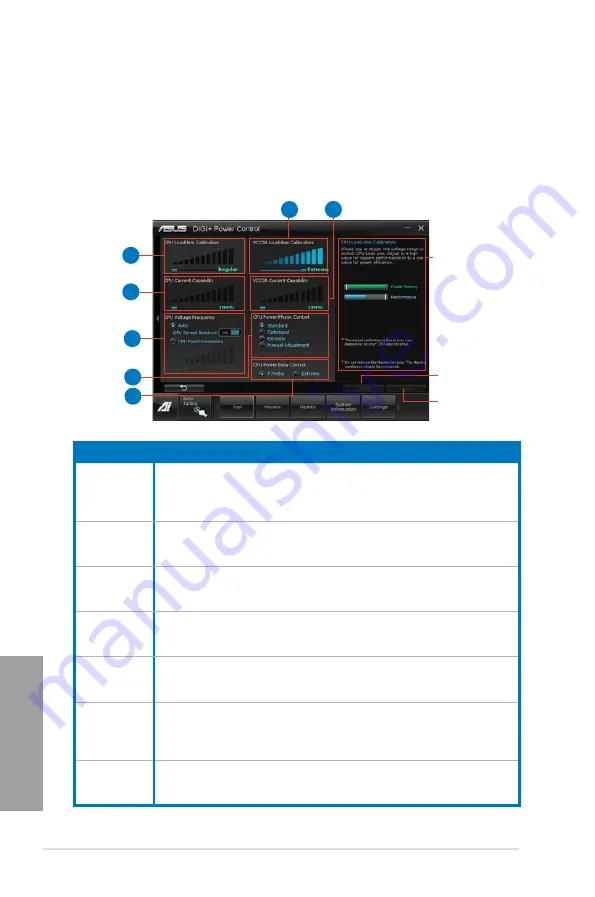
After installing AI Suite II from the motherboard support DVD, launch DIGI+ Power Control
by clicking
Tool > DIGI+ Power Control
on the AI Suite II main menu bar.
Select
CPU Power
or
DRAM Power
to adjust the power control settings.
Function no.
Function description
1
CPU Load-line Calibration
It allows you to adjust the voltage settings and control the system temperature.
Higher load-line calibration could get higher voltage and good overclocking
performance but increases the CPU and VRM thermal.
2
CPU Current Capability
CPU Current Capability provides wider total power range for overclocking. A higher
value setting gets higher VRM power consumption delivery.
3
CPU Voltage Frequency
Switching frequency will affect the VRM transient response and component thermal.
Higher frequency gets quicker transient response.
4
VCCSA Load-line Calibration
The behavior of the DRAM Controller is decided by the VCCSA Load-line. Set to a
higher value for system performance, or to a lower value for better thermal solution.
5
VCCSA Current Capability
A higher value brings wider total DRAM Controller power range and extends the
overclocking frequency range simultaneously.
6
CPU Power Phase Control
Increase phase number under heavy system loading to get more transient and
better thermal performance. Reduce phase number under light system loading to
increase VRM efficiency.
7
CPU Power Duty Control
CPU Power Duty Control adjusts the current of every VRM phase and the thermal of
every phase component.
Application aids
Apply all changes
immediately
Undo all changes
without applying
1
CPU Power
2
3
6
7
4
5
Summary of Contents for P9X79 PRO
Page 1: ...Motherboard P9X79 PRO ...
Page 20: ...1 8 Chapter 1 Product Introduction Chapter 1 ...
Page 58: ...2 38 Chapter 2 Hardware information Chapter 2 9 7 8 5 6 Triangle mark B A B A ...
Page 63: ...ASUS P9X79 PRO 2 43 Chapter 2 2 3 6 ATX Power connection 2 OR OR 1 ...
Page 64: ...2 44 Chapter 2 Hardware information Chapter 2 2 3 7 SATA device connection OR 2 OR 1 ...
Page 158: ...4 34 Chapter 4 Software support Chapter 4 ...
Page 166: ...5 8 Chapter 5 Multiple GPU technology support Chapter 5 ...


