background image

3-6

Chapter 3: OSD (On-Screen Display) menu 

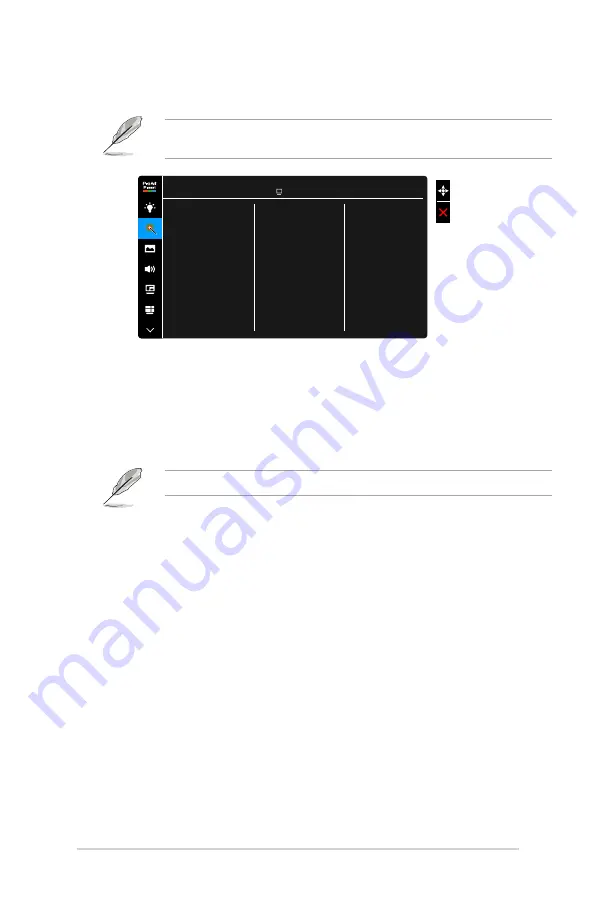
3.  ProArt Palette 

Set a desired color setting from this menu. 

To activate this function, you need to do the following: turn off Ambient Effect 

and disable HDR on your device.

Brightness

Contrast

Saturation

Hue

Color Temp.

Gamma

Color

Black Level

Color Reset


ProArt Palette

 ASUS PA32UCR

Standard Mode  DisplayPort  3840 x 2160@   60Hz

• 

Brightness

: The adjusting range is from 0 to 100.

• 

Contrast

: The adjusting range is from 0 to 100. 

• 

Saturation

: The adjusting range is from 0 to 100. 

• 

Hue

: Shifts the image color between green and purple.

• 

Color Temp.

: Contains 5 modes including 9300K, 6500K, 5500K, 5000K 

and P3-Theater.

P3-Theater is only available when DCI-P3 mode is selected.

• 

Gamma

: Allows you to set the color mode to 2.6, 2.4, 2.2, 2.0 or 1.8.

• 

Color

Six-axis Hue adjustment. 

Six-axis Saturation adjustment. 

Adjusts the gain levels for R, G, B.

Adjusts the black level offset values for R, G, B.

• 

Black Level

: The darkest level of display.

Signal: To adjust the initialized 1st signal level of darkest gray 

level.

Backlight: To adjust the darkness of backlight.

• 

Color Reset

Current mode color reset: 

Resets the color settings of current color mode to the factory 

default value.

Summary of Contents for PA32UCR Series

Page 1: ...PA32UCR Series LCD Monitor User Guide ...

Page 2: ...ANTABILITY OR FITNESS FOR A PARTICULAR PURPOSE IN NO EVENT SHALL ASUS ITS DIRECTORS OFFICERS EMPLOYEES OR AGENTS BE LIABLE FOR ANY INDIRECT SPECIAL INCIDENTAL OR CONSEQUENTIAL DAMAGES INCLUDING DAMAGES FOR LOSS OF PROFITS LOSS OF BUSINESS LOSS OF USE OR DATA INTERRUPTION OF BUSINESS AND THE LIKE EVEN IF ASUS HAS BEEN ADVISED OF THE POSSIBILITY OF SUCH DAMAGES ARISING FROM ANY DEFECT OR ERROR IN TH...

Page 3: ...view 1 3 1 3 3 Other Function s 1 4 Chapter 2 Setup 2 1 Attaching the arm base 2 1 2 2 Detaching the arm base for VESA wall mount 2 1 2 3 Adjusting the monitor 2 2 2 4 Connecting the cables 2 4 2 5 Turning on the monitor 2 5 Chapter 3 General instructions 3 1 OSD On Screen Display menu 3 1 3 1 1 How to reconfigure 3 1 3 1 2 OSD function introduction 3 2 3 2 Specifications summary 3 13 3 3 Outline ...

Page 4: ...ference to radio communications However there is no guarantee that interference will not occur in a particular installation If this equipment does cause harmful interference to radio or television reception which can be determined by turning the equipment off and on the user is encouraged to try to correct the interference by one or more of the following measures Reorient or relocate the receiving...

Page 5: ...for detail information on power management and its benefits to the environment In addition please visit http www energystar gov for detail information on the ENERGY STAR joint program NOTE Energy Star is NOT supported on FreeDOS and Linux based operating system Canadian Department of Communications Statement This digital apparatus does not exceed the Class B limits for radio noise emissions from d...

Page 6: ...ies with your local power standard Do not overload power strips and extention cords Overloading can result in fire or electric shock Avoid dust humidity and temperature extremes Do not place the monitor in any area where it may become wet Place the monitor on a stable surface Unplug the unit during a lightning storm or if it will not be used for a long period of time This will protect the monitor ...

Page 7: ...the monitor and cause an electric shock The following symptoms are normal with the monitor You may find slightly uneven brightness on the screen depending on the desktop pattern you use When the same image is displayed for hours an afterimage of the previous screen may remain after switching the image The screen will recover slowly or you can turn off the Power Switch for hours When the screen bec...

Page 8: ...tation that may have been added by your dealer These documents are not part of the standard package Takeback Services ASUS recycling and takeback programs come from our commitment to the highest standards for protecting our environment We believe in providing solutions for our customers to be able to responsibly recycle our products batteries and other components as well as the packaging materials...

Page 9: ...an enjoy the convenience and delightful visual experience that the monitor brings to you 1 2 Package contents Check your package for the following items LCD monitor Monitor base Quick start guide Warranty card Power cord HDMI cable optional USB Type C cable DisplayPort cable optional Color Calibration Testing Report Input Output port cover ProArt welcome card Color Calibrator for PA32UCR K only If...

Page 10: ... Close button Exits the OSD menu Toggles the Key Lock function between on and off with a long press for 5 seconds 3 Input select button Selects an available input source Press button Input Select button to display HDMI 1 HDMI 2 HDMI 3 DisplayPort USB Type C signals after you connect HDMI DisplayPort USB Type C cable with the monitor 4 QuickFit Plus button This is a hotkey to open the QuickFit Plus...

Page 11: ...r connection with a DisplayPort compatible device The default setting of DisplayPort Stream in the OSD menu is DisplayPort 1 2 You can change it to DisplayPort 1 1 when your device output signal is DisplayPort 1 1 5 USB 2 0 Type A This port is for service only 6 USB 3 2 Gen1 Type C supports DP Alt mode This port is for connection with a DisplayPort USB Type C compatible device This port is also fo...

Page 12: ...th USB devices such as USB keyboard mouse USB flash drive etc Port with icon is BC1 2 compliant 5V 1 5A 9 Earphone jack 10 Kensington lock slot 1 3 3 Other Function s 1 HDR The monitor supports HDR format When detecting HDR content an HDR ON message will pop up and display in the Information page HDR content is not supported when PIP PBP mode is on ...

Page 13: ...that you cover the table surface with soft cloth to prevent damage to the monitor 2 2 Detaching the arm base for VESA wall mount The detachable arm base of this monitor is specially designed for VESA wall mount To detach the arm base 1 Have the front of the monitor face down on a table 2 Remove the input output port cover Figure 1 3 Press the release button and then detach the arm base from the mo...

Page 14: ...ng we recommend that you look at the full face of the monitor then adjust the monitor to the angle that is most comfortable for you Hold the stand to prevent the monitor from falling when you change its angle You can adjust the monitor s angle from 23 to 5 and it allows 30 swivel adjustment from either left or right You can also adjust the monitor s height within 130 mm 30 0 30 130mm 23 5 Tilt Swi...

Page 15: ...or to its maximum angle 3 Pivot the monitor to the angle you need 23 5 It is normal that the monitor slightly shakes while you adjust the viewing angle 4 The OSD menu item will automatically rotate when the monitor rotates Menu Close Input Select QuickFit Brightness HDR Menu Close Input Select QuickFit Brightness HDR ...

Page 16: ...ype C jack To use the earphone connect the end with plug type to the monitor s earphone jack when an HDMI DisplayPort USB Type C signal is fed To use the USB 3 2 Gen1 ports Upstream Take the supplied USB 3 2 Gen1 Type C cable and plug one end to the monitor s USB upstream port and the other end to your computer s USB 3 2 Gen1 port Make sure your computer is installed with the latest Windows 7 Wind...

Page 17: ...w to route the cable through the cable management slot on the stand 1 3 3 3 2 5 5 4 4 6 3 Attach the input output port cover if needed 2 5 Turning on the monitor Press the power button See page 1 2 for the location of the power button The power indicator lights up in white to show that the monitor is ON ...

Page 18: ...2 6 Chapter 2 Setup ...

Page 19: ...h the functions Highlight the desired function and press the Menu 5 way button to activate it If the function selected has a sub menu move the Menu 5 way button up down to navigate through the sub menu functions Highlight the desired sub menu function and press the Menu 5 way button or move the Menu 5 way button to activate it 3 Move the Menu 5 way button up down to change the settings of the sele...

Page 20: ...ting Adobe RGB Mode Compatible with Adobe RGB color space Rec 2020 Mode Compatible with Rec 2020 color space DCI P3 Mode Compatible with DCI P3 color space DICOM Mode Compliant with DICOM standard best choice for medical image checking Rec 709 Mode Compatible with Rec 709 color space HDR_PQ DCI Presents ST2084 with DCI P3 color gamut and D65 white point PQ Optimized Delivers the optimized HDR perf...

Page 21: ...rt Calibration and then have quick access here Please apply the following settings while performing ProArt color calibration Set output dynamic to full range Set output color format to RGB Set output color depth to 8 bit Below tables show the default configurations for each ProArt Preset mode Function Standard Mode sRGB Mode Adobe RGB Mode Rec 709 Mode Color Temp 6500K Fixed 6500K Fixed 6500K 6500...

Page 22: ...ormity Compensation Enable Off Enable Off Enable Off Disable Input Range Enable Auto Enable Auto Enable Auto Enable Auto Function HDR_PQ Rec2020 Mode HDR_HLG BT2100 Mode HDR_HLG DCI Mode User Mode 1 User Mode 2 Color Temp Fixed 6500K Fixed 6500K Fixed 6500K 6500K Brightness 300nits 600nits 1000nits Max 100 100 50 Contrast Disable Disable Disable 80 Sharpness Enable 0 Enable 0 Enable 0 Enable 0 Sat...

Page 23: ...rightness function is not user configurable Please refer to the following to alleviate eye strains Users should take some time away from the display if working for long hours It is advised to take short breaks at least 5 mins after around 1 hour of continuous working at the computer Taking short and frequent breaks is more effective than a single longer break To minimize eye strain and dryness in ...

Page 24: ...ge is from 0 to 100 Hue Shifts the image color between green and purple Color Temp Contains 5 modes including 9300K 6500K 5500K 5000K and P3 Theater P3 Theater is only available when DCI P3 mode is selected Gamma Allows you to set the color mode to 2 6 2 4 2 2 2 0 or 1 8 Color Six axis Hue adjustment Six axis Saturation adjustment Adjusts the gain levels for R G B Adjusts the black level offset va...

Page 25: ...ct ratio to full 4 3 1 1 or OverScan To activate this function you need to do the following turn off PBP 4 3 is only available when input source is in 4 3 format OverScan is only available for the HDMI input source Uniformity Compensation Adjusts different areas of the screen to reduce any screen uniformy errors providing consistent brightness and color across the entire screen To activate this fu...

Page 26: ...u to open up another sub window connected from another video source besides the main window from your original video source By activating this function the monitor displays up to 4 pictures from different video sources when input source is below 4K 60Hz To activate this function you need to do the following turn off Dynamic Dimming turn off Adaptive Sync and disable HDR on your device PIP PBP Mode...

Page 27: ...QuickFit Plus In this function you can use different kinds of alignment patterns Safe Area Center Marker Customization Ruler QuickFit Plus ASUS PA32UCR Standard Mode DisplayPort 3840 x 2160 60Hz Safe Area Facilitates designers and users to organize content and layout on one page and achieve a consistent look and feel The selections are 1 1 Action Safe Title Safe 3 x 3 Center Marker Adjusts the Typ...

Page 28: ... Mode DisplayPort 3840 x 2160 60Hz HDR Preview Allows you to preview non HDR content performance with HDR10 and HLG mapping While HDR Preview function is on HDR_PQ DCI HDR_PQ Rec2020 HDR_HLG BT2100 and HDR_HLG DCI can be chosen Dynamic Dimming Synchronizes with contents while contrast changing to execute backlight dynamic dimming You can adjust the synchronization speed as Fast Medium or Gradual T...

Page 29: ...f calibrating this monitor to ensure color accuracy every working period There are 3 alarms 300 600 1000 hours and OFF for user s preference This function is enabled when User Mode 1 or User Mode 2 is selected DisplayPort Stream Compatibility with graphic card Select DisplayPort 1 1 or DisplayPort 1 2 by graphic card DP version DisplayPort 1 1 is only available when Adaptive Sync is off Key Lock T...

Page 30: ...0 x 2160 60Hz Shortcut 1 Shortcut 2 Shortcut Shortcut 1 Shortcut 2 selects a function for Shortcut 1 and 2 buttons When a certain function is selected or activated your shortcut key may not support Available function choices for shortcut Blue Light Filter Brightness HDR Contrast PIP PBP Setting Color Temp Volume Motion Sync User Mode 1 User Mode 2 ...

Page 31: ...Pivot 90 90 Height Adjustment 130 mm Kensington lock Yes AC input voltage AC 100 240V Power consumption Power On 46 W Typ Standby 0 5 W Typ Power Off 0 W Switch off Temperature Operating 0 C 40 C Temperature Non operating 20 C 60 C Dimension W x H x D 726 88 x 604 15 x 245 0 mm with stand highest 726 88 x 474 15 x 245 0 mm with stand lowest 726 88 x 425 87 x 68 68 mm without stand 913 x 365 x 521 ...

Page 32: ... ErP CEL ISO 9241 307 UkrSEPRO RCM PC Recycle KC e Standby TUV Flicker Free TUV Low Blue Light PSB CEC MEPS Energy Star USB IF Windows 7 10 and 11 WHQL Mac Compliance Specifications are subject to change without notice measuring a screen brightness of 200 nits without audio USB Card reader connection Requires Mac OS 10 13 6 10 14 1 ...

Page 33: ...ea 726 88 28 62 379 82 15 66 Active Area 425 87 16 77 604 15 23 79 336 5 13 25 245 9 65 17 87 0 70 170 07 6 70 216 69 8 53 157 93 6 22 204 54 8 05 9 0 9 0 9 2 0 36 178 28 7 02 50 1 97 117 4 61 117 4 61 100 3 94 100 3 94 ASUS PA32UCR Outline Dimension Unit mm inch 31 1 1 22 245 9 65 49 07 1 93 61 27 2 41 392 66 15 46 439 07 17 29 263 24 10 36 130 5 12 354 94 13 97 198 91 7 83 68 68 2 70 ...

Page 34: ...erly working Screen image is too light or dark Adjust the Contrast and Brightness settings via OSD Screen image bounces or a wave pattern is present in the image Make sure the signal cable is properly connected to the monitor and the computer Move electrical devices that may cause electrical interference Screen image has color defects white does not look white Inspect the signal cable and make sur...

Page 35: ... 1024 63 98 P 60 02 P 108 1280 x 1024 79 98 P 75 02 P 135 1366 x 768 47 712 P 59 79 P 85 5 1400 x 1050 65 3 N 60 P 121 75 1440 x 900 55 94 N 59 89 P 106 5 1600 x 1200 75 00 P 60 00 P 162 1680 x 1050 65 29 N 60 00 P 146 25 1920 x 1080 67 5 P 60 00 P 148 5 1920 x 1200 Reduced Blanking 74 038 P 59 95 N 154 1920 x 1200 74 556 N 59 885 P 193 25 1920 x 2160 133 293 59 988 277 25 2560 x 1080 66 636 P 59 ...

Page 36: ... 33 75 1440 x 480P 59 94Hz 31 47 60Hz 31 5 1440 x 576P 50Hz 31 25 1280 720p 50Hz 37 5 59 94Hz 44 95 60Hz 45 720 576p 50Hz 31 25 720 480p 59 94Hz 31 47 60Hz 31 5 640 480p VGA 59 94Hz 31 47 60Hz 31 5 720 1440 576i 50Hz 15 63 720 1440 480i 59 94Hz 15 73 60Hz 15 75 Modes not listed in the table may not be supported For optimal resolution we recommend that you choose a mode listed in the table above ...

Reviews: