background image

PE200U Series

25

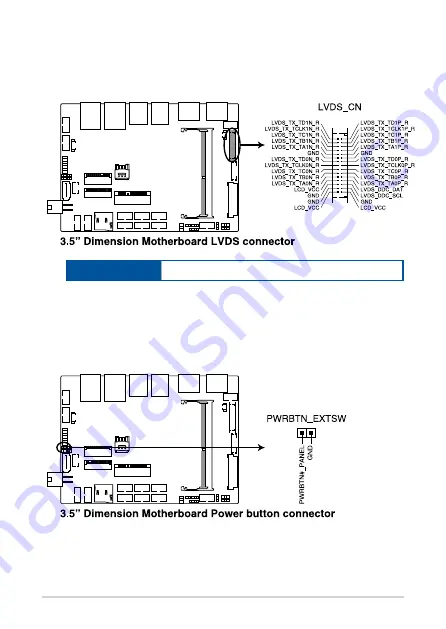
7.  LVDS connector (on selected models)

The LVDS connector allows you to connect a LCD monitor that supports 

a Low-voltage Differential Signaling (LVDS) interface. 

Connector type

WAFER HD 2X15P 1.25MM pitch

8.  Power button connector

The Power Button connector allows you to connect an external power 

button.

Summary of Contents for PE200U Series

Page 1: ...PE200U Series Desktop PC User Manual ...

Page 2: ...A COMMITMENT BY ASUS ASUS ASSUMES NO RESPONSIBILITY OR LIABILITY FOR ANY ERRORS OR INACCURACIES THAT MAY APPEAR IN THIS MANUAL INCLUDING THE PRODUCTS AND SOFTWARE DESCRIBED IN IT Copyright 2019 ASUSTeK COMPUTER INC All Rights Reserved LIMITATION OF LIABILITY Circumstances may arise where because of a default on ASUS part or other liability you are entitled to recover damages from ASUS In each such...

Page 3: ...tem memory 16 1 2 3 Onboard jumpers 17 1 2 4 Internal connectors 21 Chapter 2 Using your Edge Computer 2 1 Getting started 38 2 1 1 Connect the AC power adapter to your Edge Computer 38 2 1 2 Connect a display panel to your Edge Computer 40 2 1 3 Connect the USB cable from keyboard or mouse 42 2 1 4 Turn on your Edge Computer 43 2 2 Turning your Edge Computer off 44 2 3 Putting your Edge Computer ...

Page 4: ...3 11 Installing the USB 2 0 module on selected models 60 3 12 Installing the Serial port module on selected models 61 3 13 Installing the PoE LAN module on selected models 62 3 14 Installing the VESA mount optional 64 3 15 Installing the wall mount 66 Chapter 4 Using the software 4 1 Installing IEC Vision 68 4 2 IEC Vision overview 71 4 2 1 Demographic Mode 71 4 2 2 Dashboard 73 4 3 Configuring th...

Page 5: ...his chapter provides you with information on using your Edge Computer Chapter 3 Upgrading your Edge Computer This chapter provides you with information on how to upgrade the memory modules wireless modules and hard disk drive solid state drive of your Edge Computer Chapter 4 Using the software This chapter provides you with information on how to install the ASUS IEC Vision software and also provid...

Page 6: ...te a task NOTE This message contains additional information and tips that can help complete tasks WARNING This message contains important information that must be followed to keep you safe while performing certain tasks and prevent damage to your Edge Computer s data and components Typography Bold text Indicates a menu or an item to select Italic This indicates sections that you can refer to in th...

Page 7: ...PE200U Series 7 Package contents Your Edge Computer package contains the following items PE200U Series AC power adapter Power cord Wall mount kit SATA and power cable ...

Page 8: ...ese accessories refer to their respective user manuals The device illustration is for reference only Actual product specifications may vary with models I f the device or its components fail or malfunction during normal and proper use within the warranty period bring the warranty card to the ASUS Service Center for replacement of the defective components ...

Page 9: ...1 Getting to know your Edge Computer ...

Page 10: ...wer button The power button allows you to turn the Edge Computer on or off You can use the power button to put your Edge Computer to sleep mode or press it for four 4 seconds to force shutdown your Edge Computer LAN port The 8 pin RJ 45 LAN port supports a standard Ethernet cable for connection to a local network USB 3 2 Gen 2 port The USB 3 2 Gen 2 Universal Serial Bus port provides a transfer ra...

Page 11: ...and supports DVI or HDMI adpaters Antenna hole The antenna hole allows you to connect a wireless antenna to enhance wireless signal reception Serial COM connector The 9 pin RS232 422 485 serial COM connector allows you to connect devices that have serial ports such as bar code scanner modem or printers GPIO connector The 9 pin GPIO General purpose Input Output connector allows you to program it fo...

Page 12: ... keyboards pointing devices flash disk drives external HDDs speakers cameras and printers Microphone The built in microphone can be used for video conferencing voice narrations or simple audio recording Power input The supplied terminal block power adapter converts AC power to DC power for use with this jack Power supplied through this jack supplies power to the Edge Computer WARNING The power ada...

Page 13: ...E200U Series 13 Antenna hole The antenna hole allows you to connect a wireless antenna to enhance wireless signal reception Headphone jack This port allows you to connect amplified speakers or headphones ...

Page 14: ...14 PE200U Series 1 2 Motherboard Overview 1 2 1 Motherboard layout The PE200U Series features a motherboard with a 3 5 dimension 146mm x 105mm ...

Page 15: ...models 18 12 Back Light Power Enable jumper on selected models 19 13 GPIO connector 28 14 Mini PCIe mSATA configuration jumper 20 15 Clear RTC RAM jumper 17 16 System Management Bus connector 28 17 I2C connector 29 18 Serial Port connector 30 19 Micro SD card slot 23 20 M 2 slot 23 21 USB 2 0 connector 31 22 SATA 6Gb s SATA Power connector 21 23 DC in 4 Pin Power connector 33 24 Chassis Intrusion ...

Page 16: ...16 PE200U Series 1 2 2 System memory The motherboard comes with a Small Outline Dual Inline Memory Module SODIMM slot designed for DDR4 Double Data Rate 4 memory modules ...

Page 17: ... metal object or jumper cap for about 5 10 seconds 3 Plug the power cord and turn ON the computer 4 Hold down the Del key during the boot process and enter BIOS setup to re enter data WARNING DO NOT remove the jumper cap from its default position except when clearing the RTC RAM Removing the jumper cap will cause system boot failure NOTE If the steps above do not help remove the onboard button cel...

Page 18: ...on selected models The LVDS Panel Power jumper allows you to select the voltage for the LVDS panel 3 Back Light Power Selection jumper on selected models The Back Light Power Selection jumper allow you to select the voltage for the LVDS back light module ...

Page 19: ...the panel 5 HW WDT Enable jumper A watchdog timer is an electronic timer that is used to detect and recover from computer malfunctions The HW WDT watchdog timer Enable jumper allows the HW watchdog resets the system automatically even when the system crashes NOTE The default setting for this jumper is set to HW WDT enabled with a jumper cap attached ...

Page 20: ...s The default setting for this jumper is set to ATX mode with a jumper cap attached to switch to AT mode remove the jumper cap 7 Mini PCIe mSATA configuration jumper The Mini PCIe mSATA configuration jumper allows you to select between Mini PCIe mode or mSATA mode Set to pins 1 2 for mSATA mode or set to pins 2 3 for Mini PCIe mode ...

Page 21: ...e SATA 6Gb s and SATA Power connectors allow you to connect SATA devices such as optical disc drives and hard disk drives via a SATA cable and power cable Connector type Wafer HD 4P 2 0mm pitch NOTE Ensure to use the bundled cable when connecting a storage device to this connector ...

Page 22: ...CIe mSATA slot The Mini PCIe mSATA slot allows you to install a Mini PCIe or mSATA peripheral device NOTE The Mini PCIe mSATA peripheral device is purchased separately The mSATA shares the same slot with a full length Mini PCIe ...

Page 23: ...you to install a Micro SD card NOTE The Micro SD card is purchased separately 4 M 2 slot The M 2 slot allows you to install 2242 M 2 devices such as 2242 M 2 SSD modules NOTE The M 2 SSD module is purchased separately This motherboard supports 2242 PCIE SSD devices only ...

Page 24: ... Fi slot allows you to install an M 2 Wi Fi module E key type 2230 NOTE The M 2 Wi Fi module is purchased separately 6 Nano SIM Card slot The Nano SIM Card slot allows you to install a Nano SIM card NOTE The Nano SIM card is purchased separately ...

Page 25: ...LVDS connector allows you to connect a LCD monitor that supports a Low voltage Differential Signaling LVDS interface Connector type WAFER HD 2X15P 1 25MM pitch 8 Power button connector The Power Button connector allows you to connect an external power button ...

Page 26: ...aster more efficient motherboard troubleshooting solution When connected to a debug card users can view error and debugging codes on the card and get a better idea of initialization and recovery processes Connector type BOX header 2x5p K10 2 0mm pitch 10 Battery connector The Battery connector allows you to connect the lithium CMOS battery ...

Page 27: ...PE200U Series 27 11 EDP Signal connector on selected models The EDP Signal connector allows you to connect an internal embedded DisplayPort Connector type WtoB CON 40P 0 5MM R A ACES 88341 4001 ...

Page 28: ...nnector is generally used for communication with the system and power management related tasks Connector type Header 1x4p 2 0mm pitch 13 GPIO connector The GPIO connector allows you to connect a general purpose input output module which allows you to customize the digital signal input output Connector type BOX header 2x5p K9 2 0mm pitch ...

Page 29: ... certificates passwords and data A TPM system also helps enhance network security protects digital identities and ensures platform integrity Connector type Header 2x7p K14 2 0mm pitch 14 I2C connector The I2C Inter Integrated Circuit connector allows you to connect an I2C compatible IoT security module Connector type Header 2x3p K6 2 0mm pitch ...

Page 30: ...ort module Connect the serial port module cable to this connector then install the module to a slot opening on the system chassis Connector type BOX header 2x5p K10 2 0mm pitch NOTE The serial port module is purchased separately COM1 and COM2 support RS 232 422 485 COM 3 COM4 COM5 and COM6 support RS 232 ...

Page 31: ...additional USB 2 0 ports The USB 2 0 connector provides data transfer speeds of up to 480 MB s connection speed Connector type BOX header 2x5p K9 2 0mm pitch WARNING DO NOT connect a 1394 cable to the USB connectors Doing so will damage the motherboard NOTE The USB 2 0 module is purchased separately ...

Page 32: ...roswitch for the chassis intrusion detection feature When you remove any chassis component the sensor or microswitch triggers and sends a high level signal and records a chassis intrusion event NOTE By default a jumper cap that disables the intrusion detection feature is installed on the connector to prevent accidental triggers ...

Page 33: ... is for the panel back light module power input Connector type WAFER 6P 2 0mm pitch NATURAL S T 20 DC in 4 Pin Power connector The DC in 4 pin Power connector is for DC power input Using a compatible power cable and power board you may connect a suitable power supply with DC in jacks Connector type POWER CON 4P R A ...

Page 34: ...the system Connector type WtoB CON 4P 1 25mm S T WARNING DO NOT forget to connect the fan cable to the fan connector Insufficient air flow inside the system may damage the motherboard components Thesearenotjumpers Donotplacejumpercapsonthe fan connectors Ensure the cable is fully inserted into the connector ...

Page 35: ...ty LED connector HD_LED The 2 pin connector allows you to connect the Storage Device Activity LED The Storage Device Activity LED lights up or blinks when data is read from or written to the storage device or storage device add on card Power Button Soft off Button connector PWRSW The 3 1 pin connector allows you to connect the system power button Press the power button to power up the system or pu...

Page 36: ...e module that supports HD Audio Connect one end of the line Out mic module cable to this connector Connector type BOX header 2x5p K8 2 0mm pitch NOTE We recommend that you connect a high definition line out mic module to this connector to avail of the motherboard s high definition audio capability ...

Page 37: ...2 Using your Edge Computer ...

Page 38: ... the AC power adapter to your Edge Computer A Connect the power cord to the AC power adapter B Connect the DC power connector into your Edge Computer s power DC input C Plug the AC power adapter into a 100V 240V power source NOTE The power adapter may vary in appearance depending on models and your region ...

Page 39: ...pter Input voltage 100 240 Vac Input frequency 50 60 Hz Rating output current 6 32A max 120W Rating output voltage 19 V IMPORTANT We strongly recommend that you use only the AC power adapter and cable that came with your Edge Computer We strongly recommend that you use a grounded wall socket while using your Edge Computer The socket outlet must be easily accessible and near your Edge Computer To d...

Page 40: ... to your Edge Computer that has the following connectors HDMI connector DisplayPort Connect display via HDMI port To connect a display panel to your Edge Computer Connect one end of an HDMI or a DisplayPort cable to an external display and the other end of the cable to your Edge Computer s HDMI port or DisplayPort ...

Page 41: ...PE200U Series 41 Connect display via DisplayPort ...

Page 42: ...dge Computer You can also connect a USB dongle for a wireless keyboard and mouse set To connect a keyboard and mouse to your Edge Computer Connect the USB cable from your keyboard and mouse to any of the USB ports of your Edge Computer NOTE The keyboard varies with country or region The keyboard and mouse are purchased separately ...

Page 43: ...PE200U Series 43 2 1 4 Turn on your Edge Computer Press the power button to turn on your Edge Computer ...

Page 44: ...ded for system startup in the Edge Computer In normal circumstances the default BIOS settings apply to most conditions to ensure optimal performance Do not change the default BIOS settings except in the following circumstances An error message appears on the screen during the system bootup and requests you to run the BIOS Setup You have installed a new system component that requires further BIOS s...

Page 45: ...IOS Enter the BIOS by pressing F2 or DEL on the POST screen NOTE POST Power On Self Test is a series of software controlled diagnostic tests that run when you turn on your Edge Computer Navigate to the Exit menu Select the Load Optimized Defaults option or you may press F5 Select OK to load the default BIOS values ...

Page 46: ...46 PE200U Series ...

Page 47: ...3 Upgrading your Edge Computer ...

Page 48: ...om cover 4 Remove the four 4 screws securing the bottom cover 5 After removing the screws remove the bottom cover and place it aside IMPORTANT Ensure that your hands are dry before proceeding with the rest of the installation process Before installing any of the features in this guide use a grounded wrist strap or touch a safely grounded object or metal object to avoid damaging them due to static ...

Page 49: ...ottom cover 1 Align the bottom cover with the screw holes then replace the bottom cover onto the Edge Computer 2 Secure the bottom cover using the four 4 screws removed previously 3 Replace the four 4 rubber feet screws removed previously ...

Page 50: ...stalling memory modules Your Edge Computer comes with a SO DIMM memory slot that allow you to install a DDR4 SO DIMM Align and insert the memory module into the slot A and press it down B until it is securely seated in place ...

Page 51: ...n it with the storage bay on the bottom cover of your Edge Computer 2 Connect the storage device cable to the storage device 3 Insert your storage device into the storage bay 4 Secure the storage device to the storage bay using four 4 screws IMPORTANT This device only supports 7mm 2 5 HDD or SSD ...

Page 52: ...torage device cable to the SATA6G and SATA_PWR connectors on the motherboard 6 Replace the bottom cover then secure the bottom cover using the four 4 screws removed previously 7 Replace the four 4 rubber feet screws removed previously ...

Page 53: ...r mSATA card Your Edge Computer comes with a Mini PCIe mSATA slot that allow you to install a Mini PCIe or mSATA peripheral card Align and insert the Mini PCIe or mSATA card into the slot A and press it down and secure it in place using two 2 screws ...

Page 54: ...Ie or mSATA card first then removing the mPCIe or mSATA card 2 Push the nano SIM cover towards the front of your Edge Computer 3 Lift the nano SIM cover 4 Place the nano SIM into the nano SIM slot 5 Replace the nano SIM cover 6 Push the nano SIM cover towards the rear of your Edge Computer to secure the nano SIM card 3 6 Installing a nano SIM card ...

Page 55: ... screws on the rear cover then slightly pull the rear cover outwards but do not remove it completely 2 Insert your SD card into the SD card slot Ensure that the SD card is pushed all the way into the SD card slot 3 7 Installing an SD card ...

Page 56: ...56 PE200U Series 3 Once your SD card is properly installed into the SD card slot replace the rear cover and secure it using the five 5 screws removed previously ...

Page 57: ...f the screw hole and fasten it using the previously removed stand screw 3 optional Connect the antennas to your wireless card NOTE Please refer to the Installing the antennas section for more information on installing the antennas Connecting antennas to your wireless card may strengthen the wireless signal A soft clicking sound indicates that the antenna has been securely attached on the wireless ...

Page 58: ... an M 2 SSD 1 optional Replace the stand screw if it has been removed 2 Align and insert the M 2 SSD into its slot inside the Edge Computer then gently push down the M 2 SSD on top of the stand screw hole and fasten it using a screw ...

Page 59: ... bundled O ring to the antenna jack then secure the antenna jack using bundled hex screw 5 Connect the other end of the RF connector and cable to your wireless card or WWAN card 6 Repeat steps 1 to 5 to install additional antennas You may install antennas to the four 4 antenna holes located on the front and rear panels The installed antennas can be connected to a WWAN card installed in the Mini PC...

Page 60: ...les on the rear panel 2 Secure the USB 2 0 module to the rear panel using two 2 bundled hex bolts and hex nuts 3 Connect the USB 2 0 module connector to the USB 2 0 connector on the motherboard NOTE Please refer to the Motherboard layout section for the location of the USB 2 0 connectors 4 To install another USB 2 0 module please repeat steps 1 3 ...

Page 61: ...es on the rear panel 2 Secure the Serial port module to the rear panel using two 2 bundled hex screws 3 Connect the Serial port module connector to the Serial port connector on the motherboard NOTE Please refer to the Motherboard layout section for the location of the Serial port connectors 4 To install another Serial port module please repeat steps 1 3 ...

Page 62: ...tors on the PoE LAN module s daughter board to the CN1 and CN2 connectors on the PoE LAN module s motherboard using the two 2 bundled LAN signal cables NOTE Ensure to connect the CN1 connector on the daughter board to the CN1 connector on the motherboard and the CN2 connector on the daughter board to the CN2 connector on the motherboard CN1 CN1 CN2 CN2 motherboard daughter board ...

Page 63: ...PE200U Series 63 2 Connect the power connector on the daughter board to the power connector on the power board 3 Secure the motherboard and daughter board using the bundled screws ...

Page 64: ...rface 2 Attach the bundled two 2 12mm screws into the screw holes at the bottom of your Edge Computer 3 Remove the screw hole covers at the back of your VESA mount compatible device if any You may install a VESA mount to your Edge Computer which allows you to install your Edge Computer to a VESA mount compatible device ...

Page 65: ...in the angle shown in the illustration to secure it in place B 4 With the arrow on the VESA mounting plate pointing upward align its screw holes to the screw holes of the VESA mount compatible device 5 Secure the VESA mounting plate to the VESA mount compatible device using the bundled screws WARNING Do not overtighten the screws as it may cause damage to your VESA mount compatible device ...

Page 66: ...l mount 1 Remove the four 4 rubber feet screws 2 Align the wall mount with the rubber feet screw holes A then remove the rubber feet from the rubber feet screws B and secure the wall mount to your Edge Computer using the rubber feet screws C ...

Page 67: ...4 Using the software ...

Page 68: ...t Edge Console IEC Vision software Download IEC Vision by visiting https www asus com AIoT Industrial Solutions PE200U HelpDesk_ Download To install IEC Vision please follow the steps below 1 Click on IEC Vision msi located on the desktop to execute the installation wizard 2 Click on Next ...

Page 69: ...h the License Agreement then check the I accept the terms in the License Agreement box and click on Next 4 Click on Next to install to the default folder destination or click on Browse to select a different folder then click on Next ...

Page 70: ...70 PE200U Series 5 Click on Install to begin the installation process 6 Wait for the installation process to finish then click on Finish to complete the installation ...

Page 71: ...ings Select a camera to monitor You may also add edit or delete an IP camera or re name your connected USB cameras or IP cameras Widget settings Enable or disable the Summary Age or Gender widgets or filter the data displayed on enabled widgets by day week or month Gender widget Displays the daily weekly or monthly male female ratio for people identified by IEC Vision 4 2 1 Demographic Mode ...

Page 72: ...f the current camera being monitored Age widget Displays a bar graph of the amount of different age groups detected Export data Export the data collected on IEC Vision to an Excel file Reset Reset the data of the Total overview window Total overview Displays the total amount of gender age and people count Capture feed Displays the camera s capture feed and shows the people count and detection ...

Page 73: ...vary between hour of the day day of the week or day of the month according to the selected time range filter Age Distribution Displays a line graph of the amount of different age groups detected You may select to display or hide an age group in the drop down menu Age Group in the top right corner of the Age Distribution graph Gender Ratio Displays the daily weekly or monthly male female ratio for ...

Page 74: ... camera 1 Connect a USB camera to an available USB port on your Edge Computer NOTE For more information on the location of the USB ports on your Edge Computer please refer to the Features section of this manual 2 Click on the Camera select and settings drop down menu located at the top right of the main screen 3 Click on Camera Settings ...

Page 75: ...PE200U Series 75 4 Click on the USB Camera tab You may edit the name of your connected USB camera s here by clicking on next to the USB camera you wish to rename ...

Page 76: ...s 4 3 2 Configuring a PoE IP camera 1 Click on the Camera select and settings drop down menu located at the top right of the main screen 2 Click on the IP Camera tab then click on Add new camera to add a new IP camera ...

Page 77: ...PE200U Series 77 3 Enter a camera name and select a protocol and URL for the PoE IP camera you wish to link to then click on ADD CAMERA to add the IP camera ...

Page 78: ...78 PE200U Series ...

Page 79: ...Appendix ...

Page 80: ...with a 0 1m s air flow The product should be used in environments with an ambient temperature of 45 C when using the 65W adapter whilst using HDD or SDD only and without the PoE module installed If you use an extension cord make sure that the total ampere rating of the devices plugged into the extension cord does not exceed its ampere rating This equipment should be installed and operated with a m...

Page 81: ... instructions The system was dropped or the cabinet is damaged The system performance changes NO DISASSEMBLY The warranty does not apply to the products that have been disassembled by users DO NOT throw the Edge Computer in municipal waste This product has been designed to enable proper reuse of parts and recycling This symbol of the crossed out wheeled bin indicates that the product electrical el...

Page 82: ...e go to http csr asus com english Takeback htm for the detailed recycling information in different regions COATING NOTICE IMPORTANT To provide electrical insulation and maintain electrical safety a coating is applied to insulate the device except on the areas where the I O ports are located RF exposure warning This equipment must be installed and operated in accordance with provided instructions a...

Page 83: ...l interference when the equipment is operated in a commercial environment This equipment generates uses and can radiate radio frequency energy and if not installed and used in accordance with the instruction manual may cause harmful interference to radio communications Operation of this equipment in a residential area is likely to cause harmful interference in which case the user will be required ...

Page 84: ...exploitation est autorisée aux deux conditions suivantes 1 l appareil ne doit pas produire de brouillage et 2 l utilisateur de l appareil doit accepter tout brouillage radioélectrique subi même si le brouillage est susceptible d en compromettre le fonctionnement CAN ICES 3 A NMB 3 A ISED Radiation Exposure Statement for Canada This equipment complies with ISED radiation exposure limits set forth f...

Page 85: ...72 GHz Ch01 through Ch13 Regional notice for Singapore This ASUS product complies with IMDA Standards Complies with IMDA Standards DB103778 CIDF15000026 Regional notice for Malaysia Regional notice for California WARNING This product contains chemicals known to the State of California to cause cancer and birth defects or other reproductive harm Wash hands after handling ...

Page 86: ...cient products and practices All ASUS products with the ENERGY STAR logo comply with the ENERGY STAR standard and the power management feature is enabled by default The monitor and computer are automatically set to sleep after 10 and 30 minutes of user inactivity To wake your computer click the mouse or press any key on the keyboard Please visit http www energystar gov powermanagement for detail i...

Page 87: ... Telephone 1 510 739 3777 Fax 1 510 608 4555 Web site http www asus com us Technical Support Support fax 1 812 284 0883 Telephone 1 812 282 2787 Online support https www asus com support Product ContactUs Services questionform lang en us ASUS COMPUTER GmbH Germany and Austria Address Harkort Str 21 23 40880 Ratingen Germany Fax 49 2102 959931 Web site http www asus com de Online contact http eu rm...

Page 88: ...88 PE200U Series ...

Reviews: