background image

Motherboard

PRIME B350M-E

Summary of Contents for PRIME B350M-E

Page 1: ...Motherboard PRIME B350M E ...

Page 2: ...pective companies and are used only for identification or explanation and to the owners benefit without intent to infringe Offer to Provide Source Code of Certain Software This product contains copyrighted software that is licensed under the General Public License GPL under the Lesser General Public License Version LGPL and or other Free Open Source Software Licenses Such software in this product ...

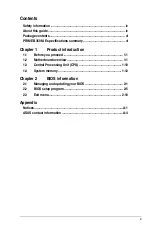
Page 3: ... vi Chapter 1 Product introduction 1 1 Before you proceed 1 1 1 2 Motherboard overview 1 1 1 3 Central Processing Unit CPU 1 10 1 4 System memory 1 12 Chapter 2 BIOS information 2 1 Managing and updating your BIOS 2 1 2 2 BIOS setup program 2 5 2 3 Exit menu 2 10 Appendix Notices A 1 ASUS contact information A 4 ...

Page 4: ...afety Before installing the motherboard and adding components carefully read all the manuals that came with the package Before using the product ensure all cables are correctly connected and the power cables are not damaged If you detect any damage contact your dealer immediately To avoid short circuits keep paper clips screws and staples away from connectors slots sockets and circuitry Avoid dust...

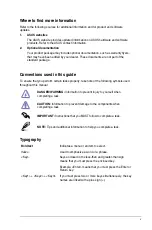
Page 5: ...ks properly take note of the following symbols used throughout this manual DANGER WARNING Information to prevent injury to yourself when completing a task CAUTION Information to prevent damage to the components when completing a task IMPORTANT Instructions that you MUST follow to complete a task NOTE Tips and additional information to help you complete a task Typography Bold text Indicates a menu ...

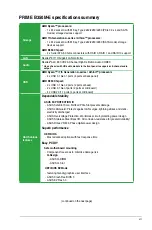
Page 6: ...CC and non ECC un buffered memory AMD 7th Generation A series Athlon processors 2 x DIMMs max 32GB DDR4 2400 2133 MHz non ECC un buffered memory Dual channel memory architecture Refer to www asus com for the latest Memory QVL Qualified Vendors List Hyper DIMM support is subject to the physical characteristics of individual CPUs Graphics Integrated AMD Radeon R Series Graphics in the 7th Generation...

Page 7: ...3 1 Gen 1 ports 4 ports at back panel AMD B350 Chipset 2 x USB 3 1 Gen 2 ports 2 ports at back 2 x USB 3 1 Gen 1ports 2 ports at mid board 4 x USB 2 0 1 1 ports 4 ports at mid board ASUS unique features Dependable Stability ASUS 5X PROTECTION III ASUS SafeSlot Core Fortified PCIe Slot prevents damage ASUS LANGuard Protects against LAN surges lightning strikes and static electricity discharges ASUS...

Page 8: ...SATA 6 0Gb s connectors 1 x COM connector 1 x CPU Fan connector 1 x Chassis Fan connector Support DC PWM mode 1 x Front panel audio connector 1 x 24 pin EATX power connector 1 x 8 pin ATX 12V power connector 1 x 2 pin Clear CMOS header 1 x S PDIF out connector 1 x Speaker connector 1 x System panel connector BIOS features 128 Mb Flash ROM UEFI AMI BIOS PnP WfM2 0 SM BIOS 3 0 ACPI 6 1 Multi languag...

Page 9: ...Failure to do so may cause severe damage to the motherboard peripherals or components Unplug the power cord before installing or removing the motherboard Failure to do so can cause you physical injury and damage motherboard components PRIME B350M E PCIEX16 PCIEX1_1 PCIEX1_2 SPEAKER CLRTC F_PANEL SPDIF_OUT USB56 USB34 USB3_12 AAFP COM EATXPWR CPU_FAN CHA_FAN BATTERY Super I O ALC 887 Realtek 8111H ...

Page 10: ...ly fit We recommend that you use an EATX 12V Specification 2 0 compliant power supply unit PSU with a minimum of 300W power rating This PSU type has 24 pin and 8 pin power plugs DO NOT forget to connect the 4 pin 8 pin ATX 12V power plug Otherwise the system will not boot up We recommend that you use a PSU with higher power output when configuring a system with more power consuming devices or when...

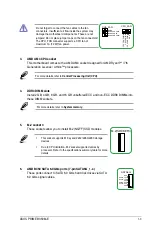
Page 11: ...orts M Key and 2242 2260 2280 storage devices Due to CPU limitation M 2 socket supported varies by processor Refer to the specifications summary table for more details 4 DDR4 DIMM slots Install 2 GB 4 GB 8 GB and 16 GB unbuffered ECC and non ECC DDR4 DIMMs into these DIMM sockets For more details refer to System memory 3 AMD AM4 CPU socket This motherboard comes with a AMD AM4 socket designed for ...

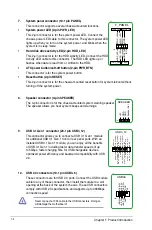
Page 12: ...ts up or flashes when data is read from or written to the HDD ATX power button soft off button 2 pin PWR_BTN This connector is for the system power button Reset button 2 pin RESET This 2 pin connector is for the chassis mounted reset button for system reboot without turning off the system power PIN 1 PWR BTN PWR_LED PWR_LED PWR GND HDD_LED HDD_LED Ground HWRST NC F_PANEL PWR LED HDD_LED RESET 9 US...

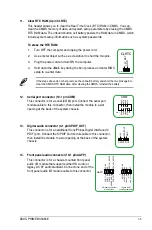
Page 13: ...the Real Time Clock RTC RAM in CMOS You can clear the CMOS memory of date and system setup parameters by erasing the CMOS RTC RAM data The onboard button cell battery powers the RAM data in CMOS which include system setup information such as system passwords 13 Digital audio connector 4 1 pin SPDIF_OUT This connector is for an additional Sony Philips Digital Interface S PDIF port Connect the S PDI...

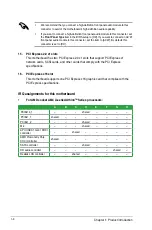
Page 14: ... controller shared AMD Promonotry Chip XHCI controller shared SATA controller shared HD audio controller shared Realtek LAN controller shared IRQ assignments for this motherboard For AMD socket AM4 A series AthlonTM Series processors We recommend that you connect a high definition front panel audio module to this connector to avail of the motherboard s high definition audio capability If you want ...

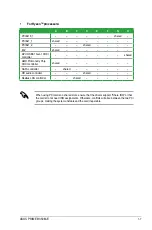
Page 15: ...conflicts will arise between the two PCI groups making the system unstable and the card inoperable A B C D E F G H PCIEx16_1 shared PCIEx1_1 shared PCIEx1_2 shared M 2 shared APU USB3 1 Gen1 XHCI controller shared AMD Promonotry Chip XHCI controller shared SATA controller shared HD audio controller shared Realtek LAN controller shared For RyzenTM processors ...

Page 16: ...Gen1 ports are controlled by the xHCI controller 4 USB 3 1 Gen 2 ports teal blue Type A These 9 pin Universal Serial Bus 3 1 USB 3 1 Gen 2 ports are for USB 3 1 Gen 2 devices 1 4 5 3 10 3 6 7 8 2 9 11 LAN port Speed LED Activity Link LED Activity Link LED Speed LED Status Description Status Description Off No link OFF 10Mbps connection Orange Linked ORANGE 100Mbps connection Orange Blinking Data a...

Page 17: ... Line Out port lime This port connects to a headphone or a speaker In the 4 1 5 1 and 7 1 channel configurations the function of this port becomes Front Speaker Out 8 Microphone port pink This port connects to a microphone Refer to the audio configuration table for the function of the audio ports in 2 1 4 1 5 1 or 7 1 channel configuration Audio 2 1 4 1 5 1 or 7 1 channel configuration Port Headse...

Page 18: ...installing the CPU The AM4 socket has a different pinout from the FM2 FM2 socket Ensure that you use a CPU designed for the AM4 socket The CPU fits in only one correct orientation DO NOT force the CPU into the socket to prevent bending the pins and damaging the CPU Installing the CPU Apply the Thermal Interface Material to the CPU heatsink and CPU before you install the heatsink and fan if necessa...

Page 19: ...ASUS PRIME B350M E 1 11 Installing the CPU heatsink and fan assembly Type 2 Type 1 1 1 3 2 2 4 Remove the screws and the retention module only Do not remove the plate on the bottom ...

Page 20: ...annel for the dual channel configuration Any excess memory from the higher sized channel is then mapped for single channel operation Always install DIMMs with the same CAS latency For optimal compatibility we recommend that you install memory modules of the same version or date code D C from the same vendor Check with the retailer to get the correct memory modules For system stability use a more e...

Page 21: ...ASUS PRIME B350M E 1 13 Installing a DIMM 1 2 To remove a DIMM B A B A A ...

Page 22: ...1 14 Chapter 1 Product introduction ...

Page 23: ...r motherboard s softwares drivers and the BIOS version easily With this utlity you can also manually update the saved BIOS and select a boot logo when the system goes into POST To launch EZ Update click EZ Update on the AI Suite 3 main menu bar PRIME B350M E 03 05 2017 Click to automatically update your motherboard s driver software and firmware Click to find and select the BIOS from file Click to...

Page 24: ...he USB flash disk that contains the latest BIOS file to the USB port then select via Storage Device b Press Tab to switch to the Drive field c Press the Up Down arrow keys to find the USB flash disk that contains the latest BIOS and then press Enter d Press Tab to switch to the Folder Info field e Press the Up Down arrow keys to find the BIOS file and then press Enter to perform the BIOS update pr...

Page 25: ...OS file When found the utility reads the BIOS file and enters ASUS EZ Flash 2 utility automatically 4 The system requires you to enter BIOS Setup to recover BIOS settings To ensure system compatibility and stability we recommend that you press F5 to load default BIOS values DO NOT shut down or reset the system while updating the BIOS Doing so can cause system boot failure 2 1 4 ASUS BIOS Updater A...

Page 26: ...l then select D ASUSTeK BIOS Updater for DOS V1 31 2014 08 01 Current ROM BOARD PRIME B350M E VER 0216 H 00 B 00 DATE 03 05 2017 Update ROM BOARD Unknown VER Unknown DATE Unknown PATH C C D FORMAN 1 DIR PRB350ME CAP 8390656 2017 0E 05 21 14 34 Note Enter Select or Load Tab Switch V Drive Info Up Down Home End Move Esc Exit 3 Press Tab to switch from Drives panel to Files panel then press Up Down o...

Page 27: ...m Use the BIOS Setup program to update the BIOS or configure its parameters The BIOS screens include navigation keys and brief online help to guide you in using the BIOS Setup program Entering BIOS Setup at startup To enter BIOS Setup at startup Press Delete or F2 during the Power On Self Test POST If you do not press Delete or F2 POST continues with its routines Entering BIOS Setup after POST To ...

Page 28: ...or press F7 The default screen for entering the BIOS setup program can be changed Go to the Setup Mode item in the Boot menu Saves the changes and resets the system Selects the display language of the BIOS setup program Displays the CPU motherboard temperature CPU voltage output CPU chassis fan speed and SATA information Displays the system properties of the selected mode Click Enter to switch EZ ...

Page 29: ...shows an example of the Advanced Mode Refer to the following sections for the detailed configurations To access the EZ Mode click EzMode F7 or press F7 Searches FAQ Language MyFavorite Q Fan control Hot Keys Displays the CPU temperature CPU and memory voltage output Sub menu item General help Configuration fields Goes back to EZ Mode Last modified settings Scroll bar Pop up window ...

Page 30: ...desired settings Hot keys This button above the menu bar contains the navigation keys for the BIOS setup program Use the navigation keys to select items in the menu and change the settings Scroll bar A scroll bar appears on the right side of a menu screen when there are items that do not fit on the screen Press the Up Down arrow keys or Page Up Page Down keys to display the other items on the scre...

Page 31: ...nfigurable A configurable field is highlighted when selected To change the value of a field select it and press Enter to display a list of options Last Modified button This button shows the items that you last modified and saved in BIOS Setup Search on FAQ Move your mouse over this button to show a QR code Scan this QR code with your mobile device to connect to the ASUS BIOS FAQ web page You can a...

Page 32: ... default values Save Changes Reset Once you are finished making your selections choose this option from the Exit menu to ensure the values you selected are saved When you select this option or if you press F10 a confirmation window appears Select OK to save changes and exit Discard Changes and Exit This option allows you to exit the Setup program without saving your changes When you select this op...

Page 33: ...to which the receiver is connected Consult the dealer or an experienced radio TV technician for help The use of shielded cables for connection of the monitor to the graphics card is required to assure compliance with FCC regulations Changes or modifications to this unit not expressly approved by the party responsible for compliance could void the user s authority to operate this equipment IC Canad...

Page 34: ...in indicates that the product electrical and electronic equipment should not be placed in municipal waste Check local regulations for disposal of electronic products DO NOT throw the mercury containing button cell battery in municipal waste This symbol of the crossed out wheeled bin indicates that the battery should not be placed in municipal waste ASUS Recycling Takeback Services ASUS recycling a...

Page 35: ... tam metni şu adreste bulunabilir www asus com support Bosanski ASUSTeK Computer Inc ovim izjavljuje da je ovaj uređaj usklađen sa bitnim zahtjevima i ostalim odgovarajućim odredbama vezanih direktiva Cijeli tekst EU izjave o usklađenosti dostupan je na www asus com support English ASUSTeK Computer Inc hereby declares that this device is in compliance with the essential requirements and other rele...

Page 36: ...rate Way Fremont CA 94539 USA Telephone 1 510 739 3777 Fax 1 510 608 4555 Web site http www asus com us Technical Support Support fax 1 812 284 0883 Telephone 1 812 282 2787 Online support http qr asus com techserv ASUS COMPUTER GmbH Germany and Austria Address Harkort Str 21 23 40880 Ratingen Germany Fax 49 2102 959931 Web site http www asus com de Online contact http eu rma asus com sales Techni...

Page 37: ...s to the following specifications FCC Part 15 Subpart B Unintentional Radiators Supplementary Information This device complies with part 15 of the FCC Rules Operation is subject to the following two conditions 1 This device may not cause harmful interference and 2 this device must accept any interference received including interference that may cause undesired operation Representative Person s Nam...

Reviews: