Chapter 2: Hardware setup
2-2
2.1
Chassis cover
2.1.1
Removing the chassis cover
• Ensure that you unplug the power cord before removing the chassis cover.
• Take extra care when removing the chassis cover. Keep your fingers from
components inside the chassis that can cause injury, such as the CPU fan,
rear fan, and other sharp-edged parts.
• The images of the barebone server shown in this section are for reference
purposes only and may not exactly match the model you purchase.
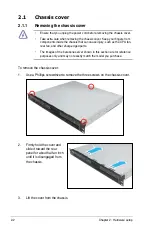
To remove the chassis cover:
1. Use a Phillips screwdriver to remove the three screws on the chassis cover.
2. Firmly hold the cover and
slide it toward the rear
panel for about half an inch
until it is disengaged from
the chassis.
3. Lift the cover from the chassis.
Summary of Contents for RS100-E6 PI2
Page 1: ...1U Rackmount Server RS100 E6 PI2 User Guide ...
Page 18: ...Chapter 1 Product introduction 1 8 ...
Page 22: ...Chapter 2 Hardware setup 2 4 3 Secure the cover with three screws ...
Page 48: ...Chapter 4 Motherboard information 4 2 4 1 Motherboard layout ...
Page 130: ...6 34 Chapter 6 RAID configuration ...


