Chapter 2: Hardware setup
2-18
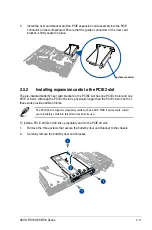
3. Place the butterfly riser card on a flat
and stable surface.
4. Remove the metal cover then set it
aside.
5.
Prepare the PCIE x8 expansion card.
6. Remove the two screws on the
expansion card (A) then remove the
card bracket (B).
7. Get the metal cover (proprietary card
bracket) that you removed earlier in
step 4.
8.
Secure the expansion card and the
metal cover with two screws.
The default metal cover on the PCIE
x8 slot of the butterfly riser card is an
ASUS proprietary card bracket. It is
screwless by design allowing for easy
installation or removal.
If your expansion card is pre-installed
with a proprietary card bracket,
proceed to step 9.
PCIE x8 slot
metal cover
card bracket
metal cover
9.
Install the expansion card and the metal
cover assembly to the PCIE x8 slot as
shown.
Ensure that the metal cover is inserted
and firmly seated in place.
Summary of Contents for RS700-E8-RS8 Series
Page 1: ...1U Rackmount Server RS700 E8 RS8 Series User Guide ...
Page 10: ...x ...
Page 27: ...2 9 ASUS RS700 E8 RS8 Series 18 Replace the air duct CPU1 CPU2 ...
Page 52: ...Chapter 4 Motherboard information 4 2 4 1 Motherboard layout ...
Page 76: ...Chapter 4 Motherboard information 4 26 ...
Page 164: ...6 38 Chapter 6 RAID configuration ...
Page 192: ...A 2 Appendix A Reference information Z10PP D24 block diagram ...


