background image

9

What you need

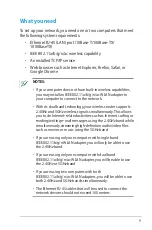
To set up your network, you need one or two computers that meet 
the following system requirements:
  •   Ethernet RJ-45 (LAN) port (10Base-T/100Base-TX/

1000BaseTX)

  •  IEEE 802.11a/b/g/n/ac wireless capability
  •  An installed TCP/IP service
  •   Web browser such as Internet Explorer, Firefox, Safari, or 

Google Chrome

NOTES: 

•  If your computer does not have built-in wireless capabilities, 

you may install an IEEE 802.11a/b/g/n/ac WLAN adapter to 
your computer to connect to the network.

•  With its dual band technology, your wireless router supports  

2.4GHz and 5GHz wireless signals simultaneously. This allows 
you to do Internet-related activities such as Internet surfing or 
reading/writing e-mail messages using the 2.4GHz band while 
simultaneously streaming high-definition audio/video files 
such as movies or music using the 5GHz band.

•  If you are using only one computer with single band  

IEEE 802.11b/g/n WLAN adapter, you will only be able to use 
the 2.4GHz band.

•  If you are using only one computer with dual band  

IEEE 802.11a/b/g/n/ac WLAN adapter, you will be able to use 
the 2.4GHz or 5GHz band.

•  If you are using two computers with both 

IEEE 802.11a/b/g/n/ac WLAN adapters, you will be able to use 
both 2.4GHz and 5GHz bands simultaneously.

•  The Ethernet RJ-45 cables that will be used to connect the 

network devices should not exceed 100 meters.

Summary of Contents for RT-AC56R

Page 1: ...features a 2 4GHz and 5GHz dual bands for an unmatched concurrent wireless HD streaming SMB server UPnP AV server and FTP server for 24 7 file sharing a capability to handle 300 000 sessions and the ASUS Green Network Technology which provides up to 70 power saving solution User Guide ...

Page 2: ...TICULAR PURPOSE IN NO EVENT SHALL ASUS ITS DIRECTORS OFFICERS EMPLOYEES OR AGENTS BE LIABLE FOR ANY INDIRECT SPECIAL INCIDENTAL OR CONSEQUENTIAL DAMAGES INCLUDING DAMAGES FOR LOSS OF PROFITS LOSS OF BUSINESS LOSS OF USE OR DATA INTERRUPTION OF BUSINESS AND THE LIKE EVEN IF ASUS HAS BEEN ADVISED OF THE POSSIBILITY OF SUCH DAMAGES ARISING FROM ANY DEFECT OR ERROR IN THIS MANUAL OR PRODUCT SPECIFICAT...

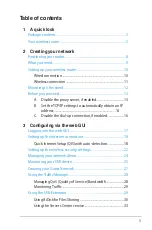
Page 3: ...ly obtain an IP address 14 C Disable the dial up connection if enabled 16 3 Configuring via the web GUI Logging into the web GUI 17 Setting up the Internet connection 18 Quick Internet Setup QIS with auto detection 18 Setting up the wireless security settings 22 Managing your network clients 24 Monitoring your USB device 25 Creating your Guest Network 27 Using the Traffic Manager 28 Managing QoS Q...

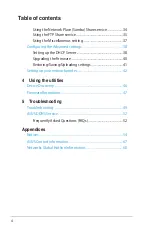
Page 4: ...ting up the DHCP Server 38 Upgrading the firmware 40 Restoring Saving Uploading settings 41 Setting up your network printer 42 4 Using the utilities Device Discovery 46 Firmware Restoration 47 5 Troubleshooting Troubleshooting 49 ASUS DDNS Service 52 Frequently Asked Questions FAQs 52 Appendices Notices 54 ASUS Contact information 67 Networks Global Hotline Information 68 ...

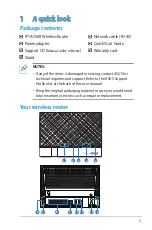
Page 5: ...upport Hotline list at the back of this user manual Keep the original packaging material in case you would need future warranty services such as repair or replacement RT AC56R Wireless Router Network cable RJ 45 Power adapter Quick Start Guide Support CD Manual utility software Warranty card Stand Your wireless router R 5 1 2 3 4 6 8 7 10 12 11 9 13 ...

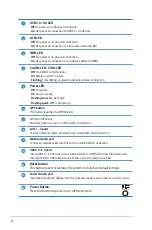
Page 6: ...ocessing 6 WPS button This button launches the WPS Wizard 7 WI FI On Off button Press this button to turn on off the Wi Fi connection 8 LAN 1 4 ports Connect network cables into these ports to establish LAN connection 9 WAN Internet port Connect a network cable into this port to establish WAN connection 10 USB 3 0 2 0 ports Insert USB 3 0 2 0 devices such as USB hard disks or USB flash drives into...

Page 7: ...er that came with your package Using other adapters may damage the device Specifications DC Power adapter DC Output 19V with max 1 58A current Operating Temperature 0 40o C Storage 0 70o C Operating Humidity 50 90 Storage 20 90 ...

Page 8: ... Keep the device away from 802 11g or 20MHz only Wi Fi devices 2 4GHz computer peripherals Bluetooth devices cordless phones transformers heavy duty motors fluorescent lights microwave ovens refrigerators and other industrial equipment to prevent signal interference or loss Always update to the latest firmware Visit the ASUS website at http www asus com to get the latest firmware updates To ensure...

Page 9: ...s simultaneously This allows you to do Internet related activities such as Internet surfing or reading writing e mail messages using the 2 4GHz band while simultaneously streaming high definition audio video files such as movies or music using the 5GHz band If you are using only one computer with single band IEEE 802 11b g n WLAN adapter you will only be able to use the 2 4GHz band If you are usin...

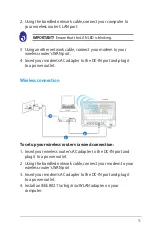
Page 10: ...our network Disconnect the cables wires from your existing modem setup If your modem has a backup battery remove it as well Reboot your computer recommended NOTE Your wireless router has an integrated auto crossover function so use either straight through or crossover cable for wired connection Computer Wall Power Outlet Modem RT AC56R WAN Power LAN 1 2 3 4 To set up your wireless router via wired...

Page 11: ...the DC IN port and plug it to a power outlet Wireless connection Modem RT AC56R 1 2 3 To set up your wireless router via wired connection 1 Insert your wireless router s AC adapter to the DC IN port and plug it to a power outlet 2 Using the bundled network cable connect your modem to your wireless router s WAN port 3 Insert your modem s AC adapter to the DC IN port and plug it to a power outlet 4 ...

Page 12: ...details on connecting to a wireless network refer to the WLAN adapter s user manual To set up the security settings for your network refer to the section Setting up the wireless security settings in this user manual ...

Page 13: ...ch the browser 2 Click Tools Internet options Connections tab LAN settings NOTE Before configuring your wireless router do the steps described in this section for your host computer and network clients 3 From the Local Area Network LAN Settings screen untick Use a proxy server for your LAN 4 Click OK when done ...

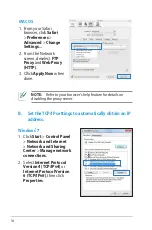
Page 14: ...n done NOTE Refer to your browser s help feature for details on disabling the proxy server B Set theTCP IP settings to automatically obtain an IP address Windows 7 1 Click Start Control Panel Network and Internet Network and Sharing Center Manage network connections 2 Select Internet Protocol Version 4 TCP IPv4 or Internet ProtocolVersion 6 TCP IPv6 then click Properties ...

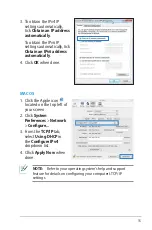
Page 15: ...atically 4 Click OK when done MAC OS 1 Click the Apple icon located on the top left of your screen 2 Click System Preferences Network Configure 3 From the TCP IP tab select Using DHCP in the Configure IPv4 dropdown list 4 Cllick Apply Now when done NOTE Refer to your operating system s help and support feature for details on configuring your computer s TCP IP settings ...

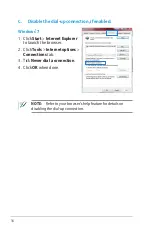
Page 16: ...ndows 7 1 Click Start Internet Explorer to launch the browser 2 Click Tools Internet options Connections tab 3 Tick Never dial a connection 4 Click OK when done NOTE Refer to your browser s help feature for details on disabling the dial up connection ...

Page 17: ... On your web browser such as Internet Explorer Firefox Safari or Google Chrome manually key in the wireless router s default IP address 192 168 1 1 2 On the login page key in the default user name admin and password admin NOTES For your network clients ensure that you set the TCP IP settings to obtain IP addresses automatically disable the proxy server settings disable the dial up settings and can...

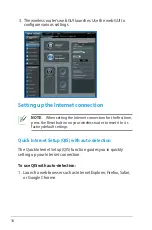
Page 18: ...on for the first time press the Reset button on your wireless router to reset it to its factory default settings Quick Internet Setup QIS with auto detection The Quick Internet Setup QIS function guides you in quickly setting up your Internet connection To use QIS with auto detection 1 Launch a web browser such as Internet Explorer Firefox Safari or Google Chrome ...

Page 19: ...s if your ISP connection type is Dynamic IP PPPoE PPTP L2TP and Static IP Key in the necessary information for your ISP connection type IMPORTANT Obtain the necessary information about your Internet connection type from your ISP RT AC56U RT AC56U ...

Page 20: ...nfigure your connection settings If QIS failed to launch automatically manually launch your wireless router s web GUI to access the QIS page To do this follow these steps On your web browser key in http 192 168 1 1 On the login page key in the default username admin and password admin Click the Quick Internet Setup icon from the upper left corner of the Network Map page 3 Assign the network name S...

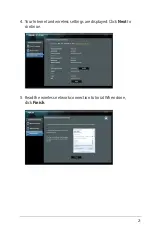
Page 21: ...21 4 Your Internet and wireless settings are displayed Click Next to continue 5 Read the wireless network connection tutorial When done click Finish ...

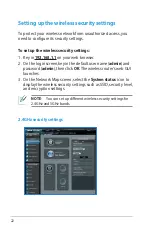
Page 22: ... on your web browser 2 On the login screen key in the default user name admin and password admin then click OK The wireless router s web GUI launches 3 On the Network Map screen select the System status icon to display the wireless security settings such as SSID security level and encryption settings NOTE You can set up different wireless security settings for 2 4GHz and 5GHz bands 2 4GHz security...

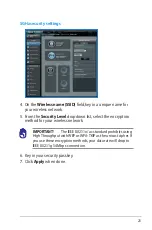
Page 23: ... dropdown list select the encryption method for your wireless network IMPORTANT The IEEE 802 11n ac standard prohibits using High Throughput with WEP or WPA TKIP as the unicast cipher If you use these encryption methods your data rate will drop to IEEE 802 11g 54Mbps connection 6 Key in your security passkey 7 Click Apply when done ...

Page 24: ...aging your network clients To manage your network clients 1 Launch the wireless router s web GUI 2 On the Network Map screen select the Client Status icon to display the information about your network clients ...

Page 25: ...to allow other network clients to access the USB device For more details refer to the section Using AiDisk for sharing files in this user manual To monitor your USB device 1 Launch the wireless router s web GUI 2 On the Network Map screen select the USB Disk Status icon to display the information about your USB device Monitoring your USB device The ASUS Wireless Router provides one USB 3 0 and one...

Page 26: ...most USB HDDs Flash disks up to 2TB size and supports read write access for FAT16 FAT32 EXT2 EXT3 and NTFS To safely remove the USB disk launch the web GUI http 192 168 1 1 then in the upper right corner of Network Map page click the USB icon click Eject USB1 Incorrect removal of the USB disk may cause data corruption 3 On the AiDisk Wizard field click GO to set up an FTP server for Internet file ...

Page 27: ...provides Internet connectivity for temporary visitors without providing access to your private network To create your guest network 1 Launch the wireless router s web GUI 2 On the Guest Network screen click Create to create a network for your visitors ...

Page 28: ...andwidth priority 1 Launch the wireless router s web GUI 2 On the Traffic Manager screen select the QoS tab 3 Click ON to enable the default rule and fill in the upload and download bandwidth fields NOTE Get the bandwidth information from your ISP If you want to prioritize specific network applications and network devices select your preferred priority from the User defined QoS rules ...

Page 29: ...ion allows you to assess the bandwidth usage and speed of your Internet LAN Wired WLAN 2 4GHz or 5GHz connections Using the USB Extension The USB Extension function provides AiDisk Servers Center Network Printer Server and Download Master submenus ...

Page 30: ...re files in the USB disk through the Internet NOTE Before using AiDisk ensure that you have inserted a USB disk into the USB port of your wireless router To use AiDisk 1 Click the AiDisk icon in USB Extension 2 From the Welcome to AiDisk wizard screen click Go ...

Page 31: ...s that you want to assign to the clients accessing your shared data 4 Create your domain name via the ASUS DDNS services select I will use the service and accept theTerms of service and key in your domain name When done click Next ...

Page 32: ...2 5 Click Finish to finish the setup 6 To access the FTP site that you created launch a web browser or a third party FTP client utility and key in the ftp link ftp domain name you have previously created ...

Page 33: ...m the USB disk connected to your wireless router NOTE Before using the UPnP Media Server function install a wireless adapter on your UPnP device To use your router as a Servers center 1 Click USB Extension from the navigation menu at the left side of your screen 2 Select Servers Center Your wireless router is now ready to share the media files stored in the USB disk ...

Page 34: ...a Share allows you to set the account and permission for samba service To use Samba share 1 Click the Network place Samba Share tab in the Servers Center of USB Extension 2 Click Add Delete or Modify to add delete or modify the account Click Apply when done RT AC56U ...

Page 35: ... for the file system support table NOTE Ensure that you safely remove the USB disk Incorrect removal of the USB disk may cause data corruption To share files via the FTP server 1 Ensure that you have set up your FTP server through AiDisk 2 Enable the DDNS service for FTP server access To do this follow these steps a From the navigation menu click Advanced WAN DDNS tab b In the Enable the DDNS Clie...

Page 36: ...W Select this option to assign write only access for a specific file folder R Select this option to assign read only access for a specific file folder No Select this option if you do not want to share a specific file folder 5 Click Apply to apply the changes 6 To access the FTP server key in the ftp link ftp hostname asuscomm com and your user name and password on a web browser or a third party FT...

Page 37: ...ings for the USB disk including maximum login user device name work group and language on FTP server To use miscellaneous setting 1 Click the Miscellaneous setting tab in the Servers Center of USB Extension 2 Follow the instruction to key in the necessary information 3 When finish click Apply ...

Page 38: ... the DHCP Server function in your wireless router so your network clients can automatically obtain IP addresses from your wireless router NOTE The ASUS Wireless Router can support up to 253 IP addresses for your network To set up the DHCP server 1 Click Advanced Setting from the navigation menu at the left side of your screen 2 Under the LAN menu click DHCP Server ...

Page 39: ...s 6 In the LeaseTime field key in the time that the IP addresses expire and the wireless router automatically assigns new IP Addresses for the network clients IMPORTANT For the IP Pool Starting and Ending IP addresses we recommend that you use IP address 192 168 1 xxx xxx can be any number between 2 and 254 IP Pool Starting Address should not be greater than the IP Pool Ending Address ...

Page 40: ...ware in your computer 4 Click Upload The uploading process takes about three minutes Upgrading the firmware NOTE Download the latest firmware from the ASUS website at http www asus com NOTE If the upgrade process fails the wireless router automatically enters the rescue mode and the power LED indicator at the front panel flashes slowly To recover or restore the system use the Firmware Restoration ...

Page 41: ...e Upload Setting 3 Select the tasks that you want to do To restore to the default factory settings click Restore and click OK in the confirmation message To save the current system settings click Save and click Save in the file download window to save the system file in your preferred path To restore previous system settings click Browse to locate the system file that you want to restore then clic...

Page 42: ...SUS wireless router refer to the Printer Support List at http event asus com 2009 networks printersupport RT AC56R htm The wireless router s printer server function is not supported on Windows 2000 To set up your USB Printer 1 Click USB Extension from the navigation menu at the left side of your screen then click Network Printer Server 2 Click Download Now in the ASUS EZ printer sharing mode to do...

Page 43: ...43 4 Follow the onscreen instructions to set up your hardware then click Next USB LAN 3 Unzip the downloaded file and click the Printer icon to run the network printer setup program ...

Page 44: ...44 5 Wait for a few minutes for the initial setup to finish Click Next 6 Click Finish to complete the installation RT AC56U ...

Page 45: ...45 8 After the printer s driver installation is completed network clients can now use the printer 7 Follow the Windows OS instructions to install the printer driver ...

Page 46: ...evice Discovery is an ASUS WLAN utility that detects an ASUS wireless router device and enables you to configure the device To launch the Device Discovery utility From your computer s desktop click Start All Programs ASUS Utility RT AC56RWireless Router Device Discovery 5 5 RT AC56U NOTE When you set the router to Access Point mode you need to use Device Discovery to get the router s IP address ...

Page 47: ...ld the Reset button at the rear panel and simultaneously re plug the wireless router into the power source Release the Reset button when the Power LED at the front panel flashes slowly which indicates that the wireless router is in the rescue mode 3 Use the following to set up your TCP IP settings IP address 192 168 1 x Subnet mask 255 255 255 0 4 From your computer s desktop click Start All Progr...

Page 48: ...ade utility and cannot be used on a working ASUS Wireless Router Normal firmware upgrades must be done through the web interface Refer to Chapter 3 Configuring via the web GUI for more details 5 Specify a firmware file then click Upload ...

Page 49: ...es NOTE The commands for deleting cookies and files vary with the web browser Disable the proxy server settings cancel the dial up connection and set the TCP IP settings to obtain IP addresses automatically For more details refer to the section Before you proceed in this user manual The client cannot establish a wireless connection with the router Out of Range Put the router closer to the wireless...

Page 50: ... correct Retry using another Ethernet cable Internet is not accessible Check the status indicators on the ADSL modem and the wireless router Check if the WAN LED on the wireless router is ON If the LED is not ON change the cable and try again When ADSL Modem Link light is ON not blinking this means Internet Access is possible Restart your computer Refer to the Quick Start Guide of the wireless rou...

Page 51: ...up the wired connection and configuring the wireless encryption again Press the Reset button at the rear panel of the wireless router for more than five seconds How to restore the system to its default settings Press the Reset button at the rear panel of the wireless router for more than five seconds Refer to the section Restoring Saving Uploading settings in Chapter 3 of this user manual The foll...

Page 52: ...n using your device contact the service center Frequently Asked Questions FAQs 1 Will the registered information be lost or registered by others If you have not updated the registered information in 90 days the system automatically deletes the registered information and the domain name may be registered by others 2 I did not register the ASUS DDNS for the router I bought six months ago Can I still...

Page 53: ... cannot You can only register one domain name for one router Use port mapping to implement security in the network 5 After restarting the router why is it that I see differentWAN IPs in MS DOS and in the router configuration page This is normal The interval time between the ISP DNS server and ASUS DDNS results in different WAN IPs in MS DOS and in the router configuration page Different ISPs may h...

Page 54: ...valuation Authorisation and Restriction of Chemicals regulatory framework we published the chemical substances in our products at ASUS REACH website at http csr asus com english index aspx Federal Communications Commission Statement This device complies with Part 15 of the FCC Rules Operation is subject to the following two conditions This device may not cause harmful interference This device must...

Page 55: ...an radiate radio frequency energy and if not installed and used in accordance with the instructions may cause harmful interference to radio communications However there is no guarantee that interference will not occur in a particular installation If this equipment does cause harmful interference to radio or television reception which can be determined by turning the equipment off and on the user i...

Page 56: ...vant and sufficient Protection requirements for electromagnetic compatibility Article 3 1b Testing for electromagnetic compatibility according to EN 301 489 1 and EN 301 489 17 has been conducted These are considered relevant and sufficient Effective use of the radio spectrum Article 3 2 Testing for radio test suites according to EN 300 328 EN 301 893 have been conducted These are considered relev...

Page 57: ...ntial for human contact during normal operation is minimized This device has been evaluated for and shown compliant with the IC Specific Absorption Rate SAR limits when installed in specific host products operated in portable exposure conditions antennas are less than 20 centimeters of a person s body This device has been certified for use in Canada Status of the listing in the Industry Canada s R...

Page 58: ...l Public License Licensing information This product includes copyrighted third party software licensed under the terms of the GNU General Public License Please see The GNU General Public License for the exact terms and conditions of this license We include a copy of the GPL with every CD shipped with our product All future firmware updates will also be accompanied with their respective source code...

Page 59: ...ee software we are referring to freedom not price Our General Public Licenses are designed to make sure that you have the freedom to distribute copies of free software and charge for this service if you wish that you receive source code or can get it if you want it that you can change the software or use pieces of it in new free programs and that you know you can do these things To protect your ri...

Page 60: ... the program proprietary To prevent this we have made it clear that any patent must be licensed for everyone s free use or not licensed at all The precise terms and conditions for copying distribution and modification follow Terms conditions for copying distribution modification 0 This License applies to any program or other work which contains a notice placed by the copyright holder saying it may...

Page 61: ...r option offer warranty protection in exchange for a fee 2 You may modify your copy or copies of the Program or any portion of it thus forming a work based on the Program and copy and distribute such modifications or work under the terms of Section 1 above provided that you also meet all of these conditions a You must cause the modified files to carry prominent notices stating that you changed the...

Page 62: ...y part regardless of who wrote it Thus it is not the intent of this section to claim rights or contest your rights to work written entirely by you rather the intent is to exercise the right to control the distribution of derivative or collective works based on the Program In addition mere aggregation of another work not based on the Program with the Program or with a work based on the Program on a...

Page 63: ...er source or binary form with the major components compiler kernel and so on of the operating system on which the executable runs unless that component itself accompanies the executable If distribution of executable or object code is made by offering access to copy from a designated place then offering equivalent access to copy the source code from the same place counts as distribution of the sour...

Page 64: ...e conditions of this License If you cannot distribute so as to satisfy simultaneously your obligations under this License and any other pertinent obligations then as a consequence you may not distribute the Program at all For example if a patent license would not permit royalty free redistribution of the Program by all those who receive copies directly or indirectly through you then the only way y...

Page 65: ... and or new versions of the General Public License from time to time Such new versions will be similar in spirit to the present version but may differ in detail to address new problems or concerns Each version is given a distinguishing version number If the Program specifies a version number of this License which applies to it and any later version you have the option of following the terms and co...

Page 66: ...CE OF THE PROGRAM IS WITHYOU SHOULD THE PROGRAM PROVE DEFECTIVE YOU ASSUME THE COST OF ALL NECESSARY SERVICING REPAIR OR CORRECTION 12 IN NO EVENT UNLESS REQUIRED BY APPLICABLE LAW OR AGREED TO IN WRITING WILL ANY COPYRIGHT HOLDER OR ANY OTHER PARTY WHO MAY MODIFY AND OR REDISTRIBUTE THE PROGRAM AS PERMITTED ABOVE BE LIABLE TOYOU FOR DAMAGES INCLUDING ANY GENERAL SPECIAL INCIDENTAL OR CONSEQUENTIA...

Page 67: ...SA Telephone 15107393777 Fax 15106084555 Website usa asus com Online support support asus com ASUS COMPUTER GmbH Germany and Austria Address Harkort Str 21 23 D 40880 Ratingen Germany Telephone 491805010923 Fax 492102959911 Website www asus de Online contact www asus de sales Technical Support Telephone Component Networking 491805010923 Telephone System Notebook Eee LCD 491805010920 Fax 4921029599...

Page 68: ...2 4770 Cantonese Chinese English 10 00 20 00 Mon to Fri 10 00 17 00 Sat Ireland 0035 31890719918 English 9 00 17 00 Mon to Fri Japan 0800 123 2787 Japanese 9 00 18 00 Mon to Fri 9 00 17 00 Sat to Sun Malaysia 603 2148 0827 Check Repair Detail Status Only 603 6279 5077 Bahasa Melayu English 10 00 19 00 Mon to Fri Netherlands Luxembourg 0031 591 570290 Dutch English 9 00 17 00 Mon to Fri New Zealand...

Page 69: ... 18 00 Mon to Fri 0041 848111014 French 9 00 17 45 Mon to Fri 0041 848111012 Italian 9 00 17 00 Mon to Fri Taiwan 0800 093 456 02 81439000 Traditional Chinese 9 00 12 00 13 30 18 00 Mon to Fri Thailand 662 679 8367 70 001 800 852 5201 Thai English 9 00 18 00 Mon to Fri Turkey 90 216 524 3000 Turkish 09 00 18 00 Mon to Fri United Kingdom 0044 870 1208340 0035 31890719918 English 9 00 17 00 Mon to F...

Page 70: ... Address HARKORT STR 21 23 40880 RATINGEN GERMANY Authorised distributors inTurkey BOGAZICI BIL GISAYAR SAN VETIC A S Tel 90 212 3311000 Address AYAZAGA MAH KEMERBURGAZ CAD NO 10 AYAZAGA ISTANBUL CIZGI Elektronik San Tic Ltd Sti Tel 90 212 3567070 Address CEMAL SURURI CD HALIM MERIC IS MERKEZI No 15 C D 5 6 34394 MECIDIYEKOY ISTANBUL EEE Yönetmeliğine Uygundur ...

Reviews: