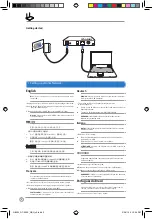
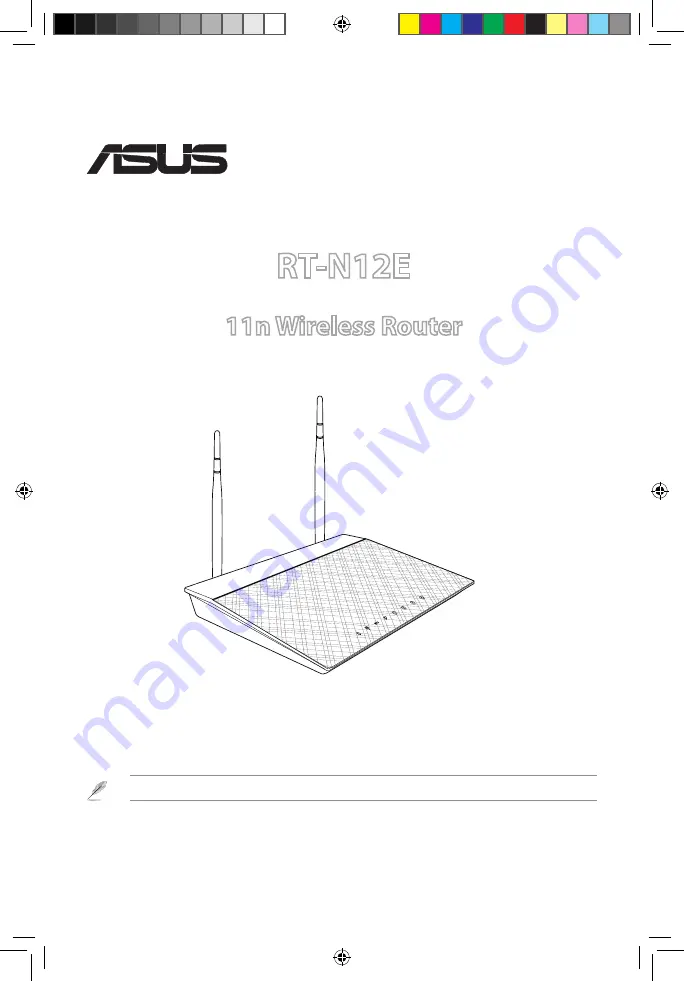
background image

Quick Start Guide

RT-N12E

11n Wireless Router

Q8205 / second Edition / March 2013

®

Note: For more details on the features of the wireless router, please refer to the user manual included in the support CD.

Q8205_RT-N12E_QSG_v2.indd   1

3/28/13   5:13:01 PM

Summary of Contents for RT-N12E

Page 1: ...N12E 11n Wireless Router Q8205 second Edition March 2013 Note For more details on the features of the wireless router please refer to the user manual included in the support CD Q8205_RT N12E_QSG_v2 indd 1 3 28 13 5 13 01 PM ...

Page 2: ...INWEIS Pour plus de détails référez vous au manuel de l utilisateur fourni inclut dans le CD d utilitaires 1 Trennen und entfernen Sie alle Kabel Leitungen Ihrer alten Modemkonfiguration a Ziehen Sie den AC Adapter aus der Steckdose und trennen Sie ihn vom Kabel ADSL Modem b Trennen Sie das Netzwerkkabel vom Kabel ADSL Modem WARNUNG Ihr Kabel ADSL Modem sollte für mindestens zwei Minuten ausgescha...

Page 3: ...ραμμάτων 1 Unplug and disconnect the wires cables from your existing modem setup a Unplug the AC adapter from teh power outlet and disconnect it from your cable ADSL modem b Disconnect the network cable from your cable ADSL modem Warning Ensure that your cable ADSL modem has been turned off at least two minutes Magyar Note További részletekért tekintse meg a felhasználói útmutatót amely a segédpro...

Page 4: ... Káblový ADSL modem vypnite aspoň na dve minúty Español NOTA Si desea obtener más información consulte el manual de usuario que encontrará en el CD de utilidades 1 Desenchufe y desconecte los cables conductores de la instalación de módem existente a Desenchufe el adaptador de CA de la red eléctrica y desconéctelo del módem por cable ADSL b Desconecte el cable de red del módem por cable ADSL ADVERT...

Page 5: ...Sie ein weiteres Netzwerkkabel um den Modem mit dem WAN Anschluss Ihres drahtlosen Routers zu verbinden d Verbinden Sie den AC Adapter ihres Modems mit dem DC In Anschluss sowie mit der Stromversorgung WICHTIG Die WAN und LAN LEDs sollten blinken Italiano a Inserire l adattatore AC del router wireless nella porta DC In e collegarlo ad una presa elettrica b Mediante il cavo di rete collegare il com...

Page 6: ...ről b Válassza a hálózati kábelt kábel ADSL modeméről c Egy másik hálózati kábel segítségével kösse össze a modemet a vezeték nélküli router WAN csatlakozójával d Csatlakoztassa a modem hálózati adapterét a DC tápcsatlakozó aljzathoz majd dugja a fali aljzatba FONTOS Győződjön meg arról hogy a WAN és LAN LED ek villognak Bahasa Indonesia a Pasang adaptor AC router nirkabel ke port DC In lalu sambu...

Page 7: ...módem al puerto WAN del router inalámbrico d Conecte el adaptador de CA del módem al puerto DC In y enchúfelo a la red eléctrica IMPORTANTE Asegúrese de que los indicadores LED WAN y LAN parpadeen ไทย a เสียบอะแดปเตอร AC ของไวร เลสเราเตอร ของคุณเข ากับพอร ต DC เข า และ เสียบเข ากับเต าเสียบไฟฟ าที ผนัง b ใช สายเคเบิลเครือข าย เชื อมต อคอมพิวเตอร ของคุณเข ากับพอร ต LAN ของไวร เลสเราเตอร ของคุณ c ใช...

Page 8: ...prohlížeče zadejte http 192 168 1 1 do webového prohlížeče a přihlaste se pomocí výchozího uživatelského jména admin a hesla admin 3 Launch the web browser and follow the web graphics user interface web GUI instructions English a Launch your web browser such as Internet Explorer Google Chrome or Firefox b Follow the Quick Internet Setup QIS steps NOTE If your wireless router s web GUI does not lau...

Page 9: ...leiskite savo saityno naršyklę pavyzdžiui Internet Explorer Google Chrome arba Firefox b Atlikite sparčiosios interneto sąrankos QIS veiksmus PASTABA Jei nepasileidžia jūsų belaidžio maršruto parinktuvo saityno grafinė sąsaja saityno naršyklėje įrašykite http 192 168 1 1 ir prisijunkite nurodydami kitą numatytąjį naudotojo vardą admin bei slaptažodį admin Bahasa Malaysia a Lancarkan penyemak imbas...

Page 10: ... หรือ Firefox b ทำตามขั นตอนในการตั งค าอินเทอร เน ตด วน QIS หมายเหตุ ถ าเว บ GUI ของไวร เลสเราเตอร ของคุณไม เปิดขึ นมา ให พิมพ http 192 168 1 1 ในเว บเบราเซอร ของคุณ และเข าสู ระบบโดยใช ชื อ ผู ใช เริ มต น admin และรหัสผ าน admin Türkçe a Internet Explorer Google Chrome veya Firefox gibi bir web tarayıcısını başlatın b Hızlı İnternet Ayarı QIS adımlarını izleyin NOTE Eğer kablosuz yönlendiriciniz...

Page 11: ...lungen zu konfigurieren folgen Sie je nach Betriebssystem den nachstehenden Anweisungen Windows 7 A Deaktivieren Sie den Proxyserver falls aktiviert 1 Klicken Sie auf Start Internet Explorer um den Webbrowser zu laden 2 Klicken Sie auf Extras Tools Internetoptionen Internet options Auswahl Verbindungen Connections LAN Einstellungen LAN settings 3 Im Fenster Einstellungen für lokales Netzwerk deakt...

Page 12: ...е протоколов снимите флажок FTP Proxy и Web Proxy HTTPS 4 Нажмите OK когда закончите B УстановитеTCP IP для автоматического получения IP адреса 1 Нажмите иконку Apple System Preferences Network 2 Выберите Ethernet затем выберите Using DHCP в поле Configure 3 Когда закончите нажмите Применить Português do Brasil Eu não posso acessar o GUI web para configurar os ajustes do roteador sem fio Feche tod...

Page 13: ...i Internetu na kartu Connections Připojení 3 Zaškrtěte políčko Never dial a connection Nikdy nevytáčet připojení 4 Po dokončení klepněte na OK Mac OS A Deaktivujte server proxy je li aktivován 1 Na panelu nabídek klepněte na Safari Preferences Předvolby na kartu Advanced Upřesnit 2 Klepněte na Change Settings Změnit nastavení v poli Proxies Servery proxy 3 V seznamu protokolů zrušte výběr FTP Prox...

Page 14: ...Center Verkko ja jakamiskeskus Manage network connections Hallitse verkkoyhteyksiä 2 Valitse Internet ProtocolVersion 4 TCP IPv4 Internet protokolla Versio 4 TCP IPv4 ja napsauta sitten Properties Ominaisuudet 3 Aseta valintamerkki kohtaan Obtain an IP address automatically Hae IP osoite automaattisesti 4 Napsauta OK kun olet valmis C Ota modeemiyhteys pois käytöstä jos se on otettu käyttöön 1 Käy...

Page 15: ...k dapat mengakses GUIWeb untuk mengkonfigurasi pengaturan router nirkabel Tutup semua browser Web yang berjalan lalu buka kembali Ikuti langkah langkah di bawah ini untuk mengkonfigurasi pengaturan komputer berdasarkan sistem operasinya Windows 7 A Menonaktifkan server proxy jika sedang diaktifkan 1 Klik Start Mulai Internet Explorer untuk membuka browser Web 2 Klik tab Tools Alat Internet options...

Page 16: ...PS Saityno tarpinis serveris HTTPS 4 Tai padarę spustelėkite OK Gerai B TCP IP parametrus nustatykite taip kad IP adresas būtų gaunamas automatiškai 1 Spustelėkite Apple piktogramą System Preferences Sistemos parinktys Network Tinklas 2 Pasirinkite Ethernet Eternetas tada lauke Configure Sąranka pasirinkite Using DHCP Naudojant DHCP 3 Tai padarę spustelėkite Apply Taikyti Bahasa Malaysia Saya tida...

Page 17: ...P automaticamente 4 Clique em OK quando terminar C Desactive a ligação de acesso telefónico caso esteja activada 1 Clique em Start Iniciar Internet Explorer para executar o navegador Web 2 Clique em Tool Ferramentas Internet Explorer Opções da Internet separador Connections Ligações 3 Marque a opção Never dial a connection Nunca marcar para ligar 4 Clique em OK quando terminar Mac OS A Desactive o...

Page 18: ...la pantalla Local Area Network LAN Settings Configuración de la red de área local LAN desactive la opción Use a proxy server for your LAN Usar un servidor proxy para la LAN 4 Haga clic en OK Aceptar cuando haya terminado B Establezca la configuraciónTCP IP del equipo para que reciba una dirección IP automáticamente 1 Haga clic en Start Inicio Control Panel Panel de control Network and Internet Red...

Page 19: ... çubuğundan Safari Preferences Tercihler Advanced Gelişmiş sekmesine tıklayın 2 Proxies Proxy ler alanından Change Settings Ayarları Değiştir e tıklayın 3 Protokoller listesinden FTP Proxy ve Web Proxy HTTP seçimini kaldırın 4 Bittiğinde OK Tamam a tıklayın B Otomatik olarak bir IP adresi almak içinTCP IP ayarlarını yapın 1 Apple simgesi System Preferences SistemTercihleri Network Ağ a tıklayın 2 ...

Page 20: ...itve modema odklopite žice kable a Odklopite napajalnik iz vtičnice in iz kabelskega ADSL modema b Omrežni kabel odklopite iz kabelskega ADSL modema Opozorilo Zagotovite da je kabelski ADSL modem izključen vsaj dve minuti Srpski Napomena Za više detalja pogledajte uputstvo za korišćenje koje se nalazi na CD u za podršku 1 Izvucite kabl i isključite žice kablove iz svoje postojeće postavke modema a...

Page 21: ...e for compliance could void the user s authority to operate the equipment Prohibition of Co locationThis device and its antenna s must not be co located or operating in conjunction with any other antenna or transmitter Prohibition of Co location This device and its antenna s must not be co located or operating in conjunction with any other antenna or transmitter IMPORTANT NOTE Radiation Exposure S...

Page 22: ...ent Regulation Cet appareil numerique de la class B respecte toutes les exigences du Reglement sur le materiel brouilleur du Canada Industry Canada Statement This device complies with RSS 210 of the industry Canada Rules Operation is subject to the following two conditions This device may not cause harmful interference This device must accept any interference received including interference that m...

Page 23: ...New Zealand 0800 278 788 0800 278 778 English 9 00 17 00 Mon to Fri Norway 0047 2316 2682 Norwegian English 9 00 17 00 Mon to Fri Philippine 632 636 8504 180014410573 English 9 00 18 00 Mon to Fri Poland 00225 718 033 00225 718 040 Polish 9 00 17 00 8 30 17 30 Mon to Fri Portugal 707 500 310 Portuguese 9 00 17 00 Mon to Fri Russia 8 800 100 ASUS 7 495 231 1999 Russian English 9 00 18 00 Mon to Fri...

Page 24: ...8 1 V5 2 1 2011 05 EN 301 908 2 V5 2 1 2011 07 EN 301 893 V1 6 1 2011 11 EN 302 544 2 V1 1 1 2009 01 EN 302 623 V1 1 1 2009 01 EN 50360 2001 EN 62479 2010 EN 50385 2002 EN 62311 2008 EN 301 489 1 V1 9 2 2011 09 EN 301 489 3 V1 4 1 2002 08 EN 301 489 4 V1 4 1 2009 05 EN 301 489 7 V1 3 1 2005 11 EN 301 489 9 V1 4 1 2007 11 EN 301 489 17 V2 1 1 2009 05 EN 301 489 24 V1 5 1 2010 09 EN 302 326 2 V1 2 2...

Page 25: ... 301 908 2 V5 2 1 2011 07 EN 301 893 V1 6 1 2011 11 EN 302 544 2 V1 1 1 2009 01 EN 302 623 V1 1 1 2009 01 EN 300 330 1 V1 7 1 2010 02 EN 300 330 2 V1 5 1 2010 02 EN 50360 2001 EN 62479 2010 EN 301 489 1 V1 9 2 2011 09 EN 301 489 3 V1 4 1 2002 08 EN 301 489 4 V1 4 1 2009 05 EN 301 489 7 V1 3 1 2005 11 EN 301 489 9 V1 4 1 2007 11 EN 301 489 17 V2 1 1 2009 05 EN 301 489 24 V1 5 1 2010 09 EN 302 326 2...

Page 26: ... 2 V5 2 1 2011 07 EN 301 893 V1 6 1 2011 11 EN 302 544 2 V1 1 1 2009 01 EN 302 623 V1 1 1 2009 01 EN 50360 2001 EN 62479 2010 EN 50385 2002 EN 62311 2008 EN 301 489 1 V1 9 2 2011 09 EN 301 489 3 V1 4 1 2002 08 EN 301 489 4 V1 4 1 2009 05 EN 301 489 7 V1 3 1 2005 11 EN 301 489 9 V1 4 1 2007 11 EN 301 489 17 V2 1 1 2009 05 EN 301 489 24 V1 5 1 2010 09 EN 302 326 2 V1 2 2 2007 06 EN 302 326 3 V1 3 1 ...

Reviews: