background image

ASUS LCD TV Monitor T1 Series 

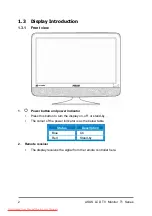
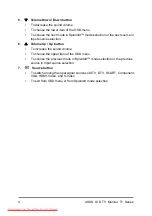
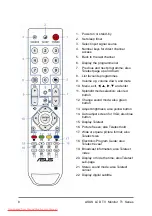
1.  Power socket and switch

 to connect power cord and to switch the display on 

and off


2. HDMI 

connection

 for High-Definition Multimedia Interface (HDMI) signal 

connection


3.  VGA connection for PC

 VGA analogue signal connection


4.  Audio-in for HDMI (if no sound from HDMI)

 for audio signal input from the 

HDMI device without transmitting audio signal over the HDMI cable 

5.  Audio-in for PC stereo sound

 to connect PC audio source 

6. SCART 

connection

 to connect AV devices 

7. Component 

connection

 to connect Component (YPbPr) video signal source 

8. S-Video 

connection

 to connect S-Video signal source 

9. Video-in 

connection

 to connect CVBS video signal source 

10. Audio-in connection

 to input audio signal through RCA cable 

11. Audio-out connection

 to output analogue audio signal over RCA cable 

12.  Optical S/PDIF audio-out

 to output digital audio signal over optical S/PDIF 

cable 

13.  TV signal connection

 to connect TV signal source from antenna or cable 

14.  CI card slot

 for CI (Common Interface) card from your CAM (Conditional Access 

Module, generally used for Pay per View services) provider 

15. Headphone jack

 to output audio signal to headphone 

16. Service port

 for manufacturer use ONLY 

17. Kensington Lock


Downloaded from ManualMonitor.com Manuals

Summary of Contents for T1 Series

Page 1: ...E LCD TV Monitor T1 Series User s Manual Downloaded from ManualMonitor com Manuals ...

Page 2: ...ABILITY OR FITNESS FOR A PARTICULAR PURPOSE IN NO EVENT SHALL ASUS ITS DIRECTORS OFFICERS EMPLOYEES OR AGENTS BE LIABLE FOR ANY INDIRECT SPECIAL INCIDENTAL OR CONSEQUENTIAL DAMAGES INCLUDING DAMAGES FOR LOSS OF PROFITS LOSS OF BUSINESS LOSS OF USE OR DATA INTERRUPTION OF BUSINESS AND THE LIKE EVEN IF ASUS HAS BEEN ADVISED OF THE POSSIBILITY OF SUCH DAMAGES ARISING FROM ANY DEFECT OR ERROR IN THIS ...

Page 3: ...roduction 7 2 1 Assembling the Display 9 2 2 Adjusting the Posture of the Display 9 2 3 Connecting the Display 10 2 4 Turning the Display On 10 2 5 Setting the Monitor 11 2 6 Setting the Television 12 2 7 Using Teletext 13 2 8 Electronic Programme Guide EPG 14 2 9 Programme List 14 3 1 On Screen Display OSD Menu 15 3 1 1 How to reconfigure 15 3 1 2 OSD menu introduction 16 3 2 Specifications Summa...

Page 4: ...e determined by turning the equipment off and on the user is encouraged to try to correct the interference by one or more of the following measures Reorient or relocate the receiving antenna Increase the separation between the equipment and receiver Connect the equipment to an outlet on a circuit different from that to which the receiver is connected Consult the dealer or an experienced radio TV t...

Page 5: ...upply to your home consult your dealer or local power company Use the appropriate power plug which complies with your local power standard Do not overload power strips and extension cords Overloading can result in fire or electric shock Avoid dust humidity and temperature extremes Do not place the display in any area where it may become wet Place the display on a stable surface Unplug the unit dur...

Page 6: ...screen may flicker during the initial use due to the nature of the fluorescent light Turn off the Power Switch and turn it on again to make sure that the flicker disappears You may find slightly uneven brightness on the screen depending on the desktop pattern you use When the same image is displayed for hours an afterimage of the previous screen may remain after switching the image The screen will...

Page 7: ...tes 1 ASUS websites The ASUS websites worldwide provide updated information on ASUS hardware and software products Refer to http www asus com 2 Optional documentation Your product package may include optional documentation that may have been added by your dealer These documents are not part of the standard package Downloaded from ManualMonitor com Manuals ...

Page 8: ...USTek UK Ltd 1st Floor Focus 31 West Wing Mark Road Hemel Hempstead HP2 7BW UK Tel 44 1442 202 700 Fax 44 1442 245 882 ASUS IBERICA S L C Plomo 5 7 08038 Barcelona Spain Tel 34 902 889688 ASUS Nordic AB Finlandsgatan 16 4 Tr 16474 Kista Sweden Tel 46 8 5889 8900 Fax 46 8 5889 8999 ASUS Computer Benelux B V Fultonbaan 12 3439 NE Nieuwegein The Netherlands Tel 31 30 60 22 452 Hotline 31 0 591 668190...

Page 9: ...Unit 2 Markham ON L3R 8C9 Canada Tel 905 370 2787 Fax 905 489 2718 ASIA PACIFIC When disposing of ASUS products in Asia Pacific please contact the following location to make arrangements for recycling ASUSTeK COMPUTER INC No 15 Li Te Rd Peitou Taipei Taiwan Tel 886 2 2894 3447 Hotline 886 0 800 093 456 Fax 886 2 2895 9254 THIS DISPLAY UNIT IS AN ELECTRIC DEVICE WHICH MAY CONTAIN HAZARDOUS MATERIAL...

Page 10: ..._______________________________________________________ ________________________________________________________________________________ ________________________________________________________________________________ ________________________________________________________________________________ ________________________________________________________________________________ ____________________...

Page 11: ...king as well as entertainment With these features you can enjoy the convenience and delightful visual experience that the TV Monitor T1 Series is to bring to you 1 2 Package Contents Check the package of your TV Monitor T1 LCD display for the following items LCD display Display base and screw Warranty card Quick start guide User s manual CD Power cord VGA cable Remote controller and batteries Audi...

Page 12: ... power indicator Press this button to turn the display on off or stand by The colour of the power indicator is as the below table Status Description Blue On Red Stand by 2 Remote receiver The display receives the signal from the remote controller here Downloaded from ManualMonitor com Manuals ...

Page 13: ...urn Exit button To activate the OSD menu To return to the top menu list when the OSD is activated To exit from input source selection 3 W Previous Programme Left button To switch to the previous programme To choose the left item of the OSD menu To choose the previous mode in Splendid mode selection or the previous source in Input source selection 4 X Next Programme Right button To switch to the ne...

Page 14: ...e selection 6 S Volume Up Up button To increase the sound volume To choose the upper item of the OSD menu To choose the previous mode in Splendid mode selection or the previous source in Input source selection 7 Source button To switch among the input signal sources of ATV DTV SCART Component VGA HDMI Video and S Video To exit from OSD menu or from Splendid mode selection Downloaded from ManualMon...

Page 15: ...ASUS LCD TV Monitor T1 Series 5 1 3 3 Rear view T 22T1E 24T1E Downloaded from ManualMonitor com Manuals ...

Page 16: ...mponent YPbPr video signal source 8 S Video connection to connect S Video signal source 9 Video in connection to connect CVBS video signal source 10 Audio in connection to input audio signal through RCA cable 11 Audio out connection to output analogue audio signal over RCA cable 12 Optical S PDIF audio out to output digital audio signal over optical S PDIF cable 13 TV signal connection to connect ...

Page 17: ...batteries in correct polarity to to 3 Close the cover DO NOT mix old or used batteries with new ones Use the remote controller in front of the remote receiver with a distance shorter than 7 meters and within 30 degree to the left and to the right Dispose of used batteries in a recycle bin to prevent from environment pollution Downloaded from ManualMonitor com Manuals ...

Page 18: ...nd enter 11 Splendid mode selection also red button 12 Change sound mode also green button 13 Adjust brightness also yellow button 14 Auto adjust screen for VGA also blue button 15 Display Teletext 16 Picture freeze also Teletext hold 17 Wide or square picture format also Teletext size 18 Electronic Program Guide also Teletext reveal 19 Broadcast information also Teletext index 20 Display or hide ...

Page 19: ...rface with soft cloth to prevent damage to the display 2 2 Adjusting the Posture of the Display 5 15 For optimal viewing we recommend that you look at the full face of the display and then adjust the display to the angle that is most comfortable for you Hold the stand to prevent the monitor from falling when you change its angle You can adjust the display s angle from 5 15 It is normal that the mo...

Page 20: ...ey on the key pad of the display or on the remote controller To connect the audio cable connect the audio cable from the display s audio in port to the computer s and or video devices audio out port To connect to external speakers Connect an audio out cable from the audio out port of the display to the audio in port of external speakers 2 4 Turning the Display On Press the power button See section...

Page 21: ...Hz 1024 x 768 75Hz 60 02KHz 78 75MHz 1152 x 864 75Hz 67 50KHz 108 00MHz 1280 x 720 60Hz 44 77KHz 74 51MHz 1280 x 768 60Hz 47 78KHz 79 50MHz 1280 x 768 75Hz 60 29KHz 102 25MHz 1280 x 800 60Hz 49 70KHz 83 50MHz 1280 x 960 60Hz 60 00KHz 108 00MHz 1280 x 1024 60Hz 63 98KHz 108 00MHz 1280 x 1024 75Hz 79 98KHz 134 99MHz 1360 x 768 60Hz 47 71KHz 85 49MHz 1366 x 768 60Hz 47 10KHz 72 43MHz 1600 x 900 60Hz ...

Page 22: ...emote controller and useW S X T and buttons to select Programme 2 Select Auto Programme and choose the country of the broadcasting system 3 Select Start to scan all the available channels and store them in the memory For further information of setting the TV please read the chapter 3 1 2 Downloaded from ManualMonitor com Manuals ...

Page 23: ...ge The button can also do the same Press the red button to display the preceding page The button can also do the same Like SIMPLE Text you can enter the three digit page number with the number buttons to display your desired page 3 Teletext functions Teletext Hold to hold and to continue the automatic page change when the Teletext page has more than one sub page Teletext Size to double the text si...

Page 24: ...You can also decide whether the programme should be reminded only once or periodically Press the green button to display the schedule list It can tell you the schedule of the programmes set to remind you 2 9 Programme List 1 Programme List The programme list will be displayed by pressing button on the remote controller You can control the programme list only by remote controller The key pad on the...

Page 25: ...ected function has a sub menu still use W X S and T to navigate through the sub menu functions Again the chosen function will be highlighted and you may activate it by pressing ENTER button 3 Use W X S or T to change the settings of the activated function 4 You can go back to the top level of the OSD menu list whenever you press the MENU button Repeat step 2 and 3 to adjust any other function 5 To...

Page 26: ...aired people Lock System to set the system password and to turn on or off the lock to prohibit from accessing to some functions Password is required to access this function Remote Control Only to disable the control function of the key pad on the display set to avoid undesired operation from the set This function can be disabled by pressing and W together in case of malfunction of remote controlle...

Page 27: ...ina Africa and CIS countries I PAL I II usually in UK Ireland Hong Kong and South Africa L SECAM L L usually in France Programme Edit To edit the programme list You can lock or skip certain channels or list some to the table of favourite programmes Password is required if Lock System is on You may use the S T buttons to move the highlighted item If you would like to list the highlighted programme ...

Page 28: ...n Standard Splendid mode Colour to adjust the colour of the displayed picture deeper or paler this function is active only in Standard Splendid mode and VGA input not in use Tint to make the displayed picture more red or green this function is active only when input is NTSC by Video port You may NOT adjust Colour or Tint for VGA input Brightness to adjust the luminance of the display Contrast to a...

Page 29: ...ow tone for fighting games Standard to adjust the equalizer to define your preferred sound effect Equalizer to set the level of each frequency band varying from low to high pitch Equalizer is active ONLY in Standard sound mode Balance to adjust the sound balance of the speakers to your preferred levels Auto Volume to automatically keep the volume level equal even if changing programmes Surround So...

Page 30: ...atically adjust the display parameters for VGA signal This function is active only for VGA input This function can be activated also by pressing key on the key pad of the display set when VGA input in use Manual Configuration to specify the display position clock and phase of the display for VGA signal This function is active only when VGA input source is selected 6 Time Clock to set the current t...

Page 31: ...l Pitch 0 248mm H x 0 248mm V Physical Resolution 1920 H x 1080 V Luminance Maximum 300 cd m2 Contrast Ratio Maximum 20 000 1 when ASCR on Number of Colours 16 7 million colours Colour Gamut 72 NTSC Synchronization Frequency Horizontal 30 82 kHz Vertical 50 76 Hz Max Pixel Frequency 162 MHz Signal Connectors 19 pin HDMI x 2 15 pin D Sub RCA R L audio in 3 5mm mini jack audio in 3 5mm mini jack hea...

Page 32: ...m H x 0 277mm V Physical Resolution 1920 H x 1080 V Luminance Maximum 300 cd m2 Contrast Ratio Maximum 20 000 1 when ASCR on Number of Colours 16 7 million colours Colour Gamut 72 NTSC Synchronization Frequency Horizontal 30 82 kHz Vertical 50 76 Hz Max Pixel Frequency 162 MHz Signal Connectors 19 pin HDMI x 2 15 pin D Sub RCA R L audio in 3 5mm mini jack audio in 3 5mm mini jack headphone out SCA...

Page 33: ...tall new batteries Screen too bright too dark or colour error Check whether the signal cable is undamaged Use Reset function in the Picture item of the OSD menu Screen image bouncing rolling or with water flowing pattern Check whether the signal cable is well connected Move away electrical devices that may cause electromagnetic interference Screen image blurry or fuzzy Check whether the video sign...

Page 34: ..._______________________________________________________ ________________________________________________________________________________ ________________________________________________________________________________ ________________________________________________________________________________ ________________________________________________________________________________ ____________________...

Reviews: