background image

TF600T

Undocking your Tablet PC

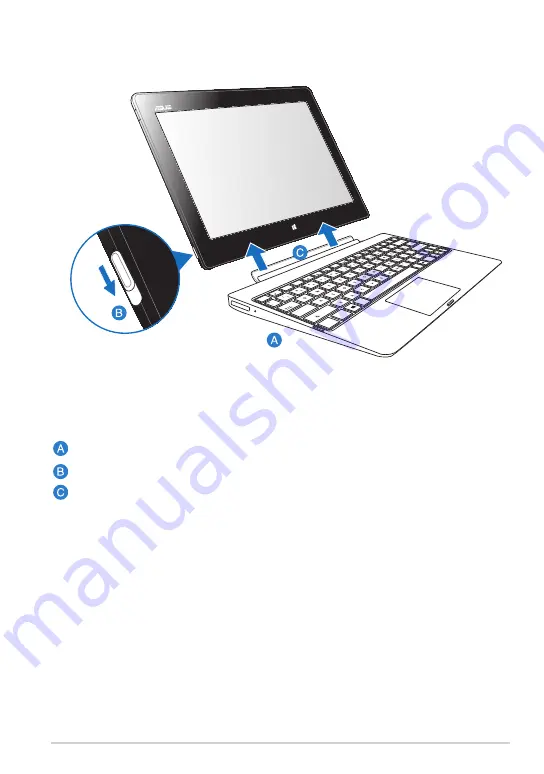
To undock your Tablet PC:

Put the entire assembly on a flat and stable surface.
Move the latch down to release the Tablet PC from the mobile dock.
Lift the Tablet PC to detach it from the mobile dock.

backspa

ce

tab

enter

caps lock

f2

esc

delete

scr lk

insertnum lk

prt scsysrq

pausebreak

f12

f10

f8

f7

f1

f6

f5

f4

f3

f9

shift

shift

ctrl

ctrl

alt

alt

fn

pgd

n

pgup

hom

e

end

fn

Summary of Contents for T600

Page 1: ...ing the impact on the environment The reduction of the number of the manual pages complies with the reduction of carbon emission For the detailed user manual and related information refer to the user manual included in the Tablet PC or visit the ASUS Support Site at http support asus com Tablet PC User Manual TF600T ...

Page 2: ...THOUT NOTICE AND SHOULD NOT BE CONSTRUED AS A COMMITMENT BY ASUS ASUS ASSUMES NO RESPONSIBILITY OR LIABILITY FOR ANY ERRORS OR INACCURACIES THAT MAY APPEAR IN THIS MANUAL INCLUDING THE PRODUCTS AND SOFTWARE DESCRIBED IN IT Copyright 2012 ASUSTeK COMPUTER INC All Rights Reserved LIMITATION OF LIABILITY Circumstances may arise where because of a default on ASUS part or other liability you are entitl...

Page 3: ... Rear view 14 Chapter 2 Using yourTablet PC Setting up yourTablet PC 18 Charging your Tablet PC 18 Turning your Tablet PC on 19 Using gestures on theTablet PC 20 Gestures 20 Connecting an HDMI compliant display 22 Using the USB dongle 23 Using the mobile dock 24 Getting to know your mobile dock 24 Docking your Tablet PC 27 Charging your Tablet PC on the mobile dock 28 Using the Touchpad 29 Functio...

Page 4: ...hing the Charms bar 39 Inside the Charms bar 40 Snap feature 41 Using Snap 41 Connecting to the Internet 43 Enabling Wi Fi 43 Airplane mode 43 Turning the Airplane mode on or off 43 Internet Explorer 10 44 Using IE10 44 Remove everything and reinstallWindows 46 Turning yourTablet PC off 47 Putting your Tablet PC to sleep 47 Chapter 4 ASUS apps Featured ASUS apps 50 My Library 50 MyDictionary 54 AS...

Page 5: ...are components of your Tablet PC Chapter 2 Using yourTablet PC This chapter shows you how to use the different parts of your Tablet PC Chapter 3 Working withWindows RT This chapter provides an overview of using Windows RT in your Tablet PC Chapter 4 ASUS Apps This chapter features the ASUS applications included with your Tablet PC Appendices This section includes notices and safety statements for ...

Page 6: ...plete a task NOTE This message contains additional information and tips that can help complete tasks WARNING This message contains important information that must be followed to keep you safe while performing tasks and prevent damage to your Tablet PC s data and components Typography Bold This indicates a menu or an item that must be selected Bold Italic This indicates sections that you can refer ...

Page 7: ...ts NOTES Contact your retailer if any of these items are damaged or missing Contents may vary per country or region Tablet PC Power adapter USB Dock cable Technical documentations and warranty card USB Dongle Cleaning cloth ...

Page 8: ...t connected to the power supply for extended periods of time Do not use damaged power cords accessories and other peripherals While powered ON ensure that you do not carry or cover your Tablet PC with any materials that can reduce air circulation Do not place your Tablet PC on uneven or unstable work surfaces You can send your Tablet PC through x ray machines used on items placed on conveyor belts...

Page 9: ... warm water Remove any extra moisture from your Tablet PC using a dry cloth Do not use strong solvents such as thinners benzene or other chemicals on or near your Tablet PC Do not place objects on top of your Tablet PC Do not expose your Tablet PC to strong magnetic or electrical fields Do not use or expose your Tablet PC near liquids rain or moisture Do not expose your Tablet PC to dusty environm...

Page 10: ...ASUS Tablet PC User Manual 10 ...

Page 11: ...TF600T 11 Chapter 1 Hardware Setup Chapter 1 Hardware Setup ...

Page 12: ...lly adjust the brightness of the display depending on the ambient light condition Front camera This built in 2 megapixel camera allows you to take pictures or record videos using your Tablet PC Camera indicator The camera indicator lights up when either of the built in cameras is in use Touch screen panel The touch screen panel allows you to operate your Tablet PC using touch gestures Front view ...

Page 13: ... go back to the last app you opened Dock port Use the dock port to charge the battery pack or supply power to your Tablet PC This port also allows you to connect the bundled USB dongle for USB 2 0 connectivity If you purchased an optional mobile dock you can connect it to the dock port to support keyboard touchpad and USB 2 0 port functions ...

Page 14: ... Press this button to increase or decrease the volume Audio speakers Your Tablet PC is equipped with a built in high quality stereo speakers Microphone The built in microphone can be used for video conferencing voice narrations or simple audio recording Built in Near Field Communication NFC tag The built in NFC tag allows you to conveniently share contacts pictures videos business cards and other ...

Page 15: ...ations of the battery s charge status Color Status White Fully charged Orange Charging mode Dim The AC adapter is not plugged to the Tablet PC Manual reset hole If the system becomes unresponsive insert a straightened paper clip into the hole to force restart your Tablet PC WARNING Forcing the system to restart may result to data loss We strongly recommend that you back up your data regularly Micr...

Page 16: ...es depending on the lighting condition ON The system uses the LED flash constantly when taking pictures in any lighting condition TORCH The system uses the LED flash as a constant lighting fixture or torch when taking photos or recording videos OFF The system disables the LED flash Mobile dock latch Move the latch down to detach your Tablet PC from the mobile dock Hinge holes Align and insert the ...

Page 17: ...TF600T 17 Chapter 2 Using your Tablet PC Chapter 2 Using your Tablet PC ...

Page 18: ...t you plug the power adapter to the correct socket outlet with the correct input rating The output voltage of this adapter is DC5V 2A When using your Tablet PC on power adapter mode the grounded socket outlet must be near to the unit and easily accessible Charge the Tablet PC for eight 8 hours before using it in battery mode for the first time To charge yourTablet PC Connect the USB Dock cable to ...

Page 19: ...TF600T 19 Turning yourTablet PC on To turn your Tablet PC on Press the power button ...

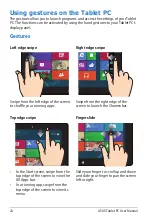
Page 20: ...es Top edge swipe Finger slide In the Start screen swipe from the top edge of the screen to view the All Apps bar In a running app swipe from the top edge of the screen to view its menu Slide your finger to scroll up and down and slide your finger to pan the screen left or right Left edge swipe Right edge swipe Swipe from the left edge of the screen to shuffle your running apps Swipe from the righ...

Page 21: ... the touch panel Tap and hold Tap Double tap To move an app tap and hold the app tile and drag it to a new location To close an app tap and hold the top side of the running app and drag it down to the bottom of the screen to close it Tap an app to launch it On Desktop mode double tap an application to launch it ...

Page 22: ...anual 22 Connecting an HDMI compliant display To connect an HDMI compliant display Connect the micro HDMI connector to the micro HDMI port of your Tablet PC Plug the HDMI cable to the HDMI port of an HDMI compliant display ...

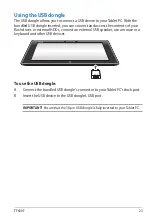
Page 23: ...s the contents of your flash drives or external HDDs connect an external USB speaker use a mouse or a keyboard and other USB devices To use the USB dongle A Connect the bundled USB dongle s connector to your Tablet PC s dock port B Insert the USB device to the USB dongle s USB port IMPORTANT Ensure that the 36 pin USB dongle is fully inserted to your Tablet PC ...

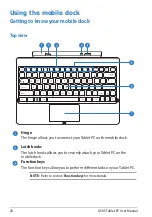
Page 24: ...hooks allows you to securely attach your Tablet PC on the mobile dock Function keys The function keys allow you to perform different tasks on your Tablet PC NOTE Refer to section Function keys for more details home pgdn pgup end enter backspace tab esc caps lock shift shift ctrl ctrl alt alt fn fn delete scr lk insert num lk prt sc sysrq pause break f12 f11 f10 f9 f8 f7 f6 f5 f4 f3 f2 f1 ...

Page 25: ...you disable the mobile dock s touchpad Keyboard The keyboard provides full sized QWERTY keys with a comfortable travel depth for typing It also enables you to use the function keys allows quick access to Windows and controls other multimedia functions NOTE The keyboard layout differs by territory Touchpad The touchpad allows you to use multi gestures to navigate onscreen providing an intuitive use...

Page 26: ...s two color LED provides a visual indication of the battery s charge status Refer to the table below for details Color Status White Fully charged Orange Charging mode Dim The AC adapter is not plugged to the mobile dock USB 2 0 Port The USB Universal Serial Bus port is compatible with USB 2 0 or USB 1 1 devices such as keyboards pointing devices flash disk drives external HDDs speakers cameras and...

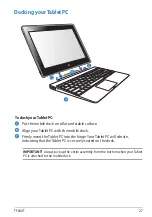
Page 27: ...lt f n pgd n pgu p ho me end fn Docking yourTablet PC IMPORTANT Always pick up the entire assembly from the bottom when your Tablet PC is attached to the mobile dock To dock yourTablet PC Put the mobile dock on a flat and stable surface Align your Tablet PC with the mobile dock Firmly insert the Tablet PC into the hinge Your Tablet PC will vibrate indicating that the Tablet PC is securely seated o...

Page 28: ...t voltage of this adapter is DC5V 2A When using your Tablet PC assembly on power adapter mode the grounded socket outlet must be near to the unit and easily accessible Charge the mobile dock for eight 8 hours before using it in battery mode for the first time To charge yourTablet PC on the mobile dock Connect the USB Dock connector to the power adapter Insert the 36 pin connector to the dock port ...

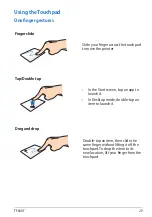
Page 29: ...same finger without lifting it off the touchpad To drop the item to its new location lift your finger from the touchpad Finger slide Slide your finger across the touchpad to move the pointer Tap Double tap In the Start screen tap an app to launch it In Desktop mode double tap an item to launch it ...

Page 30: ...wn Slide two fingers to scroll up or down Drag and drop Select an item then press and hold the left click button Using your other finger slide down the touchpad to drag and drop the item to a new location Two finger scroll left right Slide two fingers to scroll left or right ...

Page 31: ...same fn f1 Puts the Tablet PC into Sleep mode fn f4 Turns Airplane mode on or off NOTE When enabled the Airplane mode disables all wireless connectivity fn f5 Decreases the display brightness fn f6 Increases the display brightness fn f8 Activates the second screen settings NOTE Ensure that a second display is connected to your Tablet PC fn f9 Enables or disables the touchpad NOTE The light indicat...

Page 32: ...ndows 8 keys on your mobile dock are used as below Press this key to go back to the Start screen If you are already in the Start screen press this key to go back to the last app you opened In the Start screen select an app and press this key to launch the settings bar NOTE Use the arrow keys to select an app In Desktop mode press this key to simulate the right click function ...

Page 33: ...n to release the Tablet PC from the mobile dock Lift the Tablet PC to detach it from the mobile dock ba ck sp ac e t a b en t e r c a p s l o c k f2 esc de l e t e scr l k i n se r t num l k prt sc sy srq pa us e bre ak f 1 2 f 1 0 f 8 f7 f1 f6 f 5 f4 f3 f 9 sh i f t s h i f t c t r l ct rl a lt a lt f n pgd n pgu p hom e end fn ...

Page 34: ...ASUS Tablet PC User Manual 34 ...

Page 35: ...TF600T 35 Chapter 3 Working with Windows RT Chapter 3 Working with Windows RT ...

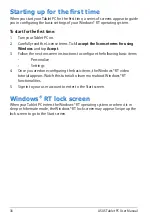
Page 36: ...g Windows and tap Accept 3 Follow the next onscreen instructions to configure the following basic items Personalize Settings 4 Once you are done configuring the basic items the Windows RT video tutorial appears Watch this tutorial to learn more about Windows RT functionalities 5 Sign in to your user account to enter to the Start screen Windows RT lock screen When your Tablet PC enters the Windows ...

Page 37: ...pears after successfully signing in to your user account It helps organize all the programs and applications you need in just one place Windows apps This group of applications can be customized to provide a one stop hub for work and play in your Tablet PC Each of them represents a specific function that you can use and share through network connections NOTE Some apps require signing in to your Mic...

Page 38: ...ng apps To unpin an app 1 Swipe down the app tile to select and launch the settings bar 2 Tap to unpin an app Accessing all apps Launching the Apps screen To view all apps 1 Swipe from the top or bottom edge of the screen to launch the All apps bar 2 Tap to show all installed apps in your Tablet PC Pinning more apps to the Start screen To pin an app 1 In the Apps screen swipe down the app to selec...

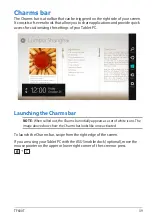
Page 39: ...the settings of your Tablet PC Launching the Charms bar NOTE When called out the Charms bar initially appears as a set of white icons The image above shows how the Charms bar looks like once activated To launch the Charms bar swipe from the right edge of the screen If you are using your Tablet PC with the ASUS mobile dock optional move the mouse pointer on the upper or lower right corner of the sc...

Page 40: ...t screen From the Start screen you can also use this to revert back to a recently opened app Devices This tool allows you to access and share files with the devices attached to your Tablet PC such as an external display or printer Settings This tool allows you to access the settings of your Tablet PC NOTE To ensure that your mobile dock optional is also updated with the latest update from Windows ...

Page 41: ... Tap and hold the app s topmost part and drag it to the left or right side of the screen until the snap bar appears 3 Launch another app Snap feature The Snap feature displays two apps side by side allowing you to work or switch between apps IMPORTANT Ensure that your Tablet PC screen resolution is set to 1366 x 768 before using the Snap feature Snap bar ...

Page 42: ...d Using the touchpad To use the touchpad 1 Launch the app that you wish to snap 2 Hover the mouse pointer on the top side of your screen 3 Once the pointer changes to a hand icon drag then drop the app to the left or right side of the display panel 4 Launch another app Using the keyboard To use the keyboard 1 Launch the app that you wish to snap 2 Press 3 Launch another app 4 To switch between app...

Page 43: ...ght Turning the Airplane mode on or off To turn the Airplane mode on or off 1 Launch the Charms bar 2 Tap and tap 3 Move the slider to the left to turn the Airplane mode off or move the slider to the right to turn the Airplane mode on EnablingWi Fi To enable the Wi Fi 1 Launch the Charms bar 2 Tap then tap 3 Tap to select an access point from the list of available Wi Fi connections then tap Connec...

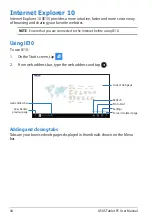
Page 44: ...E Ensure that you are connected to the Internet before using IE10 1 On the Start screen tap 2 From web address bar type the web address and tap Using IE10 To use IE10 Current web page Goes back to previous page Refresh Pin to Start Settings Forward to latest page web address bar Adding and closing tabs Tabs are your browsed web pages displayed in thumbnails shown on the Menu bar ...

Page 45: ...ss bar type the web address and tap To close a tab NOTE This action closes all tabs except the current page displayed on your screen 1 Swipe from the top or bottom edge of the IE10 page to show the Menu bar 2 Tap of the tab that you want to close 3 If you want to close all tabs tap Close tabs To add a new tab ...

Page 46: ...s Refer to the steps below to enable this option IMPORTANT Back up all your data before enabling this option NOTE This process may take a while to complete 4 Follow the onscreen instructions to complete the reinstallation and reset process 1 Launch the Charms bar 2 Tap Change PC Settings General 3 Scroll down to view the Remove everything and reinstall Windows option Under this option tap Get Star...

Page 47: ...he Charms bar then tap Shut down to do a normal shutdown From the log in screen tap Shut down If your Tablet PC is unresponsive press and hold the power button for at least eight 8 seconds until your Tablet PC turns off Putting yourTablet PC to sleep To put your Tablet PC on Sleep mode press the Power button once ...

Page 48: ...ASUS Tablet PC User Manual 48 ...

Page 49: ...TF600T 49 Chapter 4 ASUS apps Chapter 4 ASUS apps ...

Page 50: ...itle author and date NOTE MyLibrary only supports e books in ePub format Tap to sort by author date or title Books Importing e books To import more e books in your bookshelf you can perform the following steps below 1 Swipe from the top or bottom of the screen to launch the settings bar 2 Tap then tap Files to locate the e books that you want to add in your bookshelf My Library main screen ...

Page 51: ...pe the right page to proceed to the next page and tap or swipe the left page to go back to the previous page Tap to return to Bookshelf Tap to show Chapter List Tap to search for a keyword Tap to zoom in the page Tap to zoom out the page Tap to insert a bookmark Tap to view bookmark list or enable Day Night mode Tap to scroll pages ...

Page 52: ...ook to show the settings bar 2 Tap to mark the page You can also mark as many pages as you like 3 To view the bookmarked pages tap then tap the page that you want to open Placing a bookmark The bookmark allows you to mark the pages of a book so that you can easily return to the last page you read ...

Page 53: ...e your finger to select When you select a phrase the dictionary note does not appear 2 Tap Highlight to mark the word or phrase Tap Note to record the selected word or phrase Tap Copy to copy the selected word or phrase and paste it to a text app NOTES To translate a word or phrase tap Highlight Tap the highlighted word or phrase then tap Translation and select a language To share a word or phrase...

Page 54: ... to launch Dictionary screen Tap to launch Translate screen Key in the word and tap Translate Definition pane Tap to open Wiktionary Tap to hear the word s pronunciation History pane Dictionary screen Translate screen Tap to swap languages Key in the words or phrases for translation Translation pane Tap to select the translation language Tap to select the text s original language ...

Page 55: ... and voice messages and instantly save them in your WebStorage account NOTES You must have an ASUS WebStorage account to use this app Register if you don t own one Ensure that you are connected to the Internet before accessing ASUS WebStorage Ensure to install the latest ASUS WebStorage PC Suite in your computer Visit our website at http www asuswebstorage com for more details ASUSWebStorage main ...

Page 56: ...g files to MySyncFolder To upload files to MySyncFolder Adding files to MySyncFolder To add files to MySyncFolder 1 Tap to launch MySyncFolder 2 Swipe from the top or bottom edge of the screen to launch the settings bar 3 Tap then locate the file that you want to upload to your MySyncFolder 1 Swipe from the top or bottom edge of the screen to launch the settings bar 2 Tap then select which action ...

Page 57: ...Swipe down the file or folder to select and launch the settings bar 2 To rename the file or folder tap to key in the file name then tap 3 To add as favorite tap NOTE When you add as favorite a star icon appears on the upper left corner of the file or folder 4 To share through e mail or link tap then tap to share through e mail or tap to share via link NOTES You must have a Microsoft account to sha...

Page 58: ...u marked as favorites or shared as links are automatically added to Starred folder and My shared link folder respectively Backed up Data This folder allows you to open the files that you backed up from your computer It also allows you to tag files as favorites and share files via e mail or link via ASUS WebStorage site NOTES ASUS WebStorage registers your computer s name and will reflect to your B...

Page 59: ...n folder To add files to My Collection folder 1 Swipe from the top or bottom edge of the screen to launch the settings bar 2 Tap then select which action that you want to do a Tap Note taking to take down notes b Tap Snapshot to take photos c Tap Video record to record videos d Tap Audio record to record audios 3 Key in a filename and tap Save The file that you saved will be automatically uploaded...

Page 60: ...file or folder tap to key in the file name then tap 3 To add as favorite tap NOTE When you add as favorite a star icon appears on the upper left corner of the file or folder 4 To share through e mail or link tap then tap to share via e mail or tap to share via link NOTES You must have a Microsoft account to share your contents via e mail The files that you marked as favorites or shared as links ar...

Page 61: ...stomize your contents in Starred folder 1 Tap to launch Starred folder 2 Swipe down the file or folder to select and launch the settings bar 3 Tap to remove the file or folder 1 Swipe down the file or folder to select and launch the settings bar 2 To rename the file or folder tap to key in the file name then tap 3 To share through e mail or link tap then tap to share through e mail or tap to share...

Page 62: ...to view 3 Tap to go back to main screen Customizing contents in Recent changes folder You can customize your contents in this folder like rename share via e mail or link via ASUS WebStorage site To customize your contents in Recent changes folder 1 Swipe down the file to select and launch the settings bar 2 To rename the file tap to key in the file name then tap 3 To delete the file tap to delete ...

Page 63: ... allows you to view the photos saved in MySyncFolder Backed up Data and My Collection folders It also allows you to customize the recent photos like rename delete tag as favorite and share via e mail or link via ASUS WebStorage site NOTE You can only customize photos saved in MySyncFolder and My Collection folders Viewing recent photos To view recent photos 1 Tap to launch Recent photos folder 2 T...

Page 64: ...eting them 4 To add as favorite tap NOTE When you add as favorite a star icon appears on the upper left corner of the photo Recent music This folder allows you to view the music files saved in Backed up Data and My Collection folders It also allows you to customize the music files like rename delete tag as favorite and share via e mail or link via ASUS WebStorage site NOTE You can only customize m...

Page 65: ... then tap OK IMPORTANT Deleting music files from this folder will also delete the files from their original locations Ensure to make a backup of the music files before deleting them 4 To add as favorite tap NOTE When you add as favorite a star icon appears on the side of the music file My shared link This folder allows you to view and access the contents that you linked in ASUS WebStorage site NOT...

Page 66: ...ipe down the file to select and launch the settings bar 2 To rename the file tap to key in the file name then tap 3 To delete the file tap then tap OK IMPORTANT Deleting contents from this folder will also delete the contents from their original locations Ensure to make a backup before deleting them 4 To add as favorite tap NOTE When you add as favorite a star icon appears on the upper left corner...

Page 67: ...orite artists and radio stations NOTE The contents supplied may vary with the country or region Tap to open a featured artist station Tap to open more stations Using vibe ASUS vibe allows you to stream music and radio contents provided by Internet radio service such as AUPEO Free Music ASUS vibe main screen ...

Page 68: ...tream music of featured artists themes and genres To use AUPEO Free Music 1 In AUPEO Free Music tap the artist that you want to open 2 To look for more artists tap MORE and scroll the screen sideways 3 Tap the item that you want to play Tap to open all featured artists Tap to select category Tap to go back to main screen ...

Page 69: ...tebooks 1 Tap Add a new Notebook 2 Key in a notebook name and select a layout option in Page Color and Style NOTE You can view the layout of the selected options on the right corner of the screen 3 Tap OK Using SuperNote SuperNote incorporates the three modes in one canvas Paint mode Scribble mode and Keyboard mode In this design you can scribble paint doodle and type texts in your notebooks Creat...

Page 70: ...llows you to be creative with your notebooks When you swipe from the top or bottom edge of the screen a tool bar launches which consists of several tools that allow you to customize your notebooks NOTE The settings of the tool bar may vary depending on the mode that you selected To customize your notebook 1 In the SuperNote main screen tap the notebook that you want to customize 2 Swipe from the t...

Page 71: ... 1 In the SuperNote main screen swipe down the notebook to select and launch the menu bar 2 Tap then rename the notebook 3 Tap anywhere on the screen to save the new notebook filename Hiding your notebook To hide your notebook 1 In the SuperNote main screen swipe down the notebook to select and launch the menu bar 2 Tap then tap OK NOTE To view the hidden notebooks tap on the main screen ...

Page 72: ...ASUS Tablet PC User Manual 72 1 In the SuperNote main screen swipe down the notebook to select and launch the menu bar 2 Tap then tap OK Deleting your notebook To delete your notebook ...

Page 73: ...equipment into an outlet on a circuit different from that to which the receiver is connected Consult the dealer or an experienced radio TV technician for help Changes or modifications not expressly approved by the party responsible for compliance could void the user s authority to operate the equipment The antenna s used for this transmitter must not be co located or operating in conjunction with ...

Page 74: ...lso can be found at the following web address http www ic gc ca eic site smt gst nsf eng sf08792 html Canada avis d Industrie Canada IC Cet appareil numérique de classe B est conforme aux normes canadiennes ICES 003 et RSS 210 Son fonctionnement est soumis aux deux conditions suivantes 1 cet appareil ne doit pas causer d interférence et 2 cet appareil doit accepter toute interférence notamment les...

Page 75: ...verning Radio and Telecommunications Equipment and mutual recognition of conformity The highest CE SAR value for the device is 0 239 W kg Power Safety Requirement Products with electrical current ratings up to 6A and weighing more than 3Kg must use approved power cords greater than or equal to H05VV F 3G 0 75mm2 or H05VV F 2G 0 75mm2 ASUS Recycling Takeback Services ASUS recycling and takeback pro...

Page 76: ...aced in municipal waste DO NOT throw the Tablet PC in municipal waste This product has been designed to enable proper reuse of parts and recycling The symbol of the crossed out wheeled bin indicates that the product electrical electronic equipment and mercury containing button cell battery should not be placed in municipal waste Check local regulations for disposal of electronic products DO NOT th...

Page 77: ...300 440 2 V1 4 1 2010 08 EN 301 511 V9 0 2 2003 03 EN 301 908 1 V4 2 1 2010 03 EN 301 908 2 V3 2 1 2007 05 EN 301 893 V1 4 1 2005 03 EN 302 544 2 V1 1 1 2009 01 EN 62311 2008 EN 301 489 1 V1 9 2 2011 09 EN 301 489 3 V1 4 1 2002 08 EN 301 489 4 V1 3 1 2002 08 EN 301 489 7 V1 3 1 2005 11 EN 301 489 9 V1 4 1 2007 11 EN 301 489 17 V2 1 1 2009 05 EN 301 489 24 V1 5 1 2010 10 EN 302 326 2 V1 2 2 2007 06...

Page 78: ...ASUS Tablet PC User Manual 78 ...

Reviews: