Chapter 2: Hardware Information
2-6
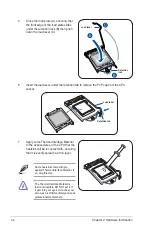
5.
Close the load plate (A), ensuring that
the front edge of the load plate slides
under the retention lock (B) then push
down the load lever (C).
Retention
lock
Load lever
6.
Insert the load lever under the retention tab to remove the PnP cap from the CPU
socket.
Retention tab
Load lever
7.
Apply some Thermal Interface Material
to the exposed area of the CPU that the
heatsink will be in contact with, ensuring
that it is evenly spread in a thin layer.
Some heatsinks come with pre-
applied Thermal Interface Material. If
so, skip this step.
The Thermal Interface Material is
toxic and inedible. DO NOT eat it. If
it gets into your eyes or touches your
skin, wash it off immediately and seek
professional medical help.
Summary of Contents for TS100-E10-PI4
Page 1: ...Pedestal Server TS100 E10 PI4 User Guide ...
Page 10: ...x ...
Page 42: ...Chapter 3 Motherboard Information 3 2 3 1 Motherboard layout ...
Page 60: ...Chapter 3 Motherboard Information 3 20 ...
Page 118: ...5 18 Chapter 5 RAID Configuration ...
Page 125: ...ASUS TS100 E10 PI4 6 7 5 Follow the onscreen instructions to complete the installation ...
Page 126: ...6 8 Chapter 6 Driver Installation ...
Page 128: ...A 2 Appendix P11C X AUDIO block diagram ...
Page 138: ...A 12 Appendix ...


