background image

2

Contents

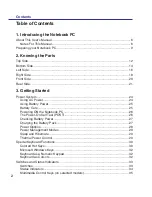
Table of Contents

1. Introducing the Notebook PC

About This User’s Manual ������������������������������������������������������������������������������������������6

Notes For This Manual �������������������������������������������������������������������������������������������6

Preparing your Notebook PC��������������������������������������������������������������������������������������9

2. Knowing the Parts

Top Side��������������������������������������������������������������������������������������������������������������������12
Bottom Side ��������������������������������������������������������������������������������������������������������������14
Left Side �������������������������������������������������������������������������������������������������������������������16
Right Side �����������������������������������������������������������������������������������������������������������������18
Front Side �����������������������������������������������������������������������������������������������������������������20
Rear Side������������������������������������������������������������������������������������������������������������������21

3. Getting Started

Power System ����������������������������������������������������������������������������������������������������������24

Using AC Power ���������������������������������������������������������������������������������������������������24

Using Battery Power ��������������������������������������������������������������������������������������������25

Battery Care ���������������������������������������������������������������������������������������������������������25

Powering ON the Notebook PC ���������������������������������������������������������������������������26

The Power-On Self Test (POST) ��������������������������������������������������������������������������26

Checking Battery Power ��������������������������������������������������������������������������������������27

Charging the Battery Pack �����������������������������������������������������������������������������������27

Power Options �����������������������������������������������������������������������������������������������������28

Power Management Modes ���������������������������������������������������������������������������������29

Sleep and Hibernate ��������������������������������������������������������������������������������������������29

Thermal Power Control ����������������������������������������������������������������������������������������29

Special Keyboard Functions �������������������������������������������������������������������������������������30

Colored Hot Keys �������������������������������������������������������������������������������������������������30

Microsoft Windows Keys ��������������������������������������������������������������������������������������32

Keyboard as a Numeric Keypad  �������������������������������������������������������������������������32

Keyboard as Cursors �������������������������������������������������������������������������������������������32

Switches and Status Indicators ��������������������������������������������������������������������������������33

Switches���������������������������������������������������������������������������������������������������������������33

Status Indicators ��������������������������������������������������������������������������������������������������34

Multimedia Control Keys (on selected models) ���������������������������������������������������35

Table of Contents

Summary of Contents for U2E

Page 1: ...Notebook PC Hardware User s Manual E3474 Oct 2007 OFF ON EXPRESS u DVI ...

Page 2: ...ttery Power 25 Battery Care 25 Powering ON the Notebook PC 26 The Power On Self Test POST 26 Checking Battery Power 27 Charging the Battery Pack 27 Power Options 28 Power Management Modes 29 Sleep and Hibernate 29 Thermal Power Control 29 Special Keyboard Functions 30 Colored Hot Keys 30 Microsoft Windows Keys 32 Keyboard as a Numeric Keypad 32 Keyboard as Cursors 32 Switches and Status Indicators...

Page 3: ... selected models 47 Windows Wireless Network Connection 48 Bluetooth Wireless Connection on selected models 49 Trusted Platform Module TPM on selected models 50 Fingerprint Registration on selected models 51 Appendix Optional Accessories A 2 Optional Connections A 3 Bluetooth Mouse Setup optional A 4 Operating System and Software A 6 System BIOS Settings A 7 Common Problems and Solutions A 9 Windo...

Page 4: ... Contents ...

Page 5: ... PC About This User s Manual Notes For This Manual Safety Precautions Preparing your Notebook PC NOTE Photos and icons in this manual are used for artistic purposes only and do not show what is actually used in the product itself ...

Page 6: ...rmation on using the Notebook PC s components 5 Appendix Introduces you to optional accessories and gives additional information Notes For This Manual A few notes and warnings in bold are used throughout this guide that you should be aware of in order to complete certain tasks safely and completely These notes have different degrees of importance as described below NOTE Tips and information for sp...

Page 7: ...ok PC should only be used in environments with ambient temperatures between 5 C 41 F and 35 C 95 F Battery safety warnings DO NOT throw the battery in fire DO NOT short circuit the contacts DO NOT disassemble the battery DO NOT expose to strong magnetic or electrical fields DO NOT place on uneven or unstable work surfaces Seek servicing if the casing has been damaged DO NOT place or drop objects o...

Page 8: ...ttery pack when the Notebook PC is in use Airplane Precautions Contact your airline if you want to use the Notebook PC on the airplane Most airlines will have restric tions for using electronic devices Most airlines will allow electronic use only between and not during takeoffs and landings Transportation Precautions To prepare the Notebook PC for transport you should turn it OFF and disconnect al...

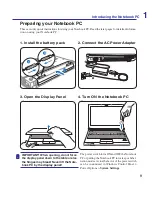
Page 9: ...ower Adapter IMPORTANT When opening do not force the display panel down to the table or else the hinges may break Never lift the Note book PC by the display panel 3 1 1 3 Open the Display Panel 4 Turn ON the Notebook PC The power switch turns ON and OFF the Notebook PC or putting the Notebook PC into sleep or hiber nation modes Actual behavior of the power switch can be customized in Windows Contr...

Page 10: ...10 1 Introducing the Notebook PC ...

Page 11: ...11 2 Knowing the Parts Basic sides of the Notebook PC NOTE Photos and icons in this manual are used for artistic purposes only and do not show what is actually used in the product itself ...

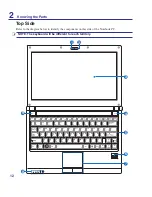
Page 12: ...12 2 Knowing the Parts Top Side Refer to the diagram below to identify the components on this side of the Notebook PC NOTE The keyboard will be different for each territory 3 2 9 1 4 7 5 6 8 ...

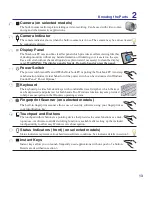
Page 13: ...ng and other interactive applications Power Switch The power switch turns ON and OFF the Notebook PC or putting the Notebook PC into sleep or hibernation modes Actual behavior of the power switch can be customized in Windows Control Panel Power Options Keyboard The keyboard provides full sized keys with comfortable travel depth at which the keys can be depressed and palm rest for both hands Two Wi...

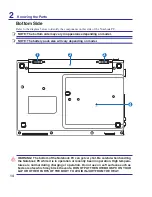
Page 14: ...PC while it is in operation or recently been in operation High tempera tures are normal during charging or operation Do not use on soft surfaces such as beds or sofas which may block the vents DO NOT PUT THE NOTEBOOK PC ON YOUR LAP OR OTHER PARTS OF THE BODY TO AVOID INJURY FROM THE HEAT NOTE The bottom side may vary in appearance depending on model NOTE The battery pack size will vary depending o...

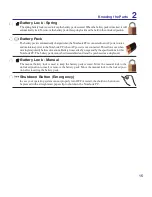
Page 15: ...Move the manual lock to the locked posi tion after inserting the battery pack Shutdown Button Emergency In case your operating system cannot properly turn OFF or restart the shutdown button can be pressed with a straightened paper clip to shutdown the Notebook PC Battery Pack ThebatterypackisautomaticallychargedwhentheNotebookPCisconnectedtoanACpowersource and maintains power to the Notebook PC wh...

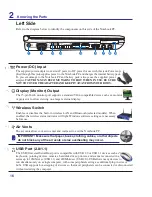
Page 16: ...y pack To prevent damage to the Notebook PC and battery pack always use the supplied power adapter CAUTION MAY BECOME WARM TO HOT WHEN IN USE BE SURE NOT TO COVER THE ADAPTER AND KEEP IT AWAY FROM YOUR BODY Wireless Switch Enables or disables the built in wireless LAN and Bluetooth selected models When enabled the wireless status indicator will light Windows software settings are necessary before ...

Page 17: ...rd DVI connector m DVI ExpressCard Slot 34mm One 26pin Express card slot is available to support one ExpressCard 34mm not 54mm ex pansion card This new interface is faster by using a serial bus supporting USB 2 0 and PCI Express instead of the slower parallel bus used in the PC card slot Not compatible with previ ous PCMCIA cards SPDIF Output Jack This jack provides connection to S PDIF Sony Phili...

Page 18: ...onic eject button for opening the tray You can also eject the optical drive tray through any software player or by right clicking the optical drive in Windows Computer and selecting Eject 2 0 USB Port 2 0 1 1 The USB Universal Serial Bus port is compatible with USB 2 0 or USB 1 1 devices such as keyboards pointing devices cameras hard disk drives printers and scanners connected in a series up to 1...

Page 19: ...nt use without additional adapters IMPORTANT The built in modem does not support the voltage used in digital phone systems Do not connect the modem port to a digital phone system or else damage will occur to the Notebook PC LAN Port The RJ 45 LAN port with eight pins is larger than the RJ 11 modem port and supports a standard Ethernet cable for connection to a local network The built in connector ...

Page 20: ...s Audio features are software controlled Front Side Refer to the diagram below to identify the components on this side of the Notebook PC 1 2 1 2 Flash Memory Slot Normally an external memory card reader must be purchased separately in order to use memory cards from devices such as digital cameras MP3 players mobile phones and PDAs This Notebook PC has a built in high speed memory card reader that...

Page 21: ...a motion detector to sound an alarm when moved Rear Side Refer to the diagram below to identify the components on this side of the Notebook PC 2 1 Battery Pack ThebatterypackisautomaticallychargedwhentheNotebookPCisconnectedtoanACpowersource and maintains power to the Notebook PC when AC power is not connected This allows use when movingtemporarilybetweenlocations Batterytimevariesbyusageandbythes...

Page 22: ...22 2 Knowing the Parts ...

Page 23: ...the Notebook PC Checking Battery Power Powering Options Power Management Modes Special Keyboard Functions Switches and Status Indicators NOTE Photos and icons in this manual are used for artistic purposes only and do not show what is actually used in the product itself ...

Page 24: ... required by the Notebook PC Your Notebook PC comes with a universal AC DC adapter That means that you may connect the power cord to any 100V 120V as well as 220V 240V outlets without setting switches or using power converters Different countries may require that an adapter be used to connect the provided US standardAC power cord to a different standard Most hotels will provide universal outlets t...

Page 25: ...deal that the battery be used in a temperature range between 5 C and 35 C 41 F and 95 F You must also take into account that the Notebook PC s internal temperature is higher than the outside temperature Any temperatures above or below this range will shorten the life of the battery But in any case the battery pack s usage time will eventually decrease and a new battery pack must be purchased from ...

Page 26: ...led diagnos tic tests called the Power On Self Test POST The software that controls the POST is installed as a permanent part of the Notebook PC s architecture The POST includes a record of the Notebook PC s hardware configuration which is used to make a diagnostic check of the system This record is created by using the BIOS Setup program If the POST discovers a difference between the record and t...

Page 27: ... the CPU system memory size and the size of the display panel Left click the battery icon Cursor over the battery icon without power adapter Cursor over the battery icon with power adapter Right click the battery icon WARNING Do not leave the battery pack discharged The battery pack will discharge over time If not using a battery pack it must continued to be charged every three months to extend re...

Page 28: ...OFF the Notebook PC or putting the Notebook PC into sleep or hiberna tion modes Actual behavior of the power switch can be customized in Windows Control Panel Power Options For other options such as Switch User Restart Sleep or Shut Down click the arrowhead next to the lock icon Restarting or Rebooting After making changes to your operating system you may be prompted to restart the system Some ins...

Page 29: ...re turned OFF Because RAM is volatile it requires power to keep refresh the data Click the Start button and the arrowhead next to the lock icon to see this option You can also use the keyboard shortcut Fn F1 to activate this mode Recover by pressing any keyboard key except Fn NOTE The power indicator will blink in this mode Power Management Modes The Notebook PC has a number of automatic or adjust...

Page 30: ...panel ON and OFF On certain models stretches the screen area to fill the entire display when using low resolution modes LCD MonitorIcons F8 TogglesbetweentheNotebookPC sLCDdisplayandan externalmonitorinthisseries NotebookPCLCD ExternalMonitor Both This functiondoesnotworkin256Colors selectHighColorinDisplayPropertySettings NOTE Must connect an external monitor before booting up Radio Tower F2 Wire...

Page 31: ... toggles power savings between various power saving modes The power saving modes control many aspects of the Notebook PC to maximize performance versus battery time Applying or removing the power adapter will automatically switch the system betweenAC mode and battery mode You can see the current mode through the on screen display OSD Fn V Toggles Life Frame software application Fn T Toggles Power ...

Page 32: ... located at the upper right hand corner of each key as shown in the figure When the numeric keypad is engaged by pressing Fn Ins Num LK the number lock LED lights up If an external keyboard is connected pressing the Ins Num LK on the external keyboard enables disables the NumLock on both key boards simultaneously To disable the numeric keypad while keeping the keypad on an external keyboard activa...

Page 33: ...can be customized in Windows Control Panel Power Options Power4Gear eXtreme Key The Power4Gear eXtreme key toggles power savings between various power saving modes The power saving modes control many aspects of the Notebook PC to maximize performance versus battery time Applying or removing the power adapter will automatically switch the system between AC mode and battery mode The selected mode is...

Page 34: ...n the Suspend to Disk Hibernation mode Switches and Status Indicators cont Capital Lock Indicator Indicates that capital lock Caps Lock is activated when lighted Capital lock allows some of the keyboard letters to type using capitalized letters e g A B C When the capital lock light is OFF the typed letters will be in the lower case form e g a b c Drive Activity Indicator Indicates that the Noteboo...

Page 35: ...udio track movie chapter CD Skip to Next Track Fast Forward When playing Skips to the next audio track movie chapter Multimedia Control Keys on selected models The multimedia control keys allows for convenient controlling of the multimedia application The following defines the meaning of each mul timedia control key on the Notebook PC with Windows Media Player Results may differ with other multime...

Page 36: ...36 4 Using the Notebook PC ...

Page 37: ... 4 Using the Notebook PC Pointing Device Storage Devices Expansion Card Optical drive Flash memory card reader Connections Modem Connection Network Connection Wireless LAN Connection on selected models Bluetooth Wireless Connection on selected models Trusted Platform Module TPM on selected models Fingerprint Scanner on selected models ...

Page 38: ...touch pad is electrostatic sensitive objects cannot be used in placeofyourfingers Thetouchpad sprimaryfunction is to move the cursor around or select items displayed on the screen with the use of your fingertip instead of a standard desktop mouse The following illustrations demonstrate proper use of the touchpad Moving The Cursor Place your finger in the center of the touchpad and slide in a direc...

Page 39: ...icking Tapping With the cursor over an item press the left button or use your fingertip to touch the touchpad lightly keeping your finger on the touchpad until the item is selected The selected item will change color The following 2 examples produce the same results Clicking Tapping Double Clicking Double Tapping Touchpad Usage Illustrations Dragging Dragging means to pick up an item and place it ...

Page 40: ...uids or grease Do not touch the touchpad if your fingers are dirty or wet Do not rest heavy objects on the touchpad or the touchpad buttons Do not scratch the touchpad with your finger nails or any hard objects Automatic Touchpad Disabling Windows can automatically disable the Notebook PC s touchpad when an external USB mouse is at tached This feature is normally OFF to turn ON this feature select...

Page 41: ...pansion Card Be sure the ExpressCard is level when inserting Inserting an Expansion Card The ExpressCard slot does not have an eject but ton Press the ExpressCard inwards and release to eject the ExpressCard Carefully pull the ejected ExpressCard out of the socket 1 If there is an ExpressCard socket protector re move it using the Removing an ExpressCard instructions below 2 Insert the ExpressCard ...

Page 42: ...no obstructions that may get jammed under the drive s tray 3 Hold the disc by the edge and face the disc s printed side up Push down on both sides of the disc s center until the disc snaps onto the hub The hub should be higher than the disc when correctly mounted 4 Slowly push the drive s tray back in The drive will begin reading the table of contents TOC on the disc When the drive stops the disc ...

Page 43: ...ptical drives due to unbalanced CDs or CD print To decrease vibration use the Notebook PC on an even surface and do not place labels on the CD Listening to Audio CD The optical drives can play audio CDs but only the DVD ROM drive can play DVD audio Insert the audio CD and Windows automatically opens an audio player and begins playing Depending on the DVD audio disc and installed software it may re...

Page 44: ... memory cards from devices such as digital cameras MP3 players mobile phones and PDAs This Notebook PC has a single built in memory card reader that can use many flash memory cards as shown in the example below The built in memory card reader is not only convenient but also faster than most other forms of memory card readers because it utilizes the internal high bandwidth PCI bus IMPORTANT Flash m...

Page 45: ...nnection The telephone wire used to connect the Notebook PC s internal modem should have either two or four wires only two wires telephone line 1 is used by the modem and should have an RJ 11 connector on both ends Connect one end to the modem port and the other end to an analog telephone wall socket the ones found in residential buildings Once the driver is setup the modem is ready to use WARNING...

Page 46: ...ps Full Duplex is supported on this Notebook PC but requires connection to a network switching hub with duplex enabled The software default is to use the fastest setting so no user intervention is required 1000BASE T or Gigabit is only supported on selected models Twisted Pair Cable The cable used to connect the Ethernet card to a host generally a Hub or Switch is called a straight through Twisted...

Page 47: ...client adapter that supports Infrastructure and Ad hoc modes giving you flexibility on your existing or future wireless network configurations for distances up to 40 meters between the client and the access point To provide efficient security to your wireless communication the optional built in wireless LAN comes with a 64 bit 128 bit Wired Equivalent Privacy WEP encryption and Wi Fi Protected Acc...

Page 48: ...onnected network icon 5 Select Show Wireless if you have many networks in your area 6 Select the wireless network you want to con nect to 7 When connecting you may have to enter a password 8 Afterconnectionhasbeenestablished Con nected will be shown 2b Or double click the Wireless Console icon on thetaskbarandselecteithertheWirelessLAN Bluetooth or just the Bluetooth 1 Switch ON the Wireless funct...

Page 49: ...connect to the Internet You may also use it for SMS messaging Bluetooth enabled computers or PDAs You can wireless connect to another computer or PDA and exchange files share peripherals or share Internet or network connections You may also make use of Bluetooth enabled wireless keyboard or mouse 2b Or double click the Wireless Console icon on the taskbar and select either the Wireless LAN Bluetoo...

Page 50: ...eness Each individual TPM must have an Owner before it is useful as a security device TPM Applications TPM is useful for any customer that is interested in providing an addition layer of security to the com puter system The TPM when bundled with an optional security software package can provide overall system security file protection capabilities and protect against email privacy concerns TPM help...

Page 51: ...s and click Next 3 Select a finger on the diagram Swipe the corresponding finger on the scanner slowly You must swipe your finger multiple times for verification 4 Youmustregisteratleasttwofingerstodecrease the chance of problems The fingerprint scanner can be used for instant and secure user authentication These instructions will show you how to setup the fingerprint registration ...

Page 52: ...your finger multiple times for verification Youmustregisteratleasttwofingers to decrease the chance of any problems 6 Click Finish when done Fingerprint Registration on selected models cont 7 Right click the icon on the taskbar and select Settings and Options 8 Select General Options and Single Sign On and configure your preferences ...

Page 53: ...System BIOS Settings Common Problems and Solutions Windows Software Recovery Glossary Declarations and Safety Statements Notebook PC Information NOTE Photos and icons in this manual are used for artistic purposes only and do not show what is actually used in the product itself ...

Page 54: ... systems no drivers are necessary USB Hub Optional Attaching an optional USB hub will increase your USB ports and allow you to quickly connect or disconnect many USB peripherals through a single cable USB Floppy Disk Drive An optional USB interface floppy disk drive can accept a standard 1 44MB or 720KB 3 5 inch floppy diskette WARNING To prevent system failures use Windows Safely Remove Hardware ...

Page 55: ...ard will allow data entry to be more comfortable Attaching an external USB mouse will allow Windows navigation to be more comfortable Both the external USB keyboard and mouse will work simultaneously with the Notebook PC s built in keyboard and touchpad Printer Connection One or more USB printers can be simultaneously used on any USB port or USB hub ...

Page 56: ...oth devices in Windows operating system 3 Select Add a Bluetooth Device on the taskbar menu 3c If launched from the Control Panel click Add from this screen 3b Or Launch Bluetooth Devices from the Windows Control Panel 2b Or double click the Wireless Console icon on the taskbar and select either the Wireless LAN Bluetooth or just the Bluetooth 2 Press FN F2 repeatedly until Bluetooth ON or WLAN Bl...

Page 57: ...list of nearby Bluetooth devices will be shown Select the Bluetooth mouse and click Next 7 Select Don t use a passkey and click Next 9 Click Finish when adding is complete 10 You will see your device in the window You can also add or remove Bluetooth devices here 8 Wait while the Bluetooth mouse is being added Bluetooth Mouse Setup optional cont ...

Page 58: ...ded as part of the factory pre install A recovery disc is optional and includes an image of the original operating system installed on the hard drive at the factory The recovery disc provides a comprehensive recovery solution that quickly restores the Notebook PC s operating system to its original working state provided that your hard disk drive is in good working order Contact your retailer if yo...

Page 59: ...reen select Boot Device Priority Security Setting 1 On the Security screen select Change Supervisor or Change User Password 2 Type in a password and press Enter 3 Re type the password and press Enter 4 Password is then set 1 Leave the password field blank and press Enter To clear the password 2 Password is then cleared ...

Page 60: ... to allow the User Password to have in the BIOS setup utility User Access Level Save Changes If you want to keep your configuration settings you must save changes before exiting the BIOS setup utility If you want to restore default settings choose Load Manufacture Defaults You must then save changes to keep the manufacture default settings System BIOS Settings cont ...

Page 61: ...the ATK0100 driver from the driver CD or download it from the ASUS website Hardware Problem Built in Camera The built in camera does not work correctly 1 Check Device Manager to see if there are any problems 2 Try reinstalling the webcam driver to solve the problem 3 If the problem is not solved update the BIOS to the latest version and try again 4 If the problem still exist contact your local ser...

Page 62: ...a local service center for repair Mechanical Problem FAN Thermal Why is the cooling fan always ON and the temperature high 1 Make sure that the FAN works when the CPU temperature is high and check whether there is air flow from the main air vent 2 If you have many applications running see taskbar close them to decrease system load 3 The problem may also be caused by some viruses use anti virus sof...

Page 63: ...ll them in Windows Safe Mode 3 Check your system for viruses 4 Update the BIOS to the latest version with WINFLASH in Windows orAFLASH in DOS mode These utilities and BIOS files can be downloaded from the ASUS website WARNING Make sure your Notebook PC does not loose power during the BIOS flashing process 5 If problem still cannot be solved use the recovery process to reinstall your entire system ...

Page 64: ...elected BIOS information Check the model version and data c Click Flash to initialize the BIOS updating procedure d Click Exit when procedure completes e Reboot the system Assuming that you have successfully flashed the BIOS file press F2 to enter BIOS setup page when the ASUS logo appears during system boot up f After entering BIOS setup page go to Exit page and choose Load Manufacture Defaults T...

Page 65: ...cking on the NIS icon in your system tray 2 Open Norton AntiVirus in Options menu 3 Click on Instant Messenger uncheck MSN Windows Messenger from Which Instant mes sengers to protect 5 NIS is damaged and need reinstalling NIS is located in the provided disc in the NIS200x folder x is the version number 6 The Start firewall when system is booted option is selected but it takes about one minute to s...

Page 66: ...ms and Solutions Cont 9 Windows Firewall must be stopped before installing Norton Internet Security or Norton Personal Firewall How to stop Windows Firewall 1 Click Start and then Control Panel 2 You will have one of two control panels Click on the Security Center icon 3 Click on the Windows Firewall icon beneath the status updates 4 Click Off and then click OK 10 Why is the Privacy Control icon s...

Page 67: ...ed RE COVERY The Recovery Partition is created at the fac tory and cannot be restored by the user if deleted Take your Notebook PC to an authorizedASUS service center if you have problems with the recovery process Using the Recovery Partition 1 Press F9 during bootup requires a Recovery Partition 2 Press Enter to select Windows Setup EMS Enabled 3 Read the ASUS Preload Wizard screen and click Next...

Page 68: ... and press Esc on bootup and select the optical drive may be labeled as CD DVD using the down cursor and press Enter to boot from the Recovery DVD 3 Select a partition option and click Next Partition options Recover Windows to first partition only This option will delete only the first partition allowing you to keep other partitions and create a new system partition as drive C Recover Windows to e...

Page 69: ...mputer transfers data between computer components such as memory disks and the display adapter The BIOS instructions are built into the computer s read only memory BIOS parameters can be configured by the user through the BIOS Setup program The BIOS can be updated using the provided utility to copy a new BIOS file into the EEPROM Bit Binary Digit Represents the smallest unit of data used by the co...

Page 70: ...he slower parallel bus used in the PC card slot Not compatible with previous PCMCIA cards Hardware Hardware is a general term referring to the physical components of a computer system including pe ripherals such as printers modems and pointing devices IDE Integrated Drive Electronics IDE devices integrate the drive control circuitry directly on the drive itself eliminating the need for a separate ...

Page 71: ...zardous diffuse reflections Personnel working with these lasers should wear appropriate protective eye wear during any operation of the laser Class 3B lasers have both admin istrative and physical controls to protect personnel Physical controls include limited access work areas Administrative controls include special warning signs posted outside the entrances to the laser work spaces and lights ou...

Page 72: ...ta The TPM provides the ability to the PC or Notebook PC to run applications more secure and to make transactions and communication more trustworthy Twisted Pair Cable The cable used to connect the Ethernet card to a host generally a Hub or Switch is called a straight through Twisted Pair Ethernet TPE The end connectors are called RJ 45 connectors which are not compatible with RJ 11 telephone conn...

Page 73: ...ire that all DVD movies be limited to a particular region usually coded to the region at which it is sold While DVD movie content may be released for multiple regions CSS design rules require that any system capable of playing CSS encrypted content must only be capable of playing one region Region Definitions Region 1 Canada US US Territories Region 2 Czech Egypt Finland France Germany Gulf States...

Page 74: ...g if provided is by means of dual tone multifrequency signalling Network Compatibility Declaration Statement to be made by the manufacturer to the Notified Body and the vendor This declaration will indicate the networks with which the equipment is designed to work and any notified networks with which the equipment may have inter working difficulties Network Compatibility Declaration Statement to b...

Page 75: ... Yes Norway Yes No Poland No Not Applicable Portugal No Not Applicable Spain No Not Applicable Sweden Yes No Switzerland Yes No United Kingdom Yes No This information was copied from CETECOM and is supplied without liability For updates to this table you may visit http www cetecom de technologies ctr_21 html 1 National requirements will apply only if the equipment may use pulse dialling manufactur...

Page 76: ...Connect the equipment into an outlet on a circuit different from that to which the receiver is connected Consult the dealer or an experienced radio TV technician for help WARNING The use of a shielded type power cord is required in order to meet FCC emission limits and to prevent interference to the nearby radio and television recep tion It is essential that only the supplied power cord be used Us...

Page 77: ...ration within 5 15 GHz and 5 25GHz frequency ranges and is restricted to indoor environments only FCC Caution Any changes or modifications not expressly approved by the party re sponsible for compliance could void the user s authority to operate this equipment The manufacturer declares that this device is limited to Channels 1 through 11 in the 2 4GHz frequency by specified firmware controlled in ...

Page 78: ...tments in which the use of the 2400 2483 5 MHz band is permitted with an EIRP of less than 100mW indoors and less than 10mW outdoors 01 Ain Orientales 02 Aisne 03 Allier 05 Hautes Alpes 08 Ardennes 09 Ariège 11 Aude 12 Aveyron 16 Charente 24 Dordogne 25 Doubs 26 Drôme 32 Gers 36 Indre 37 Indre et Loire 41 Loir et Cher 45 Loiret 50 Manche 55 Meuse 58 Nièvre 59 Nord 60 Oise 61 Orne 63 Puy du Dôme 64...

Page 79: ...red for UL1642 covering primary non rechargeable and secondary rechargeable lithium batter ies for use as power sources in products These batteries contain metallic lithium or a lithium alloy or a lithium ion and may consist of a single electrochemical cell or two or more cells connected in series parallel or both that convert chemical energy into electrical energy by an irreversible or reversible...

Page 80: ... tilbage til leverandøren Danish VARNING Explosionsfara vid felaktigt batteribyte Använd samma batterityp eller en ekvivalent typ som rekommenderas av apparattillverkaren Kassera använt batteri enligt fabrikantens instruktion Swedish VAROITUS Paristo voi räjähtää jos se on virheellisesti asennettu Vaihda paristo aino astaanlaitevalmistajansousittelemaantyyppiin Hävitäkäytettyparistovalmistaganohje...

Page 81: ... WARNING Use of controls or adjustments or performance of procedures other than those specified herein or in the laser product installation guide may result in hazard ous radiation exposure Macrovision Corporation Product Notice This product incorporates copyright protection technology that is protected by method claims of certain U S A patents and other intellectual property rights owned by Macro...

Page 82: ...A Appendix A 30 CTR 21 Approval for Notebook PC with built in Modem Danish Dutch English Finnish French German Greek Italian Portuguese Spanish Swedish ...

Page 83: ...Appendix A A 31 ...
Page 84: ...r ______________________________ Type _______________ BIOS Version _ __________________________________________Date _______________ Accessories _ _____________________________________________________________ Accessories _ _____________________________________________________________ Software Operating System _ __________Version _ ___________ Serial Number _______________ Software _ _______________...

Page 85: ...LD NOT BE CONSTRUEDASACOMMITMENT BYASUS ASUSASSUMES NO RESPONSIBILITYOR LIABILITYFORANYERRORS OR INACCURACIES THAT MAYAPPEAR IN THIS MANUAL INCLUDING THE PRODUCTS AND SOFTWARE DESCRIBED IN IT Copyright 2007 ASUSTeK COMPUTER INC All Rights Reserved Limitation of Liability Circumstances may arise where because of a default on ASUS part or other liability you are entitled to recover damages from ASUS...

Reviews: