background image

59

Software 

Utilities

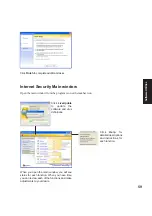
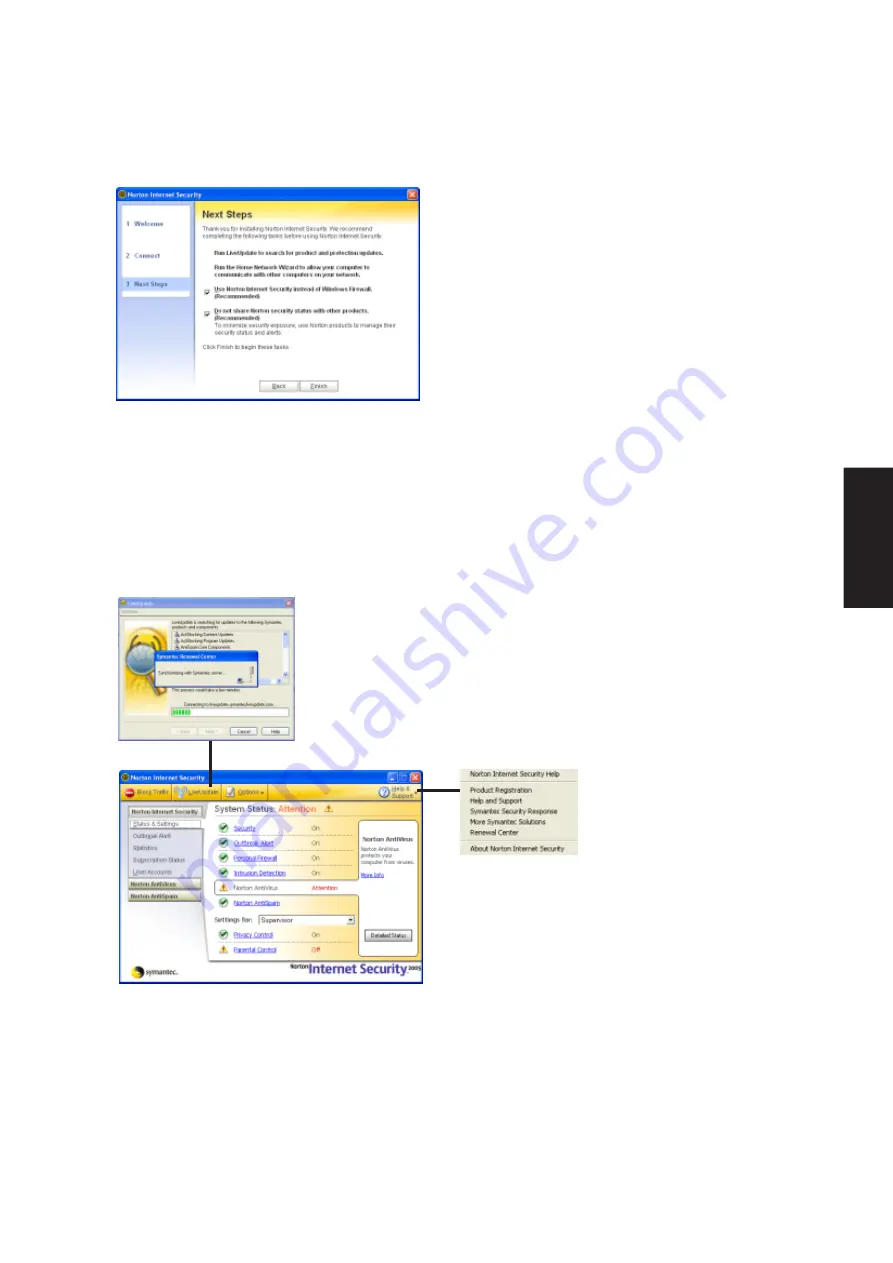
Click Finish to complete additional tasks.

When you open the main window, you will see
status for each function. When you have time,
you can review each of the functions and make
adjustments to your desire.

Click 

Help 

for

detailed descriptions
and instructions for
each function.

Click  LiveUpdate
to update the
software and virus
definitions.

Internet Security Main window

Open the main window from the program icon or the taskbar icon.

Summary of Contents for V6V

Page 1: ...E1797 Dec 2004 Notebook PC Drivers and Utilities User s Manual ...

Page 2: ...23 Wireless LAN Driver Setup Calexico2 ABG 24 Wireless LAN Driver Setup Calexico2 2200BG 25 Wireless LAN Utility Introduction 26 ASUS Wireless LAN 26 ASUS WLAN Driver Setup 28 ASUS WLAN Utility Setup 29 ASUS WLAN Utility Quick Start 30 LAN 33 LAN Driver Setup 34 Configuring your LAN 35 Joining a Domain or Workgroup Windows XP 35 Viewing Your Network 37 Modem 38 Modem Driver Setup Model 1 40 Modem ...

Page 3: ...ng Details 66 NB Probe 67 NB Probe Setup 68 Using NB Probe 69 Starting NB Probe 69 Using NB Probe Monitoring 70 TouchPad 73 Touchpad Setup 74 Synaptics TouchPad Features 75 Tap on the Pad Instead of Pressing the Buttons 75 Drag Icons Windows and Other Objects without Using Buttons 75 Adjust the Overall Touch Sensitivity 76 Customize Buttons and Taps 76 Prevent Accidental Pointing While Typing 77 S...

Page 4: ...perties Page 79 Tap Zones Properties Pages 80 More Features Properties Page 81 Button Actions Properties Page 82 Touch Properties Page 83 Edge Motion Properties Page 84 Frequently Asked Questions 85 WinFlash 86 WINFLASH Setup 88 Using WINFLASH 89 ...

Page 5: ...he autorun menu does not appear double clicking the CD ROM disc drive icon in My Computer may be the D drive or E drive on hard drives with two partitions or running SETUP EXE through Start menu Run located in the root of the support CD will bring up the autorun menu New Windows Installation If you install a new operating system on your Notebook PC there will be many hardware devices without drive...

Page 6: ...e is shown under Windows Device Manager Sound video and game controllers INF Update This installs Windows support files for advanced features in new chipsets Intel Calexico2 ASUS WLAN Depends on model Intel R PRO Wireless 2200BG Network Connection or ASUS WLAN Driver Required on models with internal wireless LAN Installs the required network driver for the Notebook PC s optional internal wireless ...

Page 7: ... lets you talk to and see your friend on the remote computer video conferencing evenwhenyouareplayingafull screengame Requires GameFaceEnhancedDisplayDriver LiveUpdate Utility This utility helps you easily upgrade your Notebook PC s BIOS through an Internet connection Norton Internet Secruity 2005 Utility Installs Norton Internet Security to provide comprehensive virus prevention threat detection ...

Page 8: ... Notebook PC already supports built in or externally connected keyboard and PS 2 mouse devices However theprovideddevicedriverwillprovideenhancementsandfeaturestotheTouchPadtoincreasethefunctionality of the TouchPad For detailed information see the Software Reference in the next section To access help right click the TouchPad icon on the taskbar and select Help WinFlash Utility Installs a BIOS upd...

Page 9: ... Windows 2000 SP4 This driver is provided by Microsoft in its Windows operating system The support CD also includes a version of this driver for Windows 98 SE or Windows ME This driver is not required for Windows 2000 or Windows XP and installation will not be possible This device is shown under Windows Device Manager Universal Serial Bus controllers SteepStep Already supported in Windows XP This ...

Page 10: ...e Manager button Hardware Devices After installing your operating system several question marks will appear under Other devices representing hardware devices that Windows cannot recognize After installing the drivers from the provided support CD Those question marks will go away 1 Click start button 2 Click My Computer icon 3 Click View system information link ...

Page 11: ...11 Software Drivers Software Drivers ...

Page 12: ...12 Software Drivers Software Drivers ...

Page 13: ... Driver Setup Display Settings for Windows XP Taskbar Menu Screens and drivers may vary depending on your model and operating system Before After It is necessary to install the VGA driver first in order to see other setup screens in their proper sizes ...

Page 14: ...me screen click Next after reading the message 3 On the Select Components screen click Express 2 On the LicenseAgreement screen click Yes after reading 3 When setup is complete select Yes and click Finish in order to restart Windows with a higher screen resolution Windows may have already provided the highest screen resolution support for this graphics controller ...

Page 15: ...raphics functions are limited Make screen resolution settings in Display Properties Higher resolutions may be available but panning will occur if you surpass the display panel s specifications Use the taskbar icon to bring up shortcuts to display settings Left click Right click ...

Page 16: ...16 Software Drivers ...

Page 17: ...17 Software Drivers ATK0100 Driver ACPI Topics Covered ATK0100 Driver Setup Screens and drivers may vary depending on your model and operating system Before After Required driver ...

Page 18: ...No software operation is required 1 Double click Unknown device 3 Select No and click Next 6 Click Finish when setup is complete 2 Click Reinstall Driver 5 Browse to your operating system folder in the ATK0100 folder and click Next 7 Click Close to close the properties window 4 Select Install from and click Next ...

Page 19: ... depending on your model and operating system The notebook PC has built in speakers and microphone however external audio accessories may be used External audio connections will disable the notebook PC s relevant built in audio device mic and or speakers Before After Required driver ...

Page 20: ...20 Software Drivers Audio Setup Running setup will give you the following wizard 1 Click Next to begin setup 2 When setup is complete select No and click Finish in order to install other items ...

Page 21: ...21 Software Drivers INF Update Intel Topics Covered INF Update Driver Setup Screens and drivers may vary depending on your model and operating system Required driver ...

Page 22: ...ing wizard 1 On the Welcome screen click Next after confirming this is what you want to setup 3 On the Readme screen click Next after reading 2 On the License Agreement screen click Next after reading 4 Setup is now complete select No and click Finish in order to install other items ...

Page 23: ...ng system Before After INTEL Calexico Wireless LAN Topics Covered Wireless LAN Driver Setup Wireless LAN Utility Setup Wireless LAN Utility Quick Start An optional access point is required to setup a wireless network for the Notebook PC to connect to Required driver on selected models ...

Page 24: ... click Install Software 2 On the Welcome screen click Next after reading the message 3 On the Agreement screen click Next after selecting I accept 4 On the Select Components screen click Next to use the default settings 5 On the Ready screen click Install to begin the installation 6 On the Wizard Complete screen click Finish to exit the installation wizard ...

Page 25: ... On the Autorun screen click Install Software 2 On the Agreement screen click Next after selecting I accept 3 On the Setup Type screen click Next to use the default settings 4 On the Install default components screen click OK to use the default settings 5 Wait while components are installed 6 When complete click Ok to exit the installer ...

Page 26: ...sing the desktop icon or through Windows start You will need to make some wireless LAN settings before being able to use your wireless connection Status View connection status here Details View available access point information here Configure Make a new profile to save specific settings for use in different WLAN networks After installation you will have several options available through the icon ...

Page 27: ... ASUS WLAN Utility Setup ASUS WLAN Utility Quick Start Screens will vary depending on your operating system but the contents should be the same An optional access point is required to setup a wireless network for the Notebook PC to connect to Required driver an selected models ...

Page 28: ...ng wizard 1 Click Next after reading the Welcome screen 3 On the Select Program Folder screen click Next to continue or you may first change the folder 2 Click Next after reading the Information screen 4 Setup is now complete select No and click Finish in order to install other items ...

Page 29: ...ity 1 Click Next after reading the Welcome screen 3 On the Choose Destination Location screen click Next to continue or you may first change the destination folder 4 On the Select Program Folder screen click Next to continue or enter a different folder name 2 Click Next after reading the Information screen ...

Page 30: ...h Windows start You will need to make some wireless LAN settings before being able to use your wireless connection 1 Right click the ASUS WLAN icon and select Wireless Settings 2 Set the Network Name SSID to the same name as the SSID set in your wireless access point 5 Click Finish on the Setup Complete screen 6 Select to use ASUS Utilities for added features while using the wireless LAN device Ri...

Page 31: ... exit the utility 5 Check the Status page to see the Association State It should show Connected xx xx xx xx xx xx 3 Use Site Survey if you don t know the name of your access point s 4 Encryption settings must also match those set in the access point Talk with your network administrator if necessary Click Apply to save your settings ...

Page 32: ...32 Software Drivers ...

Page 33: ...pics Covered LAN Driver Setup Configuring your LAN Screens and drivers may vary depending on your model and operating system Connect the LAN port to a network to begin using the built in LAN function Before After Required driver ...

Page 34: ...he driver as follows 6 When complete click Finish to exit the installation wizard 7 Click Close to exit the properties window 1 On the Ethernet Controller Properties screen click Reinstall Driver 2 Select No and click Next to install the driver from the provided CD 3 Select Install from and click Next 4 Click Browse to find the LAN driver Path will vary by model and region 5 Wait while fies are co...

Page 35: ...y Computer 2 Click View system information You cannot use spaces or symbols in the computername Intheexamplehere awarning is given when trying to use Notebook PC You can use the single word Notebook instead 3 Your computer name workgroup or domain information is shown here Click Change to view options ...

Page 36: ...b Workgroup If your network does not have a domain or you are not authorized to join a domain select Workgroup and type in an existing name or create your own by typing an unused workgroup name Administrator Name or Password not accepted You cannot login with the Administrator name and use one password then use theAdministrator name with another password to add to a domain You must login using ano...

Page 37: ... After you restart your computer you should see some contents through Entire Network 6 Clickingon My Network Places willdisplay networkswhichyouhaveinstalledprotocols for Clicking a network protocol such as MS WindowsNetwork willdisplayalltheservers available under that protocol ...

Page 38: ...38 Software Drivers ...

Page 39: ...vered Modem Driver Setup Modem Configuration Screens and drivers may vary depending on your model and operating system Before After Model 1 Connect a telephone cable from your Notebook PC to a telephone jack Required driver After Model 2 ...

Page 40: ...r reading Modem Driver Setup Model 2 Running setup will give you the following wizard 1 On the Ethernet Controller Properties screen click Reinstall Driver 2 Select No and click Next to install the driver from the provided CD 2 Setup is now complete click OK to exit Ifyouseea FAILURE youhaveadifferent model and must use another driver ...

Page 41: ...ers 5 When complete click Finish to exit the installation wizard 3 Select Install from and click Next 4 Click Browse to find the LAN driver Path will vary by model and region 6 Click Close to exit the properties window ...

Page 42: ... New Connection Wizard in Network Connections 2 Select Connect to the Internet and click Next Modem Configuration Use New Connection Wizard in Network Connections to start the configuration wizard to your modem The New Connection Wizard also allows configuration for other communication devices if available such as LAN ISDN ADSL or Bluetooth ...

Page 43: ...are Drivers Modem Configuration Cont 7 Enter the dial up number for your ISP 5 Select your modem and click Next 6 Enter any name to represent your ISP 8 Selection one of the security preferences and click Next ...

Page 44: ... 9 Enter your ISP account name and password and click Next 10 Select Add a shortcut and click Finish 11 When you click on the link the connection window will show Click Dial to connect to your ISP Modem Configuration Cont ...

Page 45: ...d drivers may vary depending on your model and operating system After the memory reader driver is installed you can read or write to various memory types See the hardware manual for information on supported memory types SD MMC MS MS Pro Memory Stick Optional driver Before After ...

Page 46: ...t you want to setup 3 When complete click Finish 2 On the Ready to install screen click Install to begin copying files to your system 4 Setup is now complete select No and click Finish in order to install other items Ricoh Driver Setup Running setup will give you the following wizard ...

Page 47: ...47 Software Utilities Software Utilities ...

Page 48: ...48 Software Utilities Software Utilities ...

Page 49: ...49 Software Utilities ChkMail Topics Covered ChkMail Setup Screens and drivers may vary depending on your model and operating system Optional Utility ...

Page 50: ...Choose Destination Location screen click Next to continue or you may first change the destination folder 3 On the Select Program Folder screen click Next to continue or enter a different folder name 4 On the Setup Complete screen click Finish NOTE You cannot run this utility without first installing ATK0100 You will be given this message if you do not have the driver installed ...

Page 51: ...51 Software Utilities LiveUpdate Topics Covered LiveUpdate Setup Using LiveUpdate Screens and drivers may vary depending on your model and operating system Recommended utility ...

Page 52: ...ssage if you do not have the driver installed 1 On the Welcome screen click Next after confirming this is what you want to setup 2 On the Choose Destination Location screen click Next to continue or you may first change the destination folder 3 On the Select Program Folder screen click Next to continue or enter a different folder name 4 On the Setup Complete screen click Finish ...

Page 53: ...l be shown Check the items to update or select Check all Click OK to download and install the update When update is complete click OK to exit Using LiveUpdate You may be instructed to reset your BIOS It entails pressing F2 on bootup to enter BIOS setup and selecting Load Setup Defaults and then Exit Saving Changes on the Exit menu ...

Page 54: ...54 Software Utilities ...

Page 55: ...rnet Security Topics Covered Norton Internet Security Setup Internet Proxy Settings Internet Security Main Window Internet Security Features Screens and drivers may vary depending on your model and operating system Recommended utility ...

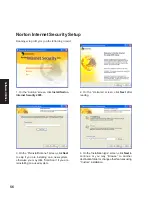
Page 56: ...4 On the installation type screen click Next to continue or you may Browse to another destination folder or change other features using Custom installation 3 On the Preinstall Scanner screen click Next to skip if you are installing on a new system otherwise you may click Start Scan if you are reinstalling on a used system 2 On the Welcome screen click Next after reading ...

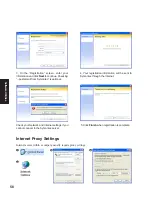
Page 57: ...laced on your desktop 1 On the License Agreement screen select I accept and click Next to continue 2 On the Registration screen select your country or region and click Next to continue You may give enter your information if you do not mind being contacted by Symantec After Windows restart Norton Internet Security will startup each time with Windows This icon will be placed in the taskbar to show t...

Page 58: ...m Symantec is optional Check your Network and Internet settings if you cannot connect to the Symantec server 5 Click Finish when registration is complete 4 Your registration information will be sent to Symantec through the Internet Internet Proxy Settings Internet access within a company usually require proxy settings 3 4 1 2 ...

Page 59: ...unction When you have time you can review each of the functions and make adjustments to your desire Click Help for detailed descriptions and instructions for each function Click LiveUpdate to update the software and virus definitions Internet Security Main window Open the main window from the program icon or the taskbar icon ...

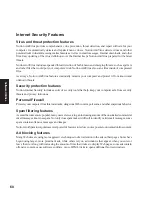
Page 60: ...ion features Norton Internet Security includes a suite of security tools that help keep your computer safe from security threats and privacy intrusions Personal Firewall ProtectsyourcomputerfromInternetattacks dangerousWebcontent portscans andothersuspiciousbehavior Spam filtering features Asemailbecomesmorepopular manyusersarereceivinganincreasingamountoftheunsolicitedcommercial email messages kn...

Page 61: ...ilities Power4 Gear Topics Covered Power4 Gear Setup Benefits of Power4 Gear Power4 Gear Interface Power4 Gear Configuration Screens and drivers may vary depending on your model and operating system Required utility ...

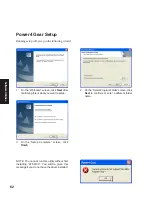
Page 62: ...mplete screen click Finish 2 On the Select Program Folder screen click Next to continue or enter a different folder name Power4 Gear Setup Running setup will give you the following wizard NOTE You cannot run this utility without first installing ATK0100 You will be given this message if you do not have the driver installed ...

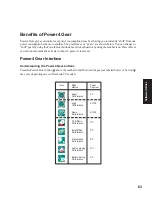
Page 63: ...k bar icon Power4 Gear can also be automatically activated when AC power is removed Power4 Gear Interface Understanding the Power4 Gear buttons Press the Power4 Gear button above the taskbar to shift between the gears as labeled below The icon may vary depending on your Notebook PC model Super Performance High Performance Game Performance DVD Movie Performance Email Office Performance Presentation...

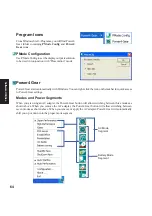
Page 64: ...er4 Gear Power4 Gear starts automatically with Windows You can right click the icon on the taskbar for quick access to Power4 Gear settings Modes and Power Segments When you are using an AC adapter the Power4 Gear button will allow switching between three modes as shown above When you remove the AC adapter the Power4 Gear button will allow switching between seven modes as shown above When you remo...

Page 65: ...id not save you will be prompted to when you exit If you change Windows Power Options Properties those settings will also be reflected in Power4 Gear and vice versa Renaming Settings You can rename the power saving levels as you like using the same method to rename files or folders in Windows In the example on the right the brightness level is decreased to 13 and the name is changed to Max Battery...

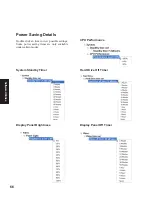
Page 66: ...aving Details Double click an item to view possible settings Some power saving items are only available under certain modes Display Panel Brightness System Standby Timer CPU Performance Display Panel Off Timer Hard Drive Off Timer ...

Page 67: ...67 Software Utilities NB Probe Topics Covered NB Probe Setup Using NB Probe Screens and drivers may vary depending on your model and operating system Recommended Utility ...

Page 68: ...stination Location click Next to continue or enter another destination folder 3 When setup is complete click OK to exit NB Probe Setup Running setup will give you the following wizard NOTE You cannot run this utility without first installing ATK0100 You will be given this message if you do not have the driver installed ...

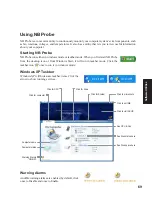
Page 69: ...robe from the desktop icon or from Windows Start it will run in taskbar mode Click the taskbar icon once to run it in windows mode Windows XP Taskbar Windows XP will hide some taskbar items Click the arrow to show running services Click for computer Click for CPU Click for System Click to exit NB Click for Drive Click to minimize to See CPU Fan See Disk status here See Disk space here Computer nam...

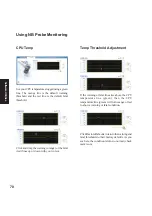
Page 70: ...e warning orange or the fatal red lines up or down with your cursor If the warning or fatal lines rise above the CPU temperature line green then the CPU temperature line green will turn orange or red to show a warning or fatal condition Click Restore Defaults to return the warning and fatal thresholds to their factory defaults As you see here the condition returns to normal check mark icon Temp Th...

Page 71: ...isk drive and the file allocation table or file system used Information on other hard drives can be accessed by clicking on the relevant drive letter For DVD drives the region code is displayed under the picture of the optical drive Drive See your system information on this page System Information ...

Page 72: ...72 Software Utilities ...

Page 73: ...ting system TouchPad Topics Covered TouchPad Setup Overview of the TouchPad Scrolling Properties Page Tap Zones Properties Page More Features Properties Page Button Actions Properties Page Touch Properties Page Edge Motion Properties Page Frequently Asked Questions Recommended Utility ...

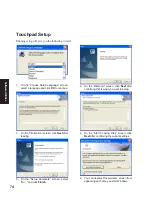
Page 74: ...irming the current settings 5 On the Setup Complete screen select No and click Finish 3 On the Information screen click Next after reading 1 On the Choose Setup Language screen select a language and click OK to continue Touchpad Setup Running setup will give you the following wizard 6 You can deselect the welcome screen from appearing each time you start Windows ...

Page 75: ...o hold the mouse or TouchPad button down while moving the pointer to move an icon or window around the screen for example This action is called dragging Just like clicking and double clicking you can also drag without using the button To move or drag an object equivalent to pressing and holding the left TouchPad button 1 Position the pointer over the object and tap twice down up down leaving your ...

Page 76: ... For additional convenience you can configure the top right corner tap zone of theTouchPad to produce right clicks Looking at theTouchPad surface in the picture below taps in the top right corner the red shaded area will produce right clicks but tapping anywhere else on the TouchPad the solid gray area produces left clicks An Example TouchPad There are many different actions that you can assign to...

Page 77: ...om your work By simply sliding your finger up and down the right edge of the TouchPad the contents of the current window will scroll vertically Similarly by sliding your finger left and right along the bottom edge of the TouchPad the contents will scroll horizontally You no longer need to laboriously maneuver the pointer to the small scroll bar elements you can scroll no matter where the pointer h...

Page 78: ...ludedtwofunapplicationprogramsthatdemonstratesomeofthecapabilitiesoftheTouchPad Pressure Graph and The Incomparable Mysterious Synaptics MoodPad To run these applications click once on the Synaptics TouchPad Icon in the Taskbar go to the Accessories menu and select the desired application More About the TouchPad The TouchPad detects your finger by capacitive sensing it is not sensitive to heat or ...

Page 79: ...Under Pointer Customizing Scroll Zone Sizes This page includes a small map of the TouchPad with the scroll zones shaded in red See the Scroll Zone TouchPad Map for a more detailed description You can adjust the size of each zone by dragging one of the black resize handles on the TouchPad map If you are having trouble activating the Virtual Scrolling feature you might want to try making the scroll ...

Page 80: ... zone to mean right clicks Then when you tap your finger on the upper right corner of your TouchPad it is as if you are clicking the right mouse or TouchPad button This page includes a small map of the TouchPad with the active tap zones shaded in red Next to each zone is a text box specifying the action for that zone To Customize 1 To activate the corner tap zones check the box next to the text En...

Page 81: ...re accuracy when pointing with the TouchPad such as in a drawing program Thespeedofthepointercanmakethistypeofaccuracydifficulttoobtain Toslowdownthepointermovement you can specify a slow motion key Then for slow pointer movement press and hold this key as you move the pointer Constrained Pointer Key At times you may want to restrict the pointer to move only horizontally or only vertically You can...

Page 82: ...ween the left and right buttons Customizing Button Assignments You can customize the TouchPad buttons in the same way that you customize the tap zones To Customize Each button has a text box that displays the current action for example it might say Left which means the left click or primary click action To display a list of possible actions click on the down arrow button located to the right of th...

Page 83: ...vity Use the Touch Sensitivity slider to control how much finger pressure you must apply before the TouchPad responds See Adjust the Overall Touch Sensitivity Palm Check The Palm Check slider controls the TouchPad s detection of accidental and unwanted pointing movement In addition to detecting palm contact with the TouchPad the TouchPad can ignore much of the accidental andunwantedpointermovement...

Page 84: ... TouchPad with the edge zones shaded in red See the Edge Zone TouchPad Map for a more detailed description You can adjust the size of each zone by dragging one of the black resize handles on the TouchPad map If you are having trouble activating the Edge Motion feature you might want to try making the edge zones wider Customizing Edge Motion Speed During Edge Motion the speed at which the pointer o...

Page 85: ...ication which owns that win dow Some applications smooth scroll while others wait until you release the scroll bar before updating their contents Virtual Scrolling knows about many common applications and window types and uses this knowledge to trick many windows into smooth scrolling Microsoft Word document windows for example do not normally smooth scroll but they do when you use Vir tual Scroll...

Page 86: ...for zooming in and out on a spread sheet in Mi crosoft Excel These keys can also be used for special pointer movement such as for slowing the pointer down or for constraining the pointer to move only horizontally or only vertically For ex ample you can assign the left shift key to be the Slow Motion Key Then when you press and hold the left shift key the pointer motion will be slower than usual No...

Page 87: ...87 Software Utilities WinFlash Topics Covered WinFlash Setup Using WinFlash Screens and drivers may vary depending on your model and operating system Recommended Utility ...

Page 88: ...o setup 2 On the Choose Destination Location screen click Next to continue or you may first change the destination folder 3 On the Setup Complete screen click Finish WINFLASH Setup Running setup will give you the following wizard Make sure you installATKACPI first or else you will get this message ...

Page 89: ... the new BIOS to your Notebook PC You need to restart your Notebook PC and reset your BIOS See instructions on the next page Do not update your BIOS for no reason You will be warned that you should only update your BIOS if you know it will solve a specific problem IfyouupdateyourBIOSusingthewrong BIOS file your Notebook PC may not boot up The text shown in these screens are examples only and will ...

Page 90: ...90 Software Utilities ...

Reviews: