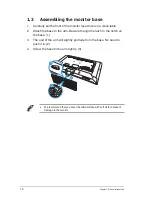
background image

1-1

ASUS LCD Monitor VA321 series

1.1 Welcome!

Thank you for purchasing the ASUS

®

 LCD monitor!

The latest widescreen LCD monitor from ASUS provides a crisper, 

broader, and brighter display, plus a host of features that enhance your 

viewing experience.

With these features, you can enjoy the convenience and delightful visual 

experience that the monitor brings to you!

1.2  Package contents

Check your package for the following items:

  LCD monitor
  Monitor Base
  Quick Start Guide
  Warranty Card
  1x Power Adapter
  1x Power Cord
  1x VGA Cable
  1x DVI Cable
  1x Audio Cable


If any of the above items is damaged or missing, contact your retailer 

immediately.

Summary of Contents for VA321H

Page 1: ...VA321 series LCD Monitor User Guide ...

Page 2: ...NESS AND THE LIKE EVEN IF ASUS HAS BEEN ADVISED OF THE POSSIBILITY OF SUCH DAMAGES ARISING FROM ANY DEFECT OR ERROR IN THIS MANUAL OR PRODUCT SPECIFICATIONS AND INFORMATION CONTAINED IN THIS MANUAL ARE FURNISHED FOR INFORMATIONAL USE ONLY AND ARE SUBJECT TO CHANGE AT ANY TIME WITHOUT NOTICE AND SHOULD NOT BE CONSTRUED AS A COMMITMENT BY ASUS ASUS ASSUMES NO RESPONSIBILITY OR LIABILITY FOR ANY ERRO...

Page 3: ...ionality In case of no signal input after 10 seconds the product automatically goes to sleep standby mode As an Energy Star Partner our company has determined that this product meets the Energy Star guidelines for energy efficiency AEEE Yönetmeliğine Uygundur ...

Page 4: ...of power supply to your home consult your dealer or local power company Use the appropriate power plug which complies with your local power standard Do not overload power strips and extention cords Overloading can result in fire or electric shock Avoid dust humidity and temperature extremes Do not place the monitor in any area where it may become wet Place the monitor on a stable surface Unplug th...

Page 5: ...he screen may flicker during the initial use due to the nature of the fluorescent light Turn off the Power Switch and turn it on again to make sure that the flicker disappears You may find slightly uneven brightness on the screen depending on the desktop pattern you use When the same image is displayed for hours an afterimage of the previous screen may remain after switching the image The screen w...

Page 6: ...e updates 1 ASUS websites The ASUS websites worldwide provide updated information on ASUS hardware and software products Refer to http www asus com 2 Optional documentation Your product package may include optional documentation that may have been added by your dealer These documents are not part of the standard package ...

Page 7: ...ance your viewing experience With these features you can enjoy the convenience and delightful visual experience that the monitor brings to you 1 2 Package contents Check your package for the following items LCD monitor Monitor Base Quick Start Guide Warranty Card 1x Power Adapter 1x Power Cord 1x VGA Cable 1x DVI Cable 1x Audio Cable If any of the above items is damaged or missing contact your ret...

Page 8: ...on a clean table 2 Attach the base to the arm Beware to align the latch to the notch on the base 1 3 The end of the arm will slightly protrude from the base No need to push it in 2 4 Screw the base to the arm tightly 3 2 1 3 We recommend that you cover the table surface with soft cloth to prevent damage to the monitor ...

Page 9: ...RISK OF ELECTRIC SHOCK DO NOT OPEN ATTENTION RISQUE D ÉLECTROCUTION NE PAS OUVRIR DVI HDMI VGA DC IN VGA DVI HDMI 1 4 5 6 2 3 7 10 8 9 1 DC IN port 2 HDMI port 3 DVI port 4 VGA port 5 Audio in 6 Earphone jack 7 Control button 8 Screw holes for VESA wall mount 9 Kensington Lock 10 Power button ...

Page 10: ...5 6 7 2 3 5 5 6 7 1 Power Button Power Indicator Press this button to turn the monitor on off The color definition of the power indicator is as the table below Status Description White ON Amber Standby mode OFF OFF 2 MENU Button Press this button to enter the OSD menu 3 QuickFit Button This is a hotkey to activate the QuickFit function designed for alignment The QuickFit function contains 6 pages ...

Page 11: ...put Select key or select from the Input Select item in the OSD menu 5 Close Button Exit the OSD menu 6 Shortcut Key1 This is a Shortcut key The default setting is Brightness 7 Shortcut Key2 This is a Shortcut key The default setting is Blue Light Filter ...

Page 12: ...acilitates designers and users to organize content and layout on one page and achieve a consistent look and feel Alignment Grid 2 Paper size Provides users to view their documents in real size on the screen A4 B5 Letter A4 B5 EXIT Letter EXIT 3 Photo size Provides photographers and other users to accurately view and edit their photos in real size on the screen 3x5 2x2 4x6 8x10 5x7 ...

Page 13: ...tom of the base Then remove the base from the stand 3 Or you may directly use a screwdriver to remove the screws that secure the stand to the monitor and detach the stand from the monitor We recommend that you cover the table surface with soft cloth to prevent damage to the monitor Hold the base while removing the screw 1 2 3 The VESA wall mount kit 100 x 100 mm is purchased separately Use only th...

Page 14: ... 1 Press the MENU button to activate the OSD menu 2 Press the and buttons to toggle between options in the Menu As you move from one icon to another the option name is highlighted 3 To select the highlighted item on the menu press the button 4 Press the and buttons to select the desired parameter 5 Press the button to enter the slide bar and then use the and buttons according to the indicators on ...

Page 15: ...ce for movie watching with SPLENDID Video Intelligence Technology Game Mode This is the best choice for game playing with SPLENDID Video Intelligence Technology Night View Mode This is the best choice for playing dark scene game or watching dark scene movie with SPLENDID Video Intelligence Technology sRGB Mode This is the best choice for viewing photos and graphics from PCs Reading Mode This is th...

Page 16: ... color temperature Level 1 4 The higher the level the more blue light will be reduced When Blue Light Filter is activated the default settings of Standard Mode will be automatically imported Between Level 1 to Level 3 the Brightness function is user configurable Level 4 is optimized setting The Brightness function is not user configurable 3 Color Select the image color you like from this function ...

Page 17: ...Auto Adjust VividPixel Color Image Blue Light Filter Input Select System Setup Shortcut Splendid Sharpness Adjusts the picture sharpness The adjusting range is from 0 to 100 Trace Free Speeds up the response time by Over Drive technology The adjusting range is from lower 0 to faster 100 Aspect Control Adjusts the aspect ratio to Full 4 3 or OverScan 4 3 is only available when input source is in 4 ...

Page 18: ...or VGA input Phase adjusts the phase of the pixel clock signal With a wrong phase adjustment the screen shows horizontal disturbances Clock pixel frequency controls the number of pixels scanned by one horizontal sweep If the frequency is not correct the screen shows vertical stripes and the image is not proportional 5 Input Select Select the input source from VGA DVI or HDMI input signal HDMI VA32...

Page 19: ...or Power Key Lock All Reset Information Splendid Color Image Blue Light Filter Input Select System Setup Shortcut Splendid Demo Mode Activate the demo mode for the Splendid function Volume Adjust the earphone output volume level The adjusting range is from 0 to 100 GamePlus The GamePlus Function provides a toolkit and creates a better gaming environment for users when playing different types of ga...

Page 20: ...arency of the OSD screen Language Select OSD language The selections are English French German Spanish Italian Dutch Russian Traditional Chinese Simplified Chinese Japanese Persian Thai Indonesian Poland Turkey Portugal Czech Croatia Hungary Romania and Korean Key Lock Pressing the second button on the right for more than five seconds to activate the key lock function More Return the next page of ...

Page 21: ... Color Image Blue Light Filter Shortcut Input Select System Setup Shortcut 1 Assign a function to the Shortcut Key1 Available options Splendid Brightness Auto Adjust Contrast Color Temp Volume GamePlus and Blue Light Filter The default setting is Brightness Shortcut 2 Assign a function to the Shortcut Key2 Available options Splendid Brightness Auto Adjust Contrast Color Temp Volume GamePlus and Bl...

Page 22: ...p 5 ms Gray to Gray D Sub input Yes DVI input Yes HDMI input Yes Power ON Consumption 45W Max Speaker 5W x2 Power saving mode 0 5W Power off mode 0 5W VESA Wall Mounting Yes 100 mm x 100 mm Phys Dimension incl base WxHxD 722 x 475 2 x 151 mm Box Dimension WxHxD 780 x 555 x 124 mm Net Weight incl stand 4 1 kg Gross Weight Esti 6 1 kg Voltage Rating 65W Adapter DC19V 3 42A AC100 240V at 50 60Hz Temp...

Page 23: ...ness settings via OSD Screen image is not centered or sized properly Open main menu OSD execute Image Auto Adjust function for VGA only Adjust the H Position or V Position settings via OSD Screen image bounces or a wave pattern is present in the image Make sure the signal cable is properly connected to the monitor and the computer Move electrical devices that may cause electrical interference Scre...

Page 24: ...80x720 60Hz 1650x750 45 00 60 000 74 25 1280x768 60Hz 1664x798 47 776 59 870 79 5 1360x768 60Hz 1792x795 47 712 60 015 85 500 1366x768 60Hz 1792x798 47 712 59 790 85 500 WXGA 1440x900 60Hz 1904x934 55 935 59 887 106 500 UXGA 1600x1200 60Hz 2160x1250 75 000 60 000 162 000 WSXGA 1680x1050 60Hz 2240x1089 65 290 59 954 146 250 WUXGA 1920x1080 60Hz 2576x1120 67 158 59 963 173 000 1920x1080 60Hz 2200x11...

Reviews: