ASUS Z10PH-D16
2-15
2.5
Expansion slots
The following subsections describe the slots and expansion cards that they support.
Ensure to unplug the power cord before adding or removing expansion cards. Failure to do
so may cause you physical injury and damage motherboard components.
2.5.2
Installing the riser card
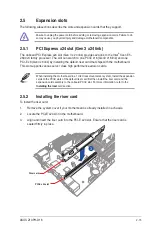
To install the riser card:
1.
Remove the system cover if your motherboard is already installed in a chassis.
2.
Locate the PCI-E x24 slot in the motherboard.
3.
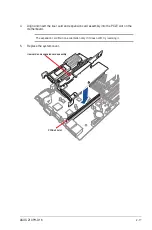
Align and insert the riser card into the PCI-E x24 slot. Ensure that the riser card is
seated firmly in place.
PCI-E x24 slot
Riser card
2.5.1
PCI Express x24 slot (Gen 3 x24 link)
The onboard PCI Express x24 slot (Gen 3 x 24 link) provides x24 link to the Intel
®
Xeon E5-
2600 v3 family processor. The slot can switch to one PCI-E x16 (Gen3 x16 link) and one
PCI-E x8 (Gen3 x8 link) by installing the default riser card that ships with the motherboard.
This slot supports various server class high performance add-on cards.
When installing the motherboard to a 1U/2U rackmount server system, install the expansion
cards to the PCI-E slots of the default riser card first then install the riser card and the
expansion card assembly to the onboard PCI-E slot. For more information, refer to the
Installing the riser
card section.
Summary of Contents for Z10PH-D16
Page 1: ...Z10PH D16 Server Motherboard User Guide ...
Page 14: ...xiv ...
Page 22: ...2 4 Chapter 2 Hardware information 2 2 3 Z10PH D16 Motherboard layout ...
Page 58: ...2 40 Chapter 2 Hardware information ...
Page 62: ...3 4 Chapter 3 Powering up ...
Page 152: ...5 38 Chapter 5 RAID configuration ...
Page 180: ...A 2 Appendix A Reference information A 1 Z10PH D16 block diagram ...


