background image

9

4. Using the Notebook PC ......................................................................... 41

Pointing Device ..................................................................................................................... 42

Touchpad Usage Illustrations ........................................................................................... 42
Using the Touchpad ......................................................................................................... 42
Caring for the Touchpad ................................................................................................... 44

Optical Drive .......................................................................................................................... 45

PC Card (PCMCIA) Socket ................................................................................................... 47

32-bit CardBus Support ................................................................................................... 47
Inserting a PC Card (PCMCIA) ........................................................................................ 48
Removing a PC Card (PCMCIA) ...................................................................................... 48
Flash Memory Card Reader ............................................................................................. 49

Modem and Network Connections ........................................................................................ 50

Modem Connection .......................................................................................................... 50

Modem and Network Connections ........................................................................................ 51

Network Connection ......................................................................................................... 52

AC Power System ................................................................................................................. 53

Battery Power System ........................................................................................................... 53

Charging the Battery Pack ............................................................................................... 53
Using Battery Power ........................................................................................................ 54

Power Management Modes .................................................................................................. 55

Full Power Mode & Maximum Performance .................................................................... 55
ACPI ................................................................................................................................. 55
Suspend Mode ................................................................................................................. 55
Thermal Power Control .................................................................................................... 56
Power Savings ................................................................................................................. 56
Power State Summary ..................................................................................................... 56

Notebook PC Upgrades ........................................................................................................ 57

System Memory Expansion ............................................................................................. 57
Hard Disk Drive Upgrades ............................................................................................... 57
Processor Upgrades ........................................................................................................ 57

Contents

Summary of Contents for Z70N Series

Page 1: ...fringe SPECIFICATIONS AND INFORMATION CONTAINED IN THIS MANUAL ARE FURNISHED FOR INFOR MATIONALUSEONLY ANDARESUBJECTTOCHANGEATANYTIMEWITHOUTNOTICE ANDSHOULD NOT BE CONSTRUED AS A COMMITMENT BY ASUS ASUS ASSUMES NO RESPONSIBILITY OR LI ABILITY FOR ANY ERRORS OR INACCURACIES THAT MAYAPPEAR IN THIS MANUAL INCLUDING THE PRODUCTS AND SOFTWARE DESCRIBED IN IT Copyright 2003 ASUSTeK COMPUTER INC All Righ...

Page 2: ...1 Product Name Notebook PC Hardware Manual Revision 1 E1434 Release Date November 2003 Notebook PC Hardware User s Manual ...

Page 3: ...ment into an outlet on a circuit different from that to which the receiver is connected Consult the dealer or an experienced radio TV technician for help Reprinted from the Code of Federal Regulations 47 part 15 193 1993 Washington DC Office of the Federal Register National Archives and Records Administration U S Government Printing Office Power Safety Requirement Products with electrical current ...

Page 4: ...ngaben des Herstellers German ADVARSELI Lithiumbatteri Eksplosionsfare ved fejlagtig håndtering Udskiftning må kun ske med batteri af samme fabrikat og type Levér det brugte batteri tilbage til leverandøren Danish VARNING Explosionsfara vid felaktigt batteribyte Använd samma batterityp eller en ekvivalent typ som rekommenderas av apparattillverkaren Kassera använt batteri enligt fabrikantens instr...

Page 5: ...ven or unstable work surfaces Seek servicing if the casing has been damaged DO NOT place or drop objects on top and do not shove any foreign objects into the Notebook PC DO NOT press or touch the display panel Do not place together with small itemsthatmayscratchorentertheNote book PC DO NOT leave the Notebook PC on your lap or any part of the body while the Notebook PC is turned ON or is charging ...

Page 6: ...ches Safety Statements Charge Your Batteries If you intend to use battery power be sure to fully charge your battery pack and any optional battery packs before going on long trips Remember that the power adapter charges the battery pack as long as it is plugged into the computer and an AC power source Be aware that it takes much longer to charge the battery pack when the Notebook PC is in use Airp...

Page 7: ...6 Danish Dutch English Finnish French German Greek Italian Portuguese Spanish Swedish CTR 21 Approval for Notebook PC with built in Modem Safety Statements ...

Page 8: ...mical cell or two or more cells connected in series parallel or both that convert chemical energy into electrical energy by an irreversible or revers ible chemical reaction Do not dispose the Notebook PC battery pack in a fire as they may explode Check with local codes for possible special disposal instructions to reduce the risk of injury to persons due to fire or explosion Do not use power adapt...

Page 9: ... Care 27 Operating Systems 27 Support Software 27 Power Connection 28 Powering ON The Notebook PC 29 The Power On Self Test POST 29 Power Management Stand By Hibernate 30 Power Management Stand By Hibernate 30 Restarting or Rebooting 31 Powering OFF the Notebook PC 31 Restarting or Rebooting 31 Powering OFF the Notebook PC 32 Instant Launch Keys and Status Indicators 34 Instant Launch Keys 34 Stat...

Page 10: ...dem Connection 50 Modem and Network Connections 51 Network Connection 52 AC Power System 53 Battery Power System 53 Charging the Battery Pack 53 Using Battery Power 54 Power Management Modes 55 Full Power Mode Maximum Performance 55 ACPI 55 Suspend Mode 55 Power Management Modes 55 Full Power Mode Maximum Performance 55 ACPI 55 Suspend Mode 55 Thermal Power Control 56 Power Savings 56 Power State ...

Page 11: ...mory 61 USB Communication Cable 61 USB Floppy Disk Drive 62 USB Keyboard and Mouse 62 Optional Connections 63 Monitor Out Connection 63 External Audio Connections 63 Parallel Printer Connection 64 IEEE1394 Connection 64 Securing Your Notebook PC 64 DVD ROM Drive Information 65 Internal Modem Compliancy 66 Glossary 68 Notebook PC Information 74 Contents ...

Page 12: ...11 1 Introducing the Notebook PC About This User s Manual Notes For This Manual Preparing your Notebook PC ...

Page 13: ...This Manual This User s Manual was created using Macintosh versions of Adobe PageMaker 6 52 Adobe Photoshop 5 5 Adobe Illustrator 8 0 and Macromedia Freehand 8 0 1 The body text type used in this manual is Times MAC or Times New Roman Windows and headings are Helvetica MAC or Arial Windows A few notes and warnings in bold are used throughout this guide that you should be aware of in order to compl...

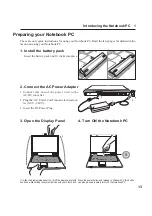
Page 14: ...nnect the AC Power Adapter 1 Connect this end of the power cord to the AC DC converter 2 Plug the AC Power Cord into an electrical out let 110V 240V 3 Insert the DC Power Plug 3 Open the Display Panel Press the power button and release In Windows XP this button can also be used to safely turn OFF the Notebook PC 1 Slide the display release button 2 lift the display panel with one hand while holdin...

Page 15: ...14 1 Introducing the Notebook PC ...

Page 16: ...15 2 Knowing the Parts Top Side Bottom Side Left Side Right Side Rear Side Front Side ...

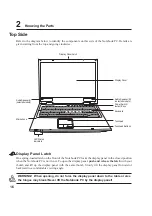
Page 17: ...To open the display panel push and release the latch with your thumb and lift up the display panel with the same thumb Slowly tilt the display panel forward or backward to a comfortable viewing angle WARNING When opening do not force the display panel down to the table or else the hinges may break Never lift the Notebook PC by the display panel Display Panel Touchpad Buttons Keyboard Touchpad Powe...

Page 18: ... once to turn OFF the Notebook PC Instant Launch Keys Instant launch keys allow you to launch frequently used applications with one push of a button Details provided later in this manual Display Panel The display panel functions the same as a desktop monitor The Notebook PC uses an active matrix TFT LCD which provides excellent viewing like that of desktop monitors Unlike desktop monitors the LCD ...

Page 19: ... temperatures are normal during charging or operation DO NOT PUT THE NOTEBOOK PC ON THE LAP OR OTHER PARTS OF THE BODY TO AVOID INJURY FROM THE HEAT Name Card Holder Battery Pack Module Device Lock Battery Lock Hard Disk Drive Compartment Memory Compartment Audio Speaker Left Module Device Shutdown Button Audio Speaker Right Audio DJ Power Switch Memory Compartment The memory compartment contains ...

Page 20: ...ce module in place Hold it in the unlock position to remove a device module Audio Speaker Left The built in speaker allows you to hear audio without additional attachments The multimedia sound system features an integrated digital audio controller that produces rich vibrant sound results im proved with external stereo headphones or speakers All audio features are software controlled Audio DJ Power...

Page 21: ...frared Port Audio DJ Power Switch Flash Memory Slot Audio DJ Buttons LAN Port The RJ 45 LAN port supports an RJ 45 Ethernet cable The internal LAN supports 10Base T or 100Base TX standard or duplex networks The built in connector allows convenient use without a dongle Modem Port The RJ 11 telephone port supports an RJ 11 telephone cable The internal modem supports up to 56K V 90 transfers The buil...

Page 22: ...o ampli fied speakers or headphones Using this jack automatically disables the built in speakers Flash Memory Slot Normally a PCMCIA memory card reader must be purchased separately in order to use memory cards from devices such as digital cameras MP3 players mobile phones and PDAs This Notebook PC has a built in memory card reader that can read the following flash memory cards Secure Digital SD Mu...

Page 23: ...al Drive Module This Notebook PC features a module bay to accept a removable module device Shown here is an optical drive module which may support CD DVD or RW discs depending on the optical drive model Optical Drive Electronic Eject and Emergency Eject The optical drive eject is an electronic eject button requiring power for opening the tray You can also eject the optical drive tray through any o...

Page 24: ...r external display USB Ports Parallel Port DC Power Input Jack Kensington Lock Port TV Out Port Monitor Port Expansion Port DC Power Input Jack The supplied power adapter converts AC power to DC power for use with this jack Power supplied through this jack supplies power to the Notebook PC and charges the internal battery pack To prevent damage to the Notebook PC and battery pack always use the su...

Page 25: ... TV Out function TV Out allows a high definition connection to a television or video projection device using a Super VHS S Video cable not pro vided An adapter is provided for use with RCA inputs available on all standard video devices This port support NTSC or PAL formats Front Side Refer to the diagram below to identify the components on the front side of the Notebook PC Display Panel Latch One ...

Page 26: ...e Battery Pack Operating Systems Power Connection Powering ON The Notebook PC Power Management Stand By and Hibernate Restarting or Rebooting Powering OFF The Notebook PC Using the Keyboard Instant Launch Keys and Status Indicators ...

Page 27: ...til it clicks into place 2 The lock will automatically snap into place To remove the battery pack 1 Slide the Battery Release to unlock and hold 2 Lift the edge of the battery pack up IMPORTANT Never attempt to remove the battery pack while the Notebook PC is turned ON as this may result in the loss of working data IMPORTANT Only use battery packs and power adapters supplied with this Note book PC...

Page 28: ... also have a shelf life it is not recommended to buy extras for storing Operating Systems This Notebook PC may offer depending on territory its customers the choice of a pre installed oper ating system such as Microsoft Windows XP The choices and languages will depend on the territory The levels of hardware and software support may vary depending on the installed operating system The stability and...

Page 29: ...nect theAC power cord to anAC outlet preferably with surge protection and then connect the DC plug to the Notebook PC Connecting the AC DC adapter to the AC outlet first allows you to test the AC outlet s power and the AC DC converter itself for compatibility problems before connecting the DC power to the Notebook PC The green power LED on the adapter lights up if the power is within accepted rang...

Page 30: ...program 1 right click any hard disk drive icon in My Computer 2 choose Properties 3 click the Tools tab 4 click Check Now 5 select a hard disk drive 6 select Thorough to also check for physical damages and 7 click Start Third party disk utilities such as Symantec s Norton Disk Doctor can also perform the same functions but with greater ease and more features Powering ON The Notebook PC The Noteboo...

Page 31: ...pplications and ask if you want to save your work if any are not saved Stand by is the same as Suspend to RAM STR This function stores your current data and status in RAM while many components are turned OFF Because RAM is vola tile it requires power to keep refresh the data To operate select Start Shut down and Stand by Hibernate is the same as Suspend to Disk STD and stores your current data and...

Page 32: ...ill provide a dialog box to allow restart To restart the system manually Click the Start button and select Shut Down and choose Restart In case the operating system hangs stops freezes crashes try a warm boot by pressing Ctrl Alt Del keys simultaneously You may try a few times if there is no response The screens are different depending on your security settings ...

Page 33: ...ithout proper power management DOS Windows NT you must power OFF the Notebook PC by holding the power switch for 2 seconds as opposed to 1 second to power ON after closing applications and exiting operating systems Holding the power switch for 2 seconds is necessary in order to prevent accidental power OFFs The screens are different depending on your security settings ...

Page 34: ...your operating system cannot properly turn OFF or restart there are two additional ways to shutdown your Notebook PC 1 Hold the power button over 4 seconds or 2 Press the shutdown button TIP Use a straightened paper clip to press the shutdown button ...

Page 35: ...ng the touchpad will prevent you from accidentally moving the cursor while typing To enable the touchpad simply press this button again Wireless LAN Key Optional This button is only applicable on models with internal wireless LAN When the internal wireless LAN is enabled this indicator will light Windows software settings are necessary to use the wireless LAN Power4 Gear Key The Power4 Gear button...

Page 36: ...n seven modes in the battery DC mode segment When you remove or apply theAC adapter Power4 Gear will automatically shift you up or down into the proper mode segment AC or DC Super Performance High Performance Game Performance DVD Movie Performance Email Office Performance Presentation Performance Audio Listening Performance Battery Saving Performance Mode Names Icons AC AC DC AC DC DC DC DC DC DC ...

Page 37: ...y charge indicator is an LED that shows the status of the battery s power as follows ON The Notebook PC s battery is charging Blinking The Notebook PC s battery power is lower than 10 Off The Notebook PC s battery is charged or completely drained Email Indicator Flashes when there is one or more new email s in your email program s inbox This function requires software setup and may not be currentl...

Page 38: ...the Notebook PC is accessing one or more storage device s such as the hard disk The light flashes proportional to the access time Capital Lock Indicates that capital lock Caps Lock is activated when lighted Capital lock allows some of the keyboard letters to type using capitalized letters e g A B C When the capital lock light is OFF the typed letters will be in the lower case form e g a b c Right ...

Page 39: ...Decreases the display brightness Open Sun Icon F6 Increases the display brightness LCD Icon F7 Toggles the display panel ON and OFF This also stretches your screen area on certain models to fill the entire display when using low resolution modes LCD Monitor Icons F8 Toggles between Notebook PC LCD External Monitor Television This function does not work in 256 Colors select High Color in Display Pr...

Page 40: ...d enables disables the NumLock on both keyboards simultaneously To disable the numeric keypad while keeping the keypad on an external keyboard activated press the keys on the Notebook PC NOTE The large bold characters and symbols are printed here for your reference They are not labeled on the keyboard as shown here Microsoft Windows Keys There are two special Windows keys on the keyboard as descri...

Page 41: ...th Number Lock OFF press and one of the cursor keys shown below For example Fn 8 for up Fn K for down Fn U for left and Fn O for right With Number Lock ON use Shift and one of the cursor keys shown below For example Shift 8 for up Shift K for down Shift U for left and Shift O for right NOTE The large bold characters and symbols are printed here for your reference They are not labeled on the keyboa...

Page 42: ...sing the Notebook PC Pointing Device Optical Drive Flash Memory Card Reader PC Card PCMCIA Socket Modem and Network Connections AC Power System Battery Power System Power Management Modes Notebook PC Upgrades ...

Page 43: ...essure with the tip of your finger is all that is required to operate the touchpad Because the touch pad is electrostatic sensitive objects cannot be used in place of your fingers The touchpad s primary func tion is to move the cursor around or select items dis played on the screen with the use of your fingertip The following illustrations demonstrate proper use of the touchpad Moving The Cursor P...

Page 44: ... You can set the double click speed using the Windows Control Panel Mouse The following 2 examples produce the same results press the left button twice and release lightly but rapidly strike the touchpad twice press the left cursor button and release lightly but rapidly strike the touchpad Clicking Tapping With the cursor over an item press the left button or use your fingertip to touch the touchp...

Page 45: ...ving the cursor to the desired location then release the button Or you can simply double tap on the item and hold while dragging the item with your fingertip The following 2 examples produce the same results hold left button and slide finger on touchpad lightly strike the touchpad twice sliding finger on touchpad during second strike Dragging Clicking Dragging Tapping NOTE A software controlled sc...

Page 46: ...no obstructions that may get jammed un der the drive s tray 3 Hold the disc by the edge and face the disc s printed side up Push down on both sides of the disc s center until the disc snaps onto the hub The hub should be higher than the disc when correctly mounted 4 Slowly push the drive s tray back in The drive will begin reading the table of contents TOC on the disc When the drive stops the disc...

Page 47: ... disc and installed software it may require that you open a DVD player to listen to DVD audio You can adjust the volume using hotkeys or Windows speaker icon on the taskbar Using the Optical Drive Optical discs and equipment must be handled with care because of the precise mechanics involved Keep in mind the important safety instructions from your CD suppliers Unlike desktop optical drives the Not...

Page 48: ...d standards actually have different thicknesses Type I cards are 3 3mm Type II cards are 5mm and Type III cards are 10 5mm thick Type I and Type II cards can be used in a single socket and Type III cards take up two sockets Type III cards are only supported on Notebook PC s with two PC card sockets 32 bit CardBus Support CardBus support allows PC Cards and their hosts to use 32 bit bus mastering a...

Page 49: ...ed in one orientation Look for a sticker icon or marking on one side of the connector repre senting the top side 1 Press in the toggle eject button and release The recessed spring loaded toggle button will ex tend when pushed in and released 2 Press the extended button again to eject the PC Card Carefully pull the ejected PC card out of the socket Removing a PC Card PCMCIA To remove the PC card fi...

Page 50: ...ith MS adapter Memory Stick Pro and Memory Stick Pro Duo with MS Pro adapter Memory Sticks may be standard or with MagicGate technology The built in memory card reader is not only convenient but also faster than most other forms of memory card readers because it utilizes the high bandwidth PCI bus MMC SD MS Pro IMPORTANT Never remove cards while or immediately after reading copying for matting or ...

Page 51: ...phone outlets found in the walls of residential homes and some commercial buildings some commercial buildings may have telephone wir ing designed for dedicated phone systems that may not be compatible RJ 45 network cables are found connecting network computers to network hubs or switches usually found in business environments IMPORTANT Only use analog telephone outlets The built in modem does not ...

Page 52: ... systems found in many commercial buildings or else damage will occur This is an example of the Notebook PC connected to a telephone jack for use with the built in modem Modem Connection The telephone wire used to connect the Notebook PC s internal modem should have either two or four wires only two wires telephone line 1 is used by the modem and should have an RJ 11 connector on both ends Connect...

Page 53: ...d pair wiring Duplex transfers up to 200Mbps is supported on this Notebook PC but requires connection to a switch with duplex enabled The software default is to use the fastest setting so no user intervention is required Twisted Pair Cable The cable used to connect the Ethernet card to a host generally a Hub or Switch is called a straight through Twisted Pair Ethernet TPE The end connectors are ca...

Page 54: ... to accurately report the amount of charge percentage left in the battery Additional battery packs are optional and can be purchased separately through a Notebook PC retailer Before using the Notebook PC on battery power for the first time check the battery icon in the Windows task bar to make sure that the battery is fully charged Charging the battery takes a few hours when the Notebook PC is pow...

Page 55: ... when the battery power is de pleted Suspend to Disk STD is not the same as power OFF STD requires a small amount of power and will fail if no power is available due to complete battery deple tion or no power supply e g removing both the power adapter and battery pack NOTE If you ignore the low battery warning eventually the Notebook PC enters sus pend mode Windows default uses STR WARNING Never a...

Page 56: ...When the Notebook PC is operating in Full Power Mode the Power LED remains ON If you are conscious of both system performance and power consumption select Maximum Performance instead of disabling all power management features ACPI Advanced Configuration and Power Management ACPI was developed by Intel Microsoft and Toshiba especially for Windows and later to control power management and Plug and P...

Page 57: ...wer Savings In addition to reducing the CPU clock this mode puts devices including the LCD backlight in their lower active state The Notebook PC enters Stand by mode low priority when the system remains idle for a specified amount of time The timeout can be set through Windows power management higher priority To resume system operation press any key Power State Summary STATE ENTRY EVENT EXIT EVENT...

Page 58: ...storage industry The high speed transfer modes supported are UltraATA 100 up to 100MB sec and PIO mode 4 up to 16 6MB sec The Notebook PC comes with a removable 2 5 6 35cm wide and 374 95cm high UltraATA 100 66 IDE hard disk drive with current capacities up to 80GB Current IDE hard drives support S M A R T Self Monitoring and Reporting Technology to detect hard disk errors or failures before they ...

Page 59: ...58 4 Using the Notebook PC ...

Page 60: ...59 Appendix Optional Accessories Optional Connections Internal Modem Compliancy Glossary Notebook PC Information ...

Page 61: ...ial port other devices should function normally while hot dockable If any device does not function or cannot be seen you can refresh devices by 1 right clicking the My Computer icon on the desktop 2 selecting Properties on the menu 3 selecting the Device Manager tab 4 clicking the Refresh button and 5 click ing OK button to finish USB Hub Attaching an optional USB hub will increase your USB ports ...

Page 62: ...1b but supports any computer Notebook or Desktop with a USB port Wireless LAN Cardbus Card Wireless LAN USB USB Flash Memory A USB flash memory device can replace the slow 1 44MB floppy disk by with up to 128MB in high speed durable storage that is compatible with all computers using the USB port USB Communication Cable Attaching optional USB communication cables be tween computers through the USB...

Page 63: ... the external USB key board and mouse will work simultaneously with the Notebook PC s built in keyboard and touchpad Optional Accessories Cont These items if desired come as optional items to complement your Notebook PC USB Floppy Disk Drive The Notebook PC features an optional USB interface disk drive that accepts a standard 1 44MB or 720KB 3 5 inch floppy diskette The eject button is on the top ...

Page 64: ...l while simultaneously allowing others to view the external monitor For large audiences try you can connect a video projector to this port Optional Connections These items if desired may be purchased from third parties External Audio Connections The Notebook PC provides easy access for con necting a stereo headphone or multichannel am plifier mono microphone and a stereo audio source just like on ...

Page 65: ...uld be marked DV for Digital Video port Parallel Printer Connection This Notebook PC provides a Parallel port that al lows you to connect inkjet laser dye printers and other Parallel printing devices In addition one or more USB printers can be simultaneously used on any USB port Securing Your Notebook PC For system and hard disk drive security see BIOS setup Security Athird party lock such as the ...

Page 66: ...vies be limited to a particular region usually coded to the region at which it is sold While DVD movie content may be released for multiple regions CSS design rules require that any system capable of playing CSS encrypted content must only be capable of playing one region Region Definitions Region 1 Canada US US Territories Region 2 Czech Egypt Finland France Germany Gulf States Hungary Iceland Ir...

Page 67: ...g if provided is by means of dual tone multifrequency signalling Network Compatibility Declaration Statement to be made by the manufacturer to the Notified Body and the vendor This declaration will indicate the networks with which the equipment is designed to work and any notified networks with which the equipment may have inter working difficulties Network Compatibility Declaration Statement to b...

Page 68: ...o Poland No Not Applicable Portugal No Not Applicable Spain No Not Applicable Sweden Yes No Switzerland Yes No United Kingdom Yes No This information was copied from CETECOM and is supplied without liability For updates to this table you may visit http www cetecom de technologies ctr_21 html 1 National requirements will apply only if the equipment may use pulse dialling manufacturers may state in ...

Page 69: ...0 11 0 0095 1810 28 0 12 0 011 1520 33 36 0 13 0 013 1300 40 35 0 14 0 015 1120 45 0 15 0 018 970 54 34 0 16 0 020 844 60 0 17 0 023 757 68 33 0 18 0 026 676 75 0 19 0 028 605 85 32 0 20 0 031 547 93 30 0 25 0 049 351 147 29 0 30 0 071 243 212 27 0 35 0 096 178 288 26 0 40 0 13 137 378 25 0 45 0 16 108 477 Gauge Diam Area R I 3A mm2 AWG mm mm2 ohm km mA 24 0 50 0 20 87 5 588 0 55 0 24 72 3 715 0 6...

Page 70: ...pting the CPU Bus master IDE driver and bus master IDE hard disk drives are required to support bus master IDE mode Byte Binary Term One byte is a group of eight contiguous bits Abyte is used to represent a single alphanumeric character punctuation mark or other symbol Clock Throttling Chipset function which allows the processor s clock to be stopped and started at a known duty cycle Clock throttl...

Page 71: ...r SCSI devices UltraDMA 66 or 100 IDE devices can achieve up to 33MB Sec transfer IEEE1394 Also known as iLINK Sony or FireWire Apple IEEE1394 is a high speed serial bus like SCSI but has simple connections and hot plugging capabilities like USB The interface IEEE1394 has a band width of 400 1000 Mbits sec and can handle up to 63 units on the same bus It is very likely that IEEE1394 together with ...

Page 72: ...B lasers have both adminis trative and physical controls to protect personnel Physical controls include limited access work areas Administrative controls include special warning signs posted outside the entrances to the laser work spaces and lights outside the entrances that warn personnel when the lasers are in use CLASS 4 Class 4 lasers are high power lasers that will cause damage to unprotected...

Page 73: ...sing the function keys The timeout setting of both Hard Disk and Video can be set by the BIOS Setup The Power LED blinks when the Notebook PC is in STR mode In STD mode the Notebook PC will appear to be powered OFF System Disk A system disk contains the core file of an operating system and is used to boot up the operating system Twisted Pair Cable The cable used to connect the Ethernet card to a h...

Page 74: ...73 Appendix A ...

Page 75: ...city ________________ 2nd Hard Disk Drive Manufacturer ___________________Capacity ________________ BIOS Version _______________________________________ Date ________________ Accessories _______________________________ Serial Number ________________ Accessories _______________________________ Serial Number ________________ Software Operating System ________________________________ Version ________...

Page 76: ...ny Address 44370 Nobel Drive Fremont CA 94538 USA General Email tsd asus com Web Site Address usa asus com General Fax 1 510 608 4555 Technical Support Support Email notebooktsd asus com Support Fax 1 502 933 8713 General Support 1 502 995 0883 Notebook Tel 1 510 739 3777 x5110 ASUS COMPUTER GmbH Germany Austria Company Address Harkort Str 25 D 40880 Ratingen Germany Web Site Address www asuscom d...

Reviews: