background image

ZS571KL

User Guide

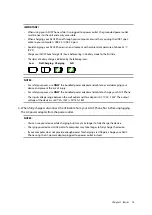
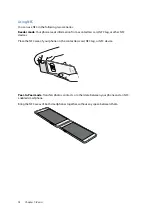
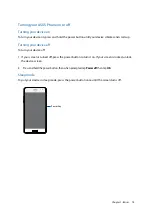
Summary of Contents for ZenFone AR ZS571KL

Page 1: ...ZS571KL User Guide ...

Page 2: ... power adapter complies with this rating Do not use damaged power cables accessories and other peripherals with your device Keep your device dry Do not use or expose your device near liquids rain or moisture You can put your device through x ray machines such as those used in conveyor belts for airport security but do not expose the device to magnetic detectors and wands The device screen is made ...

Page 3: ...cling The symbol of the crossed out wheeled bin indicates that the product electrical electronic equipment and mercury containing button cell battery should not be placed in municipal waste Check local regulations for disposal of electronic products DO NOT throw this product in fire DO NOT short circuit the contacts DO NOT disassemble this product ZenTalk Fans Forum http www asus com zentalk globa...

Page 4: ...Customizing your lock screen 31 Customizing the quick access buttons 32 Fingerprint ID sensor 33 Starting your ASUS phone for the first time 33 Setting up fingerprint ID from Settings 34 3 Work hard play harder Chrome 36 Launching Chrome 36 Sharing pages 37 Bookmarking pages 37 Clearing the browsing data 37 Gmail 38 Google Calendar 39 Creating events 39 Editing or removing events 39 Creating remin...

Page 5: ...ck 59 Google Play Music 60 Daydream 61 Tango 62 6 Your precious moments Capture moments 63 Launching the Camera app 63 Advanced camera features 67 Using the Gallery 72 Viewing files from your social network or cloud storage 72 Viewing the photo location 73 Sharing files from the Gallery 74 Deleting files from the Gallery 74 Editing images 74 7 Staying connected Mobile network 75 Enabling the mobil...

Page 6: ...ock 82 World Clock 82 Alarm clock 83 Stopwatch 83 Timer 84 9 Zen Everywhere Special Zen Tools 85 Calculator 85 Sound Recorder 86 Mobile Manager 88 10 Maintain your Zen Keeping your device up to date 89 Updating your system 89 Storage 89 Backup and reset 89 Securing your ASUS Phone 90 Appendix Notices 93 Index ...

Page 7: ... unique individual needs and make your life easier while letting you have fun with your ASUS Phone ZenUI FAQ Find answers from FAQs Frequently Asked Questions or provide your feedbacks in the user forum Camera With PixelMaster technology capture those precious moments in vivid and high quality photos and videos NOTE Availability of ASUS Zen UI apps vary per region and ASUS Phone model Tap from you...

Page 8: ...DGE WCDMA HSPA DC HSPA FDD LTE and TD LTE DSDS network bands But only one Nano SIM can connect to FDD LTE and TD LTE at a time The microSD card slot supports microSD and microSDXC card formats IMPORTANT We do not recommend using a screen protector as it can interfere with the proximity sensor If you want to use a screen protector ensure that it does not block the proximity sensor Keep the device p...

Page 9: ...slots Turn off your device before inserting a Nano SIM card Be extra careful when handling Nano SIM cards ASUS is not responsible for any loss or damage incurred to your Nano SIM cards Your ASUS Phone supports a microSD and microSDXC memory card with up to 200GB capacity NOTE Some memory cards may not be compatible with your ASUS Phone Ensure that you use only compatible memory cards to prevent lo...

Page 10: ...ur device to avoid scratches on it Use only a standard Nano SIM card on your ASUS Phone IMPORTANT You can only use the Nano SIM2 card or the MicroSD card at a time When two SIM cards are inserted only one SIM card slot supports 4G 3G 2G service The other SIM card slot only supports 2G 3G service ...

Page 11: ...ano SIM cards memory card Eject the memory card properly to safely remove it from device To eject the memory card tap Settings Storage USB then under Portable storage click beside SD card To remove a Nano SIM card memory card 1 Push a pin into the hole on the Nano SIM MicroSD card tray to eject it 2 Remove the Nano SIM or MicroSD card s from the card slot s 3 Push the tray to close it 1 2 ...

Page 12: ...en using your ASUS Phone while plugged in to a power outlet the power outlet must be near your device and easily accessible To conserve electricity unplug the AC power adapter from the power outlet when not in use Do not place heavy objects on top of your ASUS Phone CAUTION While charging your ASUS Phone can become warm This is normal however if your device becomes unusually hot disconnect the USB...

Page 13: ... use ONLY the bundled power adapter and cable to avoid damaging your device and prevent the risk of injury For safety purposes use ONLY the bundled power adapter and cable to charge your ASUS Phone The input voltage range between the wall outlet and this adapter is AC 100V 240V The output voltage of the device is 5V 2A 10W 9V 2A 18W 4 When fully charged disconnect the USB cable from your ASUS Phon...

Page 14: ... from a contactless card NFC tag or other NFC devices Place the NFC area of your phone on the contactless card NFC tag or NFC device Peer to Peer mode Transfers photos contacts or other data between your phone and an NFC enabled smartphone Bring the NFC areas of both smartphones together without any space between them ...

Page 15: ... starts up Turning your device off To turn your device off 1 If your screen is turned off press the power button to turn it on If your screen is locked unlock the device screen 2 Press and hold the power button then when prompted tap Power off then tap OK Sleep mode To put your device in sleep mode press the power button once until the screen turns off Power key ...

Page 16: ...count to set up your device if you do not have a Google or ASUS account yet go ahead and create one Google Account Using a Google Account allows you to fully utilize these Android OS features Organize and see all your information from anywhere Automatically backup all your data Leverage Google services conveniently from anywhere ASUS Account Having an ASUS Account gets you to enjoy the following p...

Page 17: ... preserve the power of your ASUS Phone battery Close all running apps that are not in use When not in use press the power button to put the device in sleep mode Decrease brightness of display Keep the speaker volume to a low level Disable Wi Fi feature Disable Bluetooth feature Disable the screen auto rotate feature Disable all auto sync features in your device ...

Page 18: ... selecting items Do any of the following To launch an app simply tap on it To select an item such as in File Manager app simply tap on it Moving or deleting items Do any of the following To move an app or widget tap and hold then drag it to the location where you want it to be To delete an app or widget from the Home screen tap and hold then drag it up to Remove ...

Page 19: ...inger to the left or to the right to switch between screens or to flip through a Gallery of images Scroll your finger up or down to go through web pages or list of items Zooming in Spread apart your two fingers on the touch panel to zoom in an image in Gallery or Maps or zoom in a web page ...

Page 20: ...ether your two fingers on the touch panel to zoom out an image in Gallery or Maps or zoom out of a web page NOTE You may not be able to zoom in out of some web pages as these pages may have been designed specifically to fit your mobile screen ...

Page 21: ... system updates weather forecasts and text messages from people who really matter to you right from your Home screen Swipe down this area once to display System notifications Swipe down this area twice to display Quick settings Tap to display Time and Weather settings Tap to open All Apps screen Tap to open an app Tap to open Google Search page Tap to open Voice Search ...

Page 22: ...that it is set as the preferred network Messages Shows that you have an unread message Wi Fi Shows the signal strength of your Wi Fi connection Bluetooth Shows that Bluetooth is turned on Battery life Shows the battery status of your ASUS Phone MicroSD card Shows that a MicroSD card is inserted in your ASUS Phone Screenshots Shows that you took screenshots of your ASUS Phone Airplane mode Shows th...

Page 23: ... to individual utilities that you can quickly access via the Quick Settings Notification Panel Tap these buttons to enable or disable their functions Slide left or right to adjust the screen s brightness Tap to open Settings Tap to select deselect items to display in Quick settings Swipe up to switch to System notifications panel Adding or removing buttons To add or remove existing buttons from th...

Page 24: ...ne Most of these changes are data and system related To launch the System notifications panel swipe down from the top of your screen Tap this to delete all of the listed notifications Swipe the notification to the left or right to remove it from the list Tap on the notification to view its details Tap to open Settings Swipe down to switch to Quick settings panel ...

Page 25: ... often used or favorite apps from your Home screen You can add remove or group your apps into one folder You can put widgets which are small dynamic apps on your Home screen Widgets provide you with quick views of the weather forecast calendar events information battery status and more Adding app shortcuts or widgets To add an app shortcut or a widget 1 Tap and hold an empty area on your Home scre...

Page 26: ...der Wallpapers Let your apps icons and other Zen elements sit on an attractively designed wallpaper You may add a translucent background tint to your wallpaper for readability and clarity You can also select an animated wallpaper to make your screen come alive Applying wallpaper To apply wallpaper 1 Tap and hold an empty area on your Home screen and select Wallpapers 2 Select a wallpaper then tap ...

Page 27: ...con and font and align the icons to the top or bottom of your screen 1 Tap and hold an empty area on your Home screen and select Home edit 2 Tap a feature to edit your Home screen Easy Mode Navigate your ASUS Phone better with Easy Mode an intuitive interface with large icons buttons and font size for better readability and easier user experience You can also quickly do your core tasks such as mak...

Page 28: ...hirty six 36 app shortcuts on the Home screen 1 Swipe to the right of the Home screen then tap 2 From the All apps screen select the app that you want to add to the list Removing shortcuts Do the following 1 Tap 2 Select the app or apps that you want to remove from the list then tap Delete ...

Page 29: ...en select the contact that you want to add to the list Removing contacts Do the following 1 Swipe to the left of the Home screen then tap Edit contacts 2 Select the contact or contacts that you want to remove from the list then tap Delete Disabling Easy Mode To disable Easy Mode 1 Swipe down from the top of your screen then tap 2 Select Easy Mode from the Settings screen 3 Slide Easy Mode to OFF ...

Page 30: ...Select the time zone and manually set the date and time 6 You can opt to use the 24 hour format if you prefer NOTE See also Clock Setting up your ringtone and alert sounds Set up the sound for your phone ringtone notifications such as text messages emails and event alerts You can also choose to enable or disable the dial pad touch tones touch sounds screen lock sound or you can choose to have your...

Page 31: ... Your device s lock screen can also be customized to regulate access to your mobile data and apps Customizing your lock screen If you want to change your lock screen settings from the default Swipe option refer to the following steps 1 Launch Quick settings then tap 2 Scroll down the Settings screen and select Lock screen 3 In the next screen tap Screen lock 4 Tap the screen lock option you would ...

Page 32: ...mize these buttons to launch other apps on the lock screen using the following steps 1 Launch Quick settings then tap 2 Scroll down the Settings screen and select Lock screen 3 Under Display tap Quick access 4 Select which button you would like to customize 5 Tap the app you would like to preset on the quick access button you chose to configure NOTE Scroll up or down to view the current list of ap...

Page 33: ...ingerprint ID when using your ASUS Phone for the first time 1 Ensure that the fingerprint identification module and your finger are clean and dry 2 From the Welcome page follow the on screen instructions to the Protect your phone page and tick Set up fingerprint 3 Click NEXT to choose a screen lock method and then follow the instructions to the Locate fingerprint scanner page and click NEXT 4 Find...

Page 34: ... fingerprint ID from Settings To set up your fingerprint ID from Settings 1 Ensure that the fingerprint scanner and your finger are clean and dry 2 Launch the Settings screen by doing any of the following Launch Quick settings then tap Tap Settings 3 Scroll down the Settings screen and select Fingerprint ...

Page 35: ...like to use and follow the on screen instructions to set up the screen lock function NOTE For more details see Securing your ASUS Phone 6 Click NEXT on the Locate fingerprint scanner page 7 Repeatedly place and lift your finger on the scanner until your fingerprint is captured 8 Click DONE to complete the setup ...

Page 36: ...abs bookmarks and browsing history across all your devices If you don t have a Google account register for one NOTE For details on creating a Google account see Gmail IMPORTANT Before doing any Internet surfing or Internet related activities ensure that your ASUS Phone is connected to a Wi Fi or mobile network For more details see Staying connected Launching Chrome From your Home screen do any of ...

Page 37: ...you can go back and browse them again To bookmark a page From the page tap To view your favorite pages tap Bookmarks then select the page you want to view or access Clearing the browsing data Clear the browsing data that are temporarily stored in your ASUS Phone to improve the loading performance of your Chrome browser The browsing data includes browsing history cache cookies site data saved passw...

Page 38: ...ou can add an email account or send and receive emails from added accounts For more details see Staying connected To set up your Google account 1 From your Home screen do any of the following to launch Gmail Tap Google Gmail Tap Google Gmail 2 Tap Add an email address 3 Select Google then tap Next 4 Enter your email address To create a new Google account tap Or create a new account 5 Follow the ne...

Page 39: ...lect how often you want the event to recur or repeat 4 To set the time zone tap More options then enter the country whose time zone you want displayed 5 From the Add location field enter the venue or location of the event 6 Tap then you may select or set the time or day to get a notification or reminder about the event 7 From the Invite people field enter the email addresses of your guests to the ...

Page 40: ...r recurring reminder All day reminder From the All day field move the slider to the right Recurring reminder Tap then select how often you want the reminder to recur or repeat 5 Once finished tap SAVE Editing or removing reminders To edit or remove a reminder 1 Tap Google Calendar 2 Tap the reminder that you want to edit or delete 3 To edit the reminder tap and make the necessary changes To remove...

Page 41: ...er IMPORTANT Before accessing files saved on the network and cloud storage ensure that Wi Fi or mobile network is enabled on your ASUS Phone For details see Staying connected Tap to display the files under the category Displays the usage of the internal and external storage Tap to search for a file Tap to access the internal external network and cloud storage Tap to clear search history invite a f...

Page 42: ...torage Drive OneDrive and Dropbox ASUS WebStorage Register for or sign in to ASUS WebStorage and get free cloud storage Automatically upload newly captured photos for instant sharing sync files among different devices or share files via your ASUS WebStorage account IMPORTANT Ensure that Wi Fi or mobile network is enabled on your ASUS Phone For details see Staying connected ...

Page 43: ...nd answers from FAQs Frequently Asked Questions or directly interact with other Zen UI users to find and share solutions about ZenUI apps To access ZenUI FAQ 1 Tap ASUS ZenUI FAQ 2 Tap ZenUI FAQs then select the app that you want to find answers for ...

Page 44: ...network Renaming your Nano SIM cards Change the names of your Nano SIM cards on your ASUS Phone so that you can identify them easily To change the names of your Nano SIM cards tap SIM1 name SIM1 or SIM2 name SIM2 then key in the names for your Nano SIM cards NOTE If your SIMs have different mobile service providers we recommend you to use the names of these providers for your SIM names If both SIM...

Page 45: ...ferred SIM card to connect the call To assign a SIM card for voice calls tap Voice call then tap the SIM that you want to use IMPORTANT You can only use this feature if you make a call from your contacts list SIM card for SMS messages To assign a SIM card for SMS messages tap SMS messages then select from SIM1 or SIM2 SIM card for data service To assign a SIM card for data service tap Data service...

Page 46: ...en tap the number keys 2 Select from call buttons SIM1 or SIM2 to dial the number NOTE The labels of the call buttons may vary depending on the setting that you made to your SIM cards For more details see Dual SIM feature Dialing an extension number When you need to call an extension number you can do any of these steps to skip the voice prompts Prompting for confirmation of an extension number Yo...

Page 47: ...ches then you can quickly place that call 1 Launch the Phone app then enter the number or name of the contact 2 From the list of possible matches tap the contact you wish to call If the contact is not on list enter the complete number or name of the contact 3 Select from call buttons SIM1 or SIM2 to make the call NOTE The labels of the call buttons may vary depending on the setting that you made t...

Page 48: ...on the status of your ASUS Phone If your device is active tap Answer or to reject a call tap Dismiss If your device is locked drag to to answer or to to reject the call Managing your call logs From your call logs you can call back your missed calls save calls to your contacts list or redial your recently called number or contact Saving calls to Contacts You can add a call number from your call log...

Page 49: ... you Speakerphone Turns the speakerphone on or off Call on hold Puts an active call on hold Conference call When you have subscribed to a conference call service with your mobile service provider this icon allows you to add a contact or contacts in an active call NOTES The number of participants in the conference call depend on your conference call subscription You can inquire from your mobile ser...

Page 50: ...ive an incoming call while on an active call Recording calls Your ASUS Phone allows you to record a conversation for future reference or information 1 Call a contact or dial a number 2 Tap to record the call IMPORTANT Before recording a call ensure that you ask for permission from the other party or parties 3 To stop recording tap This icon appears on the system notification bar 4 Swipe down from ...

Page 51: ...nch the Contacts app tap Contacts Contacts Settings Select how you would want to display your contacts from the Contacts settings Such display options include displaying only those contacts with phones sorting list by first last name or viewing contact names as first last names first To set up your Contacts settings tap Settings from the Contacts app Setting up your profile Make your ASUS Phone tr...

Page 52: ...mail addresses tap Add new 5 If you want to add other contact information tap Add another field 6 When you ve completed the info tap Adding an extension number to a contact number You can add a contact s extension number to skip the voice prompts when making a call 1 In the contact s information screen enter the contact s main number and extension number in either of these two ways Insert a comma ...

Page 53: ... or by capturing a photo You can display a Facebook profile cover as the theme cover for a Facebook contact Setting up your VIPs Group your contacts as VIPs to get notified about upcoming anniversaries birthdays and other important events You ll also get alerts about any unread messages or emails or any missed calls from your VIPs Setting up your VIP from the contact s info screen To set up your V...

Page 54: ...VIP contact You can add an event to a VIP contact such as anniversary birthday and other important events 1 Launch the Contacts app tap the contact you want to add an event detail to then tap 2 In the contact s info screen tap Add another field Events 3 Select the date for the event then tap Set 4 Ensure that you select VIP under the Groups field When finished tap 5 The contact s special event wil...

Page 55: ... refer to the section Calling your favorite contacts You can also set a favorite contact as a VIP For more details refer to the section Setting up your VIPs Importing contacts Import your contacts and their respective data from one contact source to your ASUS Phone email account or a SIM card 1 Tap Contacts then tap Manage contacts 2 Tap Import export then select from the following importing optio...

Page 56: ...rs Create your list of blocked contacts or numbers to avoid receiving any unwanted calls or messages Your blocked calls and messages will be saved to the Block List archive 1 Tap Contacts then tap Manage contacts Block list 2 Tap then do any of the following To block a contact tap Choose from contacts then select the contact you want to block from your contacts list To block a number from the rece...

Page 57: ...NT Before you can integrate social network accounts of your contacts you need to log in to your social network account and sync its settings Syncing your social network account Sync your social network account to add the social network accounts of your contacts to your ASUS Phone 1 Do any of the following to launch the Settings app Launch Quick settings then tap Tap Settings 2 From the Settings sc...

Page 58: ...u can also take photos or record videos and easily share these files Sending messages 1 From the Home screen tap 2 Tap then select the contact whom you want to send a message to 3 Start composing your message in the message field 4 When you re done select the SIM account where you re going to send your message from Replying to messages 1 Tap your message alert from your Home screen or Lock screen ...

Page 59: ...of your device WARNING Do not insert other objects into the audio jack port Do not insert a cable with electric power output into the audio jack port Listening at a high volume for long periods can damage your hearing NOTES We highly recommend to use only compatible headsets or the bundled headset with this device Unplugging the audio jack while listening to music automatically pauses the music pl...

Page 60: ...n to your Google or Gmail account to be able to use Google Play Music Once you ve signed in to your acccount all music files on your ASUS Phone including the uploaded or purchased ones from Google Play are added to your library To set up your Google Play Music 1 From the Home screen Google Play Music 2 Tap then tap Settings Tap to choose account 3 Enter your account then tap ADD ACCOUNT 4 Follow t...

Page 61: ...ext insrtuctions to download VR components 4 When done tap OK to update Google VR settings 5 On the next page move the slider to the right and tap Allow to enable Google VR Services 6 Tap on the home page and follow the on screen instructions to pair your Daydream ready controller with your phone via Bluetooth NOTE Ensure that your controller is charged and next to your phone 7 Launch a Daydream r...

Page 62: ...ngage explore and enjoy Using Tango To use Tango 1 Launch the Tango platform to download a Tango enabled app To do this tap from the Home screen NOTE If Tango is not available on your ASUS Phone you can download it from Google Play Store 2 Select download and install a Tango enabled app on your ASUS Phone 3 Launch a Tango enabled app then hold up or move your ASUS Phone around Tango uses your came...

Page 63: ...the first time After launching the Camera for the first time two consecutive features appear to help you get started Tutorial and Image locations Tutorial If it is your first time to use your ASUS Phone s camera you will encounter the following tutorial screen after launching the Camera app Refer to the following steps to proceed from this screen 1 On the Tutorial screen tap Skip if you want to sk...

Page 64: ...creen tap No thanks to proceed to the camera screen or Yes to set up location tagging for your captured images 2 Slide Location to ON to enable the location tagging feature 3 Tap Agree on the next screen to fully enable the feature and proceed to the Camera screen Camera home screen Your ASUS Phone s camera is equipped with auto scene detection and auto image stabilizer features It also features a...

Page 65: ...ng the steps below IMPORTANT Apply the settings first before taking images 1 On the camera s home screen tap 2 Scroll down and configure the available options Image Configure the image quality using these options Shoot mode Set your shutter speed to Timer mode Focus exposure Enable Touch auto exposure or Face detection under this option ...

Page 66: ...guring your camera s settings using the steps below IMPORTANT Apply the settings first before taking images 1 On the camera s home screen tap 2 Scroll down and configure the available options Image Configure the video quality using these options Focus exposure Enable Touch auto exposure under this option ...

Page 67: ...screen tap Time Rewind 2 Tap to start capturing photos 3 Adjust the time in seconds that you want your captured photo to play in reverse or rewind mode 4 Tap when finished Using the Time Rewind viewer 1 After pressing the shutter the Time Rewind viewer appears onscreen on top of a captured photo Rotate the button on the viewer to browse through the photos you just took NOTE Tap Best to view the be...

Page 68: ...pture images from various angles using Panorama Images captured from a wide angle perspective are automatically stitched together using this feature Capturing panoramic photos 1 From the Camera app s home screen tap Panorama 2 Tap then pan your ASUS Phone to the left or right to capture the scenery NOTE While panning your ASUS Phone a timeline of thumbnails appears on the lower part of your screen...

Page 69: ...sult Capturing photos with depth of fields 1 From the Camera app screen tap Depth of field 2 Tap to start capturing macro photos Miniature Simulate the tilt shift effect of DSLR lenses via the Miniature feature Using this feature allows you to focus on specific areas of your subject adding a bokeh effect that can be used on both photos and video using your ASUS Phone Capturing Miniature photos 1 F...

Page 70: ...ge for comparison Capturing All smiles photos 1 From the Camera app s home screen tap All smiles 2 Tap to start capturing photos that can be edited using All Smiles 3 Touch the subject s face then select the subject s best facial expression 4 Swipe down from the top then tap to save the photo Beautification Have fun during and after taking photos of your family and friends using the Beautification...

Page 71: ...capture stills for automatic time lapse playback In effect events seem to move in a fast forward manner though they actually occured and were recorded between long intervals Recording Time lapse videos 1 From the Camera app s home screen tap Time lapse 2 Tap then select the time lapse interval 3 Tap to start taking Time lapse videos Night Take well lit photos even on night time or on low light sit...

Page 72: ...allery View images and play videos on your ASUS Phone using the Gallery app This app also allows you to edit share or delete image and video files stored in your ASUS Phone From Gallery you can display images in a slideshow or tap to view the selected image or video file To launch Gallery tap Gallery Viewing files from your social network or cloud storage By default your Gallery displays all the m...

Page 73: ...rea where the photos are taken as well a map of the location via Google Map or Baidu in China only To view the details of a photo 1 Turn on the location access from Settings Location 2 Ensure that you have shared your location to Google Map or Baidu 3 Launch the Gallery app and select the photo whose photo details you want to view 4 Tap the photo then tap Tap to show the photo location details ...

Page 74: ...der where the files you want to delete are located 2 After opening the folder tap to activate file selection 3 Tap the files you want to delete A check mark appears on top of the image you select 4 Tap Editing images The Gallery also features its own image editing tools that you can use to enhance images saved on your ASUS Phone 1 From the Gallery screen tap the folder where the files are located ...

Page 75: ...r mobile network additional charges will be incurred depending on your data plan For more details on your mobile network charges fees and setttings contact your mobile service provider Wi Fi The Wi Fi technology of your ASUS Phone gets you connected to the wireless world Update your social media accounts browse the Internet or exchange data and messages wirelessly from your ASUS Phone Enabling Wi ...

Page 76: ...witch to the left to turn off the Wi Fi NOTE You can also disable the Wi Fi from Quick Settings screen See Quick Settings on how to launch Quick Settings screen Bluetooth Use the Bluetooth feature of your ASUS Phone to send or receive files and stream multimedia files with other smart devices over short distances With Bluetooth you can share your media files with your friends smart devices send da...

Page 77: ...e and is discoverable See the user guide that came with your device to learn how to enable its Bluetooth and and set it to discoverable 2 Tap Refresh to scan for more Bluetooth devices 3 In the list of available devices tap the Bluetooth device that you want to pair with 4 Ensure that the same passkey show on both devices then tap PAIR NOTE Turn off the Bluetooth feature when you re not using it t...

Page 78: ...ering may be slower than the standard Wi Fi or mobile connection Only a limited number of mobile devices can tether to your ASUS Phone for Internet access Turn off the tethering feature when you re not using it to help save battery power Wi Fi Hotspot Turn your ASUS Phone into a Wi Fi Hotspot to share Internet connection with other devices 1 Do any of the following to launch the Settings screen La...

Page 79: ...SUS Phone and use it as a modem for Internet access on your Bluetooth enabled mobile devices such as a laptop or a tablet 1 Enable Bluetooth on your ASUS Phone and the other device 2 Pair both devices NOTE For details see Pairing your ASUS Phone to a Bluetooth device 3 From the Settings screen tap More Tethering portable hotspot then silde Bluetooth tethering to ON You can now surf the Internet or...

Page 80: ...straight from your ASUS Phone using the weather app Using Weather you can also check other weather details from around the world Launching the Weather app From your Home screen launch the Weather app using either of the following options Tap Weather From your ASUS Phone s home screen tap the weather icon ...

Page 81: ... parts of the world Tap to search for a city s weather info Tap to get the area s current weather info refresh the weather info edit the location list or configure the weather settings Swipe up to see other weather information Swipe to the left or right to see the weather information of other cities in your location list ...

Page 82: ...e weather forecast and the world clock s map Tap this to add a new city to mark on your world clock s map Tap this to access the Clock app settings Clock Customize the time zone settings of your ASUS Phone set alarms and use your ASUS Phone as a stop watch using the Clock app Launching Clock Launch the Clock app using either of the following options Tap Clock From your ASUS Phone s home screen tap...

Page 83: ...tings of your ASUS Phone Stopwatch Tap to use your ASUS Phone as a stopwatch Tap this button to start running the stopwatch feature Tap this to access the settings of the alarm clock feature Tap this to delete any of the previously set alarms Tap this to set a new alarm time ...

Page 84: ...steps below Setting the timer 1 Tap to access the timer feature of your ASUS Phone Tap this to set a new timer Tap this to delete the preset timer Tap this to access the settings of the timer feature Tap to set the ringtone for the timer Tap this to edit the preset timer Tap this button to start running the timer ...

Page 85: ...wipe and a tap is all it takes to launch your Calculator When you open the Quick settings panel the Calculator icon is there visibly on top of the list Tap it to get started with your computations Zen Everywhere 9 Tap this to enable the calculator 9 Zen Everywhere ...

Page 86: ...rd audio files using your ASUS Phone by enabling the Sound Recorder app Launching Sound Recorder To launch Sound Recorder tap Sound Recorder Tap to start audio recording Tap to customize the Sound Recorder settings Tap to view the list of saved audio recording files ...

Page 87: ...ume the recording Tap to save the recording Tap to delete the recording Recording List From the Recording List you can play rename share or delete a saved audio recording file To view your recording list tap from the Sound Recorder main screen Tap to play pause your selected recording Tap to share rename or delete your selected recording ...

Page 88: ...m your Home screen then tap Mobile Manager Tap this to launch the Power saver app Tap this to allow or block notifications from an individual app Tap this to view the mobile data usage set a monthly limit for mobile data use and control apps to access the Internet only over Wi Fi only over mobile network neither or both Tap this to boost system memory Tap this to uninstall the selected unused apps...

Page 89: ...your files on an online storage Use the bundled USB cable to copy files to or from the computer to your ASUS Phone Backup and reset Back up data Wi Fi passwords and other settings to Google servers using your ASUS Phone 1 Tap then tap Settings Backup reset 2 From the Backup reset window you can Back up my data This feature backs up your data Wif Fi passwords and other settings to Google servers wh...

Page 90: ...e security unlocking options that the ASUS Phone offers you 1 Tap then tap Settings Lock screen 2 Tap Screen lock then select an option to unlock your ASUS Phone NOTES Refer to section Unlock screen options for more information To deactivate the unlock screen option that you set tap None on Choose screen lock screen Unlock screen options Choose from these options to lock your ASUS Phone Swipe Swip...

Page 91: ...a PIN IMPORTANT Ensure to remember the PIN that you created to unlock your device Pattern Slide your finger on the dots and create a pattern IMPORTANT You can create a pattern with a minimum of four dots Ensure to remember the pattern that you created to unlock your device ...

Page 92: ...S Phone s identity such as serial number IMEI International Mobile Equipment Identity number or model number This is important as when you may lose your ASUS Phone you can contact your mobile carrier and provide the information to blacklist the unauthorized use of your ASUS Phone To display your ASUS Phone s identity 1 Tap then tap Settings 2 On the Settings screen slide down to display other item...

Page 93: ...erence in a residential installation This equipment generates uses and can radiate radio frequency energy and if not installed and used in accordance with the instructions may cause harmful interference to radio communications However there is no guarantee that interference will not occur in a particular installation If this equipment does cause harmful interference to radio or television receptio...

Page 94: ...n Results will vary depending on the level of immunity of your hearing device and the degree of your hearing loss If your hearing device happens to be vulnerable to interference you may not be able to use a rated phone successfully Trying out the phone with your hearing device is the best way to evaluate it for your personal needs This phone has been tested and rated for use with hearing aids for ...

Page 95: ...host products operated in portable exposure conditions Canada s REL Radio Equipment List can be found at the following web address http www ic gc ca app sitt reltel srch nwRdSrch do lang eng Additional Canadian information on RF exposure also can be found at the following web address http www ic gc ca eic site smt gst nsf eng sf08792 html Informations concernant l exposition aux fréquences radio R...

Page 96: ...untries that follow the Council of the European Union limit Tests for SAR are conducted using standard operating positions with the device transmitting at its highest certified power level in all tested frequency bands To reduce exposure to RF energy use a hands free accessory or other similar option to keep this device from your head and body Carry this device at least 15 mm away from your body t...

Page 97: ... 16 5 dBm 5GHz 802 11an HT40 5150 5250 5250 5350 5470 5725 MHz 16 5 dBm 5GHz 802 11ac HT80 5150 5250 5250 5350 5470 5725 MHz 16 5 dBm GSM GSM 900 Burst 880 915 925 960 MHz 32 5 dBm GSM 1800 Burst 1710 1785 1805 1880 MHz 30 dBm WCDMA WCDMA Band I 1920 1980 2110 2170 MHz 21 5 dBm WCDMA Band VIII 880 915 927 960 MHz 24 dBm LTE LTE Band I 1920 1980 2110 2170 MHz 22 dBm LTE Band III 1710 1785 1805 1880...

Page 98: ... otherwise maintain a distance of 0 5 cm from the body to ensure compliance with RF exposure requirements CE Marking CLASS 1 LASER PRODUCT Complies with 21 CFR 1040 10 and 1040 11 except for deviations pursuant to Laser Notice No 50 dated June 24 2007 Using GPS Global Positioning System on your ASUS Phone To use the GPS positioning feature on your ASUS Phone Ensure that your device is connected to...

Page 99: ...g and takeback programs come from our commitment to the highest standards for protecting our environment We believe in providing solutions for you to be able to responsibly recycle our products batteries other components as well as the packaging materials Please go to http csr asus com english Takeback htm for detailed recycling information in different regions Regional notice for Singapore This A...

Page 100: ...l logs 48 see Extension number 46 see Multiple calls 50 see Smart Dialing 47 Camera 63 Index Camera home screen 64 first time use 63 image settings 65 focus exposure 65 image 65 shoot mode 65 launching 63 see Advanced camera features 67 video settings 66 Chrome 36 bookmarking pages 37 clearing the browser cache 37 launching 36 sharing pages 37 Clock 82 alarm clock 83 launching 82 stopwatch 83 time...

Page 101: ...e screen 21 notification icons 22 personalizing 25 see also App shortcuts 25 see also Easy Mode 27 see also Wallpapers 26 see also Widgets 25 L Lock screen 31 customizing 31 customizing the quick access buttons 32 see also Securing your ASUS phone 90 Low light 67 see also Advanced camera features 67 M Managing your call logs 48 redialing your last called number 49 saving calls to Contacts 48 Minia...

Page 102: ...ng items 18 moving or deleting items 18 moving through pages or screens 19 zooming in 19 zooming out 20 V VIPs 53 adding an event 54 setting up from the contact s screen 53 setting up from the VIP screen 54 W Wallpapers 26 animated wallpaper 27 Weather 80 launching 80 weather home screen 81 WebStorage 42 Widgets 25 Wi Fi 75 connecting 76 disabling 76 enabling 75 see also Wi Fi Hotspot tethering 78...

Reviews: