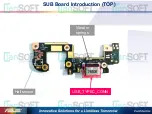
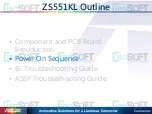
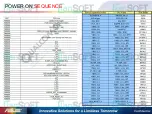
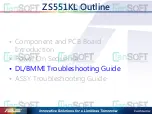
background image

ZS551KL 

EE Troubleshooting Guide 

Introduction & Training 

2017/8/9 

Summary of Contents for ZS551KL

Page 1: ...ZS551KL EE Troubleshooting Guide Introduction Training 2017 8 9 ...

Page 2: ...ZS551KL Outline Component and PCB Board Introduction Power On Sequence BL Troubleshooting Guide ASSY Troubleshooting Guide ...

Page 3: ...PCB Board Introduction TOP P Sensor SIM2 SD SIM1 CAM ISP MSM8998 LPDDR4x UFS Indicator LED Receiver Speaker AMP Receiver AMP NFC IC PMI8998 OVP IC USB Switch ADC ...

Page 4: ...CB Board Introduction BOTTOM PM8998 RCAM G G CONN FCAM CONN Side key CONN PM8005 LCM CONN WCD933 5 SMB138 1 BATT CONN B2B CONN Vibrator AMP LCM driver RGB laser Laser sensor Flash LED MIC3 MIC3 Ecompass ...

Page 5: ...SUB Board Introduction TOP USB_TYPEC_CONN Hall sensor Vibrator springs ...

Page 6: ...SUB Board Introduction BOTTOM Audio jack CONN USB_TYPEC_CONN Fingerprint CONN B2B CONN PU3302 Main MIC ...

Page 7: ...ZS551KL Outline Component and PCB Board Introduction Power On Sequence BL Troubleshooting Guide ASSY Troubleshooting Guide ...

Page 8: ...POWER ON SEQUENCE ...

Page 9: ...ZS551KL Outline Component and PCB Board Introduction Power On Sequence DL BMMI Troubleshooting Guide ASSY Troubleshooting Guide ...

Page 10: ... up probe VBAT T9603 or T9602 and VPH_PWR C2402 1 or C2402 1 and search for short circuits 1 VPH_PWR shorts to GND X ray check PMIC PU9701 PU8401 PU9001 NFC Power U5402 BL driver PU8901 Audio codec AU2601 Vibrator AMP U2401 4 If system shuts down before booting up check MSM_RESIN_N T8702 if the TP is high 1 2V Check which power in the PON sequence ended 2 VREG_S2A S8A S9A S3C abnormal impedance Ch...

Page 11: ...or QDLoader 9008 remains or not when provision If not check your power supply battery and the power key status T2503 2 If retry fail try to burn QFIL lite image ask BSP If success we can narrow down to DDR problems Check by X ray 3 If LITE image fail check UFS U1101 and surroundings Reheat U1101 or change the UFS ...

Page 12: ...R U0201 and UFS U1101 to search for SMT problems 3 If no SMT problems found demount the shielding on the backside of the CPU Check the power on sequence to check power rails below 1 C0711 1 VREG_S4A_1P8 2 U0737 1 VREG_S2A_1P125 3 U0813 3 VREG_S3C_0P6 4 U0806 1 VREG_S8A_0P8 5 U0916 1 VREG_S9A_0P8 If power on sequence ended at power rails above try to remount DDR ...

Page 13: ...ng ASUS log please check the connection between IOFPC SUB board If it blackouts when showing android logo please enter fastboot mode and run cmd exe fastboot erase modemst1 fastboot erase modemst2 fastboot erase fsc fastboot reboot If the device enters home after reboot check RF defects using X ray 2 Board MMI Equipment key part installation that cause boot fail 1 Change the power supply into manu...

Page 14: ...k PU8901 PC8904 PC8905 by X ray and search for any short circuits or SMT issues 4 If nothing found using X ray demount shielding to check PU8901 PC8904 PC8905 for defects on IC or any short circuits 5 Probe the power net VDISP_P_OUT VDISP_M_OUT VREG_WLED and compare the impedance with normal PCB 6 Probe the power net VDISP_P_OUT 4 6V VDISP_M_OUT 2 5V VREG_WLED 6 1V Change PU8901 if any power with ...

Page 15: ...or SIM2 power VREG_L10A_1P8 when either SIM inserted Check U5401 PU8401 for any defects if any power unusual 2 Compare the impedance of UIM1_CLK UIM1_RESET UIM1_DATA SIM1 or UIM2_CLK UIM2_RESET UIM2_DATA SIM2 to normal PCB 3 If any unusual impedance issue reheat PoP If still NG demount PoP and probe the signal to check any open circuits check each net 4 Remount the PoP if no open circuits ...

Page 16: ...ge when SD card inserted 2 95V for few secs and back to 0V 3 If 2 fails check the appearance of U2201 to find any cracks SMT issues and also check inside the tray shielding to find any bent or shifted pin Change U2201 or repair the parts Green net is SD_CARD_DET yellow net is SDC2_VDD_CON Check all surrounding components ...

Page 17: ...short circuits wrong polarity Change U1802 if any defect found 2 If no defect found probe U1803 4 pins and compare the impedance with normal PCB check if any short circuits between each pin 3 U1803 B2 B1 A2 voltage should be 1 8V B2 A2 are I2C SDA SCK 4 X ray and check both R0407 R0408 for SMT issues 5 Swap U1802 to check the IC U1802 C1809 ...

Page 18: ... Fail or Board_Mic_Volt Fail 1 Check the appearance of all MIC for wrong polarity shift and solder overflow Besides also check surrounding components 2 If all MIC appearance are normal check the MIC through the hole using a microscope to check any foreign matters or cracks on the film for Board_Mic_FREQ fail 3 If Board_Mic_FREQ PASS but Board_Mic_Volt Fail the fixture and equipment need to be tune...

Page 19: ...stead of one high level 3V and the other low level 0V when power on 3 Check PQ9001 PQ9002 PQ9003 PU9502 by X ray to find any short circuits solder overflow or IC cracks 4 Check PQ9001 PQ9002 PQ9003 PU9502 to find any SMT issues by demount the shielding above 986 Sub board 1 Check TYPE C connector if there are any SMT issues pin shift solder skip 2 Check CON3201 and find any sunken pins matters or ...

Page 20: ...mount the shielding and check the appearance of PQ8004 PQ8005 and their surrounding components wrong polarity IC cracks short circuits 3 Check the impedance of net LID_EN USBCON_LID with key parts and compare with normal PCB 4 If the impedance seems normal please connect the SUB board and USB cable to power on and check the net voltage of LID_EN USBCON_LID If both nets are high level 1 8V please c...

Page 21: ...oblems Main board 1 Please swap the panel sub board and IOFPC on the testing fixture 2 Check CON1702 for any SMT issues Sub board 1 Please swap the IOFPC and panel on the testing fixture 2 Check the contact between the FGP FPC and CON3303 3 Check the FPC if there are any ripped area ...

Page 22: ...roblems Especially check PR8015 it should be mounted 3 Demount the shielding power on and probe the voltage of PR8015 1 The voltage should be 0 V when sub board connected Sub board 1 Swap the main board and reassemble the panel 2 Check CON3201 for any sunken pins and solder skip 3 Check PU3302 PR3304 for any SMT issues 4 Power the sub board and probe PR3304 1 The pin should be 0 V ...

Page 23: ...Usually PU8101 SMB1381 defects 1 Check PU8101 and PRT8101 for any SMT issues components shift short circuits 2 Demount the shielding and probe the impedance between PRT8101 2 and GND 90 95K Ohm 3 Please swap PRT8101 then swap PU8101 ...

Page 24: ...5088 Audio Codec FAIL BMMI Usually AU2601 Audio Codec problems 1 Check AU2601 by X ray for any short circuits solder skip or shifting of IC and it s surrounding components ...

Page 25: ...es check CPU U0201 for any short circuits 2 Demount the shielding and compare the impedance of the pins in the table below with normal PCB Besides connect the display and camera to probe the voltage and swap the corresponding IC of the voltage shown in the table 3 Remount or change the ISP U1201 if there are no other suspicious defects Pin voltage Ohm IC PR9544 1 1 8V 20K PC8204 1 2V 12K PU8202 C1...

Page 26: ... right after the opening it and shows a message sensor didn t initial 1 Please check both front rear CAM connectors for any defect Besides check PU9501 PU9504 PU9505 PU9506 PU9508 by X ray for SMT issues 2 Probe the impedance of the pins in the table below and compare the with normal PCBs If any pin didn t match the same please swap or change the corresponding IC 3 If MCLK I2C pin didn t match che...

Page 27: ...AM_AVDD_2V8 2 8V VREG_LVS1A_1P8 1 8V Please check PU9504 PU9501 to find any cracks short circuits or wrong polarity if there is an unusual voltage 5 If all power nets are normal probe net impedance of FRNOT_CAM_RESET CAM_MCLK2_IN and compare with normal PCBs Check R1401 0Ω SMT first 6 If low impedance detected on net FRNOT_CAM_RESET or CAM_MCLK2_IN check for any short circuits using X ray If open ...

Page 28: ...o preview front CAM Probe power net of ISP VREG_CORE_ISP V_ISP_1V0 ISPAVDD_1V8 V_ISP_DDR_1V2 Check the power source IC PU8202 PU9507 PR9544 PU9509 for cracks polarity or SMT issues if any power net found unusual 4 If all power nets are normal when CAM is on please check if R1227 R1224 R1226 are all mounted 5 If nothing wrong with items above please remount U1201 RK or change U1201 RK when remount ...

Page 29: ...EAR_1_1V05 1 05V V_2V8_CAM 2 8V VREG_LVS1A_1P8 1 8V Please check PU9506 PU9501 to find any cracks short circuits or wrong polarity if there is an unusual voltage 5 If all power nets are normal probe net impedance of CAM1_RST_N CAM_MCLK0_CON and compare with normal PCBs 6 If low impedance detected on net CAM1_RST_N CAM_MCLK0_CON check for any short circuits using X ray If open circuit detected remo...

Page 30: ...10 to preview Rear CAM Probe power net of ISP VREG_CORE_ISP V_ISP_1V0 ISPAVDD_1V8 V_ISP_DDR_1V2 Check the power source IC PU8202 PU9507 PR9544 PU9509 for cracks polarity or SMT issues if any power net found unusual 4 If all power nets are normal when CAM is on please check if R1223 R1227 R1224 R1226 are all mounted 5 If nothing wrong with items above please remount U1201 RK or change U1201 RK when...

Page 31: ...EAR_2_1V05 1 05V V_2V8_CAM 2 8V VREG_LVS1A_1P8 1 8V Please check PU9508 PU9501 to find any cracks short circuits or wrong polarity if there is an unusual voltage 5 If all power nets are normal probe net impedance of CAM2_RST_N CAM_MCLK1_CON and compare with normal PCBs 6 If low impedance detected on net CAM2_RST_N CAM_MCLK1_CON check for any short circuits using X ray If open circuit detected remo...

Page 32: ...10 to preview Rear CAM Probe power net of ISP VREG_CORE_ISP V_ISP_1V0 ISPAVDD_1V8 V_ISP_DDR_1V2 Check the power source IC PU8202 PU9507 PR9544 PU9509 for cracks polarity or SMT issues if any power net found unusual 4 If all power nets are normal when CAM is on please check if R1223 R1227 R1224 R1226 are all mounted 5 If nothing wrong with items above please remount U1201 RK or change U1201 RK when...

Page 33: ...ZS551KL Outline Component and PCB Board Introduction Power On Sequence BL Troubleshooting Guide ASSY Troubleshooting Guide ...

Page 34: ...utdown 3 High current consumption 4 Display issues 5 Touch Virtual key issues 6 Fingerprint issues 7 Camera issues 8 G sensor test fail 9 E compass issues 10 USB issues 11 Charging issues 12 SD SIM card detection 13 Flash LED 14 P sensor issues 15 Vibrator ...

Page 35: ... CON2501 CON1602 if there are any defects or SMT issues sunken pins cracks foreign matters 4 Both Rear CAM and Front CAM FPC contact with there connector firmly Please remove the FPC to check 5 Make sure if the IOFPC connectors are contacts firmly with no deformation If it looks fine please remove the FPC and check both sides of the connector if there are any defects or SMT issues You can swap IOF...

Page 36: ...lease check MB Check CON9601 for any SMT problems foreign matters Battery Check for any torn parts on the battery FPC and check if the connector Reboot 1 If the devices is power triggered by USB check the contact between battery FPC and the connector 2 Swap your battery to check if it s a fault battery 3 Re download image to see any difference Reboot Shutdown ASSY ...

Page 37: ...are fault parts please check if there are any damage on the FPC connector sub board IOFPC and also swap parts to double check 3 If there are no fault parts check the appearance of the MB to find any SMT ASSY issues bumped off IC bending springs If possible check by X ray and 3D microscope High current consumption ASSY ...

Page 38: ...ts sunken pins cracks SMT issues 3 Swap panels to make sure the parts are functionally normal 4 Probe VREG_WLED PC8906 1 6 1V DISP_P_OUT PC8904 1 4 6V VDISP_M_OUT PC8905 1 2 5V to make sure all voltages match Please change PU8901 if voltages are abnormal 5 Make sure PC8904 and PC8905 are not short Low brightness 1 Please swap panels ...

Page 39: ...els to make sure the parts are functionally normal Virtual key with no response 1 Check CON1602 to make sure there are no defects sunken pins cracks SMT issues 2 Remove MB check the edge connector under the IOFPC whether the FPC is inserted inside the connector 3 Check the FPC whether if it is torn off Virtual key edge connector CON1602 with LCM FPC ...

Page 40: ... if there are any ripped area 2 Make sure CON3303 and FGP FPC contact well 3 Check CON3303 and make sure there are no defects sunken pins cracks SMT issues 4 Probe C3319 1 or C3317 1 to make sure FGP power VDD_2P85 has a stable 2 85V 5 Swap a new FGP to assure the part is functional CON3303 SMT issues FGP FPC ripped apart ...

Page 41: ...efects sunken pins cracks SMT issues 3 Please swap new modules to exclude NG modules 4 Re download image 2 Camera black screen MIPI CSI interface 1 Please check both camera FPCs and connector are inserted well 2 Check CON1401 CON1301 to make sure there are no defects sunken pins cracks SMT issues 3 Please swap new modules to exclude NG modules 4 Re download image 5 X ray check internal components ...

Page 42: ... for checking FPC contact 2 Remove the FPC and insert again 3 Check CON1301 to make sure there are no defects sunken pins cracks SMT issues Assembly tips of RCAM module 1 Pre bend the FPC 2 Slip in the module on the left side first 3 Only slightly press in the right side of the module PCB bending of the G sensor area G sensor test fail ASSY CAM assembly ...

Page 43: ...es 1 Make sure U1802 C1809 is not bumped off 2 Change the IC if there are any cracks on the package 3 Probe VREG_LVS2A_1P8 C1809 1 to check the voltage 1 8V also check if there are any short circuits E compass issues ASSY U1802 and C1809 are close to PCB edge ...

Page 44: ...t parts 5 TYPE C CONN should be horizontal instead of rising on one side Also check any SMT problems pin shift short circuits solder skip USB one side detect fail 1 Swap IOFPC SUB board to narrow down fault parts 2 TYPE C CONN should be horizontal instead of rising on one side Also check any SMT problems pin shift short circuits solder skip 3 Check PQ9001 PQ9002 PQ9003 PU9502 using X ray for SMT p...

Page 45: ...e sides of the USB cable Swap SUB board to avoid NG SUB board No Quick charge 1 Check the same items above first 2 Probe T1704 T1705 impedance 2M Ohm without USB cable If powered please probe the voltage of the test points above without USB cable It should be a switching voltage instead of keeping high 3V and low 0V 3 X ray check PQ9001 PQ9002 PQ9003 PU9502 to find any SMT problems short circuits ...

Page 46: ... inserted 2 Check U2201 for cracks short circuits SMT problems Also check SD card CON2206 CON2202 SIM card CON2204 CON2203 for any squeezed and bending pins 3 X ray to check all RLC components inside shielding U3002 If not reheat the shielding and retry Crack on U2201 SD SIM card detection ASSY Tray insert detect pin state ...

Page 47: ...heck cracks or defects of the appearance of the LED 2 Make sure there are no pin shift short circuits 3 Probe the LED test point T1301 by using the diode meter make sure the LED can light up Flash LED ASSY ...

Page 48: ... the window to see any obstacles blocking the sensor sensor rubber dust fingerprints 3 Reassemble and calibrate again to make sure if it is functional 4 Probe the voltage on R1816 1 1 8V and C1807 1 3V If unusual please swap the sensor P sensor issues ASSY P sensor under the window ...

Page 49: ...ease assemble again to double check the RF cables don t interfere with the SUB board 2 Swap the vibrator to avoid NG parts 3 Check U2401 and nearby components if there are any cracks or SMT problems 4 R2408 R2409 and R2401 should be non mounted R2410 should be mounted 5 Probe VIBRATOR_SHDN R2410 1 It should pull high 1 8V when vibration Vibrator ASSY ...

Page 50: ...END ...

Reviews: