background image

Contents

6

Chapter 1: Get to know your Notebook PC

1-1 Introduction to the components of your Notebook PC ................................................. 10

Front view .................................................................................................................. 10

Open the top cover .................................................................................................... 10

Rear view ................................................................................................................... 11

Top view ..................................................................................................................... 12

Bottom view ............................................................................................................... 13

Left view ..................................................................................................................... 14

Right view .................................................................................................................. 15

1-2 Security function .......................................................................................................... 16

Chapter 2: Before you use your Notebook PC

2-1 Connect the battery ..................................................................................................... 18

Removing Battery ...................................................................................................... 19

2-2 Connect the transformer .............................................................................................. 20

2-3 Power on ...................................................................................................................... 21

2-4 Install the operation system ......................................................................................... 22

Left View of Notebook PC .......................................................................................... 22

2-5 LED Indicator ............................................................................................................... 23

Chapter 3: Using the Notebook PC

3-1 Basic use of computer ................................................................................................. 26

3-2 LCD and brightness adjustment .................................................................................. 27

3-3 Using the joystick ......................................................................................................... 28

Using the joystick ....................................................................................................... 28

Maintenance of joystick ............................................................................................. 30

3-4 How to use the keyboard ............................................................................................. 30

WindowsTM function keys ......................................................................................... 30

Using combined function keys ................................................................................... 31

How to use number keys ........................................................................................... 32

How to use direction keys .......................................................................................... 32

3-5 How to use the PC card ............................................................................................... 33

32-byte CardBus ........................................................................................................ 33

Summary of Contents for S200N

Page 1: ...Notebook PC User s Manual Version E1082 Version 1 00 Date of Release August 2002 ...

Page 2: ... limits are designed to provide reasonable protection against harmful interference in a residential installation This equipment generates uses and can radiate radio frequency energy and if not installed and used in accordance with the instructions may cause harmful interference to radio communications However there is no guarantee that interference will not occur in a particular installation If th...

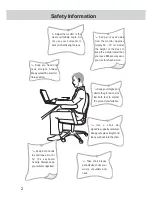
Page 3: ...lective light areas Keep you head and neck straight Always keep yourself in a comfort able position Keep your thighs par allel to the ground and al low both feet to contact the ground comfortably Use a chair de signed to support your waist Keep your spine straight and lean your back into the chair Keep your eyes away from the monitor approxi mately 50 70 cm Adjust the height of the desk to keep th...

Page 4: ...bjects such as amplifiers and TVs Do not place diskettes in front of or above your Notebook PC Otherwise the electromagnetic interference may destroy the data in the diskettes 6 Keep your Notebook PC away from direct sunshine especially cars under direct sunshine 7 Keep your monitor away from excessively cold or excessively hot areas Otherwise you may have a hard time turning on your Notebook PC 8...

Page 5: ...danger Do not use a transformer not contained in your Notebook PC box Do not use the transformer of your Notebook PC for other purposes because the circuits of the transformer are designed in a different way and may damage the parts Do not eat while you are typing on your Notebook PC Do not place any drinks beside your Notebook PC These may cause malfunction Do not insert anything into your Notebo...

Page 6: ...g happens please turn off the power and contact our repair r epresentatives immediately The power cord is damaged or worn out Liquid penetrated into your Notebook PC Your Notebook PC dropped on the ground or its shell is damaged 5 If your operation system crashes and doesn t function at all you should press the power switch longer than 4 seconds to forcibly turn off your computer system Do not thr...

Page 7: ...ng Battery 19 2 2 Connect the transformer 20 2 3 Power on 21 2 4 Install the operation system 22 Left View of Notebook PC 22 2 5 LED Indicator 23 Chapter 3 Using the Notebook PC 3 1 Basic use of computer 26 3 2 LCD and brightness adjustment 27 3 3 Using the joystick 28 Using the joystick 28 Maintenance of joystick 30 3 4 How to use the keyboard 30 WindowsTM function keys 30 Using combined function...

Page 8: ...face 38 3 9 Modem Local Area Network 39 How to use 39 Connect to household phone 40 Connect to pay phone 40 Chapter 4 Power system 4 1 AC Power System 42 4 2 Battery Power System 42 Using Battery Power 43 Checking Battery Power 43 Charging the Battery Pack 44 4 3 Power Management Modes 45 Full Power Mode Maximum Performance 45 ACPI 45 Suspend Mode 46 Power Savings 46 Power State Summary 46 Thermal...

Page 9: ...c use of the Notebook PC Chapter 4 Power system Power supply energy administration setup To avoid loss resulting from improper use read the safety information at the beginning of this manual Message icons Warning improper use is prohibited to avoid any loss resulting from improper use Caution Improper use may affect your health and the Notebook PC Users are advised to be extremely cautious Key poi...

Page 10: ...Chapter 1 Get to know your Notebook PC 1 1 Introduction to the components of your Notebook PC 1 2 Security functions Chapter 1 ...

Page 11: ... view Top cover latch Opening the top cover Open the top cover in the same manner as you would open a car door or a biscuit box Hold the Notebook PC with one hand Press the lower edge of the top cover latch with the thumb of the other hand then open the top cover Do not connect the power cord right away after you take your Notebook PC out of the box Let s take a look at the components of your Note...

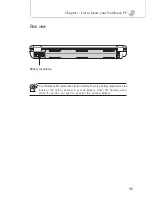
Page 12: ...PC Rear view Battery receptacle Your Notebook PC comes with a built in battery There is a battery receptacle on the back of the unit to connect a second battery Cover the battery recep tacle if you don not wish to connect the second battery ...

Page 13: ... 12 Top view 10 1 2 3 4 5 6 7 8 9 11 LCD Power switch All purpose keyboard Joystick Speaker Indicator 3 4 2 1 6 5 Right key Direction key Left key Speaker Indicator 7 8 9 10 11 ...

Page 14: ...13 Chapter 1 Get to know your Notebook PC Bottom view 7 5 6 2 3 4 1 Battery Battery switch Ventilation holes Memory expansion socket Ventilation holes Ventilation holes Battery lock 7 6 5 4 3 2 1 ...

Page 15: ... 14 Left view SD MMC memory receptacle Burglarproof socket 1394 portal Reset Ventilation holes PC card receptacle PC card eject 1 1 2 3 4 5 6 1 2 6 3 5 4 7 7 ...

Page 16: ...r 1 Get to know your Notebook PC Right view Speaker out Mic in USB portal USB portal Indicator out Network line receptacle RJ 45 Telephone line receptacle RJ 11 Power receptacle 1 1 2 3 4 5 6 7 8 1 2 3 4 5 6 7 8 ...

Page 17: ...urn on the computer and your data will be safe System security you can also set a user s password at the Security menu of the BIOS You will be asked to enter the system administrator s password each time you turn on the Notebook PC or enter the BIOS Therefore unauthorized users are prohibited from using your Notebook PC If you have set both passwords each time you turn on your Notebook PC the syst...

Page 18: ...pter 2 Before you use your Notebook PC 2 1 Connect the battery 2 2 Connect the transformer 2 3 Turn on the power 2 4 Install the operation system 2 5 Check the system restoration process 2 6 Check the LED indicator ...

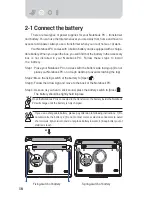
Page 19: ...not place your Notebook PC on a rough desktop to avoid scratching the top Step 2 Move the fixing switch of the battery to Open Step 3 Follow the arrow sign and move to the back of the Notebook PC Step 4 As soon as you hear a click sound press the battery switch to Close The battery should be tightly held in place 2 1 3 Fixing switch of battery Spring switch of battery If you use a chargeable batte...

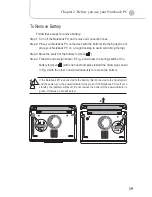
Page 20: ...lost To Remove Battery Follow these steps to remove battery Step 1 Turn off the Notebook PC and remove all connection lines Step 2 Place your Notebook PC on the desk with the bottom side facing up Do not place your Notebook PC on a rough desktop to avoid scratching the top Step 3 Move the switch of the battery to Open Step 4 Follow the arrow sign shown in Fig 2 and press the spring switch of the b...

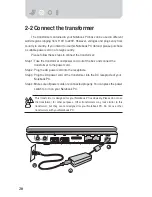
Page 21: ...ut of the box and connect the transformer to the power cord Step 2 Plug the AC power cord into the receptacle Step 3 Plug the DC power cord of the transformer into the DC receptacle of your Notebook PC Step 4 Make sure all power cords are connected properly You can press the power switch to turn on your Notebook PC T T T T T G G G G G This transformer is designed for your Notebook PC exclusively P...

Page 22: ...purpose Your Notebook PC has been installed with an operation system before ship ment and all defaults are correct As soon as POST is completed your Notebook PC proceeds to the operation system The hard disk of your Notebook PC is installed with S M A R T If the hard disk detects an error in the self detecting analysis during the POST test a warning message will be displayed In such a case please ...

Page 23: ...e you can install whatever operating system you need If an application software crashes please press Ctrl Alt Del keys When you seen a dialogue box on the screen please select the crashed application program and press Job ends button If you install application software and need to restart the Notebook PC you can do it by one of following methods Method 1 Press the power switch longer than 4 second...

Page 24: ...e activated 4 Scroll key indicator Press keys When the light is on the scroll keys are locked 5 Power indicator The light is on when the power is turned on flashes when the Notebook PC is on standby and off when the Notebook PC is turned off 6 Built in battery power indicator The orange light is on if the Notebook PC is charging The green light is on if charging is complete 7 Expanded battery powe...

Page 25: ... 24 ...

Page 26: ...Basic use of computer 3 2 LCD and brightness adjustment 3 3 Using the joystick 3 4 Using the keyboard 3 5 Using the PC card 3 6 Using the memory card 3 7 Multimedia sound effect system 3 8 USB interface 3 9 Adjustor and net area Chapter 3 ...

Page 27: ... and joystick The output equipment displays the results processed by the computer in a manner understood by humans As far as your Notebook PC is concerned the output equipment includes the screen amplifier and printer The following sections cover the basic functions of hardware as well as use and setup For the use of the operating system refer to the operating system manual or the online instructi...

Page 28: ...een To change the brightness and switch of the LCD refer to the key combination table below If you do not use your Notebook PC for some time enter into the energy saving mode in order to prolong the life of the notebook components Key Combination Function Decrease the brightness of the LCD Increase the brightness of the LCD Switch between LCD and displayer The surface of the LCD is made of glass I...

Page 29: ...f mouse You can use it to select the function keys of windows and execute programs The right key is similar to the right key of mouse The direction key is used to open the window or move options Using the joystick 1 Move the cursor You can place a finger on top of the joystick lightly and then move your finger slowly to move the cursor around the screen You can find the utility program of the joys...

Page 30: ...ottom You can also do it by pressing the intelligent direction button and moving the joystick to scroll to the picture on the top bottom right or left or roll the scroll to the top or bottom on the right of the window The cursor has to be in the window to be rolled 2 Execute To execute functions of Windows you can use the joystick to move the cursor to the top of that function Single click the lef...

Page 31: ...yboard Your Notebook PC comes with a Windows TM reinforced keyboard Your keyboard can be used as a standard keyboard and also includes 2 Windows TM special function keys to help you use Windows TM in a swift and convenient manner WindowsTM function keys There are two keys designed specifically for the WindowsTM operating system and can be used in WindowsTM only Press this key to activate the Start...

Page 32: ...n the lower left corner 1 Decrease the brightness of the LCD 2 Increase the brightness of the LCD 3 Standby mode Save to RAM 4 Sleep mode Save to Disk 5 Increase volume Only applicable to Windows system 6 Decrease volume Only applicable to Windows system 7 Mute Only applicable in Windows system 8 Switch to LCD or displayer 9 Activate built in number keyboard The built in keyboard al lows you to us...

Page 33: ... can press the following keys to enter the numbers and symbols shown on the lower end of the keys Using the direction keys Use as direction keys Press to activate direction keys Press Shift the keys shown preceding Fig Then the number keys will become direction keys The functions of all keys are shown as follows ...

Page 34: ...vides 32 byte BUS and its speed is as high as 33 MHz Under the burst mode the data transmission speed reaches 132 Mb per second However a 16 byte PC card transmits 20Mb per second only The CardBus is compatible with the 16 byte PC card PC card socket Eject button Our PC card socket supports the hot plug function However we suggest that you follow the instructions of the Windows operating system to...

Page 35: ...p Place the end with 68 holes facing the PC card socket when you insert the card into the socket If you hold the card upside down you cannot insert the card into the socket If you have a hard time inserting the card do not force the card into the socket If you do the card and the socket will be damaged Step 2 After the PC card is inserted into the socket if the PC card comes with a plug please plu...

Page 36: ...on Remove hardware safely located on the lower right work row or control station of the Windows operating system Step 2 The window Remove hardware safely appears At Hardware device chose PCMCIA device and click Stop to stop the PC card from running Step 3 Press the eject button ...

Page 37: ...38 Step 5 Press the eject card toward the PC card socket to eject the PC card Step 4 The eject button bounces out as shown in following Fig ...

Page 38: ...e check How To Use PC Card for details Inserting the memory card Note A memory card has to be inserted in a designated direction If you place the card in a reverse direction the card will not be inserted at all Do not insert the card too heavily Otherwise the card and socket may be damaged Ejecting the memory card Note Please stop the memory card from running before you eject the memory card Press...

Page 39: ...ct manufacturers With USB manufactur ers do not have to modify the system setup whenever a peripheral computer sys tem is invented and thus the peripheral device can be installed easily Your Notebook PC comes with 2 USB sockets to connect the peripheral de vices with USB plugs such as a keyboard and mouse No restart or setup is re quired for the peripheral device with USB specification Just insert...

Page 40: ...ecommunication specifications and telephone signals If you are in any of the preceding countries you can use your built in modem If not you should check whether the local telecommunication specification complies with the preceding countries telecommunication specification before you use your built in modem Please remove all connection lines before you remove your Notebook PC Otherwise the plug may...

Page 41: ...42 Connect to pay phone Connect to household phone ...

Page 42: ...Chapter 4 Chapter 4 Power system 4 1 AC Power System 4 2 Battery Power System 4 3 Power Management Modes ...

Page 43: ...y life which can be further extended by using power management features through the BIOS setup The battery system implements the Smart Battery standard under the Windows environment which allows the battery to accurately report the amount of charge percentage left in the battery Additional battery packs are optional and can be purchased separately through a Notebook PC retailer Before using the No...

Page 44: ...mation and settings The following example is that of Windows XP NOTE If you ignore the low battery warning eventually the Notebook PC enters sus pend mode Windows default uses STR WARNING Save to RAM does not last long when the battery power is depleted Save to Disk STD is not the same as power OFF STD requires a small amount of power and will fail if no power is available due to complete battery ...

Page 45: ... a few hours to receive a full charge when the power is OFF but takes twice as long when the Notebook PC is in use When the orange charge LED is flashing charging is required The battery is charging when the orange LED is solid When the LED is OFF the battery pack is charged NOTE The battery stops charging if the temperature is too high or the battery voltage is too high BIOS provides a smart batt...

Page 46: ...y the following Standby Power LED Blinks and Hibernation Power LED OFF Full Power Mode and Maximum Performance The Notebook PC operates in Full Power mode when the power management function is disabled by configuring Windows power management and Speedstep When the Notebook PC is operating in Full Power Mode the Power LED remains ON If you are conscious of both system performance and power consumpt...

Page 47: ...xcept Fn Recover from STD by using the power switch just like powering ON the Notebook PC Power Savings The Notebook PC enters Standby mode low priority when the system remains idle for a specified amount of time The timeout can be set through BIOS setup lower priority and Windows power management higher priority To resume system operation press any key Power State Summary STATE ENTRY EVENT EXIT E...

Page 48: ...e known in case the Notebook PC should enter these states The following temperatures represent the chassis temperature not CPU The fan turns ON for active cooling when the temperature reaches the safe upper limit The CPU decreases speed for passive cooling when the temperature exceeds the safe upper limit The system shut down for critical cooling when temperature exceeds the maximum safe upper lim...

Page 49: ... 48 ...

Reviews: