background image

MAINTENANCE

Engine/Electrical

36

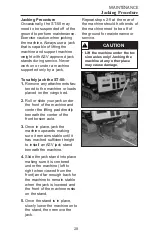
Water Separator

The water separator removes
water from the fuel supply as the
engine runs. Drain the water
separator daily to maintain prop-
er function.

To drain the water separator:

1.

Loosen the twist valve on 
the bottom of the separator. 

2.

Retighten the valve once all 
of the water has been 
drained from the catch bowl.

Accessory Belts

The engine uses a belt to drive
accessories like the alternator,
water pump, and cooling fan.
Belts typically stretch and wear
during their service life. As a
result, the accessory belt on the
ST-50 should be visually
inspected daily for tension, con-
dition, and presence prior to
operating your machine.

To check drive belt:

1.

With the engine off and cool, 
remove the key from the igni-
tion to avoid accidental start.

2.

Remove the engine cover 
from the machine. 

3.

Visually inspect the belt to 
make sure it is present, tight 
on the pulleys and and in 
good condition.

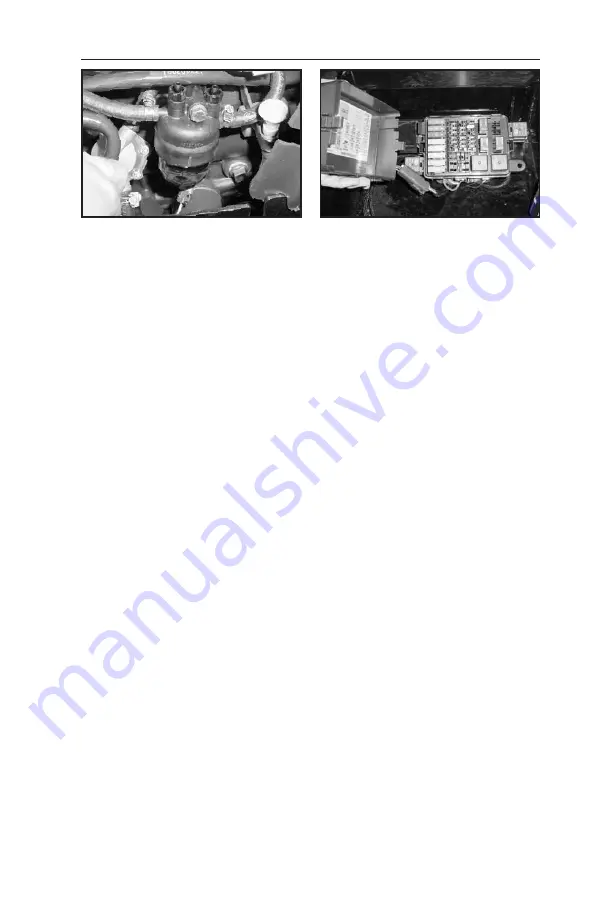
Fuse Panel

The electrical system in the ST-
50 is equipped with fuses that
protect the electrical compo-
nents from damage. They can
be found in the fuse panel locat-
ed beneath the passenger seat.

In the event of an electrical mal-
function, the most logical place
to start is the fuse panel. Check
the fuse(s) related to the prob-
lem you are having and inspect
it. If the fuse filament appears
broken, black or burned, it
needs to be replaced. Replace
fuses with the correct amperage
replacement fuse only.
Replacing a fuse with one of a
higher amperage rating may
burn out the electrical compo-
nent the fuse was meant to pro-
tect. See the troubleshooting
section of this manual for an
additional resource to aid in
tracking suspected electrical
problems.

Summary of Contents for ST50 Scout

Page 1: ...al ST50 Scout SN All English All Language Geographic Region Serial Number Range This manual is complements of TrackLoaderParts com The world s best source for ASV parts Track Loader Parts 6543 Chupp Road Atlanta Georgia 30058 USA 800 616 8156 ...

Page 2: ...s on the part of the operator There are many hazards that can be encountered during operation of an off highway utility vehicle such as the ST 50 With this in mind it is the responsibility of each operator to read and fully under stand this manual before attempting to operate the machine Machine damage bodily injury or even death may result if the pro cedures and precautions described in this manu...

Page 3: ...y are intended to make you aware of poten tial risks and encourage a safe approach to operation inspection and maintenance of the machine Do not operate the machine until you are sure you have a thorough understanding of its operation inspection and maintenance It is your responsibility as the operator to exercise caution while performing these tasks to ensure your safety and the safety of others ...

Page 4: ...cessories Warranty claims will not be processed unless the machine PIN is provided Engine Serial Number B The engine serial number is located on the right side of the engine near the front just above the injection pump Manual Storage C The machine manuals are stored in the compartment locat ed beneath the driver s seat M MA AC CH HI IN NE E I ID DE EN NT TI IF FI IC CA AT TI IO ON N 3 A C B Remove...

Page 5: ...1 Safety Overview 2 Machine Identification 3 Safety 6 Controls 14 Operation 20 Maintenance 26 Troubleshooting 48 Machine Specifications 51 California Proposition 65 52 Recommended Fluids 53 Standard Torque Guidelines 54 Service Log 55 ...

Page 6: ...5 ...

Page 7: ...S SA AF FE ET TY Y CONTENTS 6 Features 7 Cargo Bed Capacity GVW 8 Fire Prevention 9 Warning Decal Locations 10 Warning Decals 11 Dump Box Brace if equipped 13 ...

Page 8: ... is allowed to take place It is enabled by the operator presence switch whenever the operator seat is occupied C Operator and Passenger Presence Switches The presence switches are acti vated whenever their respective seats are occupied D Passenger Seat Belt Safety Switch The passenger s seat belt is equipped with a safety switch enabled by the passenger pres ence switch that is activated whenever ...

Page 9: ... a seat belt has been unfastened during motion not recommended the motion controls will be disabled You must make sure seat belts are fastened then activate the push to operate switch item F to resume operation Cargo Bed Capacity The bed capacity is the amount of weight that can be safely applied to the bed and carried by the ST 50 Bed Capacity 4000 lbs Note The bed capacity specifi cation is the ...

Page 10: ...ionary tasks that should be performed daily or more often if necessary Repair or replace worn or dam aged components as needed to ensure safe machine operation Precautionary Tasks With the engine off and cool remove any debris present in the engine compartment Remove the belly pans and pressure wash this area as needed to clean it properly Check the battery fuse box electrical wiring and connec ti...

Page 11: ...SAFETY Warning Decal Locations 10 A B B F D C C G E ...

Page 12: ...al Operating Position Never operate the machine with any part of your body protruding out of the operator enclo sure Failure to do so may result in serious injury or even death Prior to Operating Read and fully under stand the operation and maintenance manual prior to operating this machine 2051 678 WARNING Keep away from tracks while machine is in motion Serious personal injury or even death may ...

Page 13: ...ays Keep hands and feet inside the cab Watch for branches or other hazards that may enter the cab Keep clear of the tracks while the machine is in motion Passenger Position Seated in passenger seat Seat belt fastened Hands feet inside cab 2051 679 G Operating with a Load The Scout s operating characteristics can change dramatically when carrying a load Terrain and maneuvers that are considered saf...

Page 14: ...ox empty the box 2 Park the machine on level ground in a safe area for per forming service work 3 Make sure any bystanders are clear of the dump box then raise it to the upper limit 4 Have an assistant pivot the brace into position under the box 5 Lower the dump box slowly until it comes to rest on the brace The brace is in place You may now safely turn the engine off and exit the machine To remov...

Page 15: ...C CO ON NT TR RO OL LS S CONTENTS 14 Switch Panels Instrument Display 15 Motion Controls 16 Throttle Two Speed 17 Auxiliary Hydraulics 18 ...

Page 16: ...Gauge I Warning Light Display J Hour Meter K High Range Indicator L Glow Plug Operation Indicator M Oil Pressure Warning Light N Coolant Temp Warning Light O Hyd Oil Temp Warning Light P Battery Voltage Warning Light Optional equipment is indicated by an asterisk The glow plug operation light should illuminate only when the ignition switch is turned to the pre heat position CONTROLS Switch Panels ...

Page 17: ...chine turns Bi directional Speed Control The scout is equipped with a foot pedal Q that controls both machine speed and movement in forward reverse directions To move the machine forward press the right side of the pedal gently towards the floor To move the machine back ward press the left side of the pedal gently towards the floor Machine speed is determined by how far the pedal is pressed toward...

Page 18: ... drive sys tem that provides high and low range capability Low range is best suited for strenuous tasks maneuvering through tight areas or tra versing rough terrain High range is best suited for open areas with even terrain where obstacles are easily seen and avoided To activate high range press the two speed activation switch B located in the right switch cluster on the instrument display There i...

Page 19: ... can be used with the blade attachment Float allows the blade to follow the contours of the ground as you move with only its own weight acting as downforce To engage float Pull the trigger on the front of the joystick control To disengage float Gently pull back on the joy stick until the blade moves upward Continuous Flow Hydraulics optional The ST 50 is available with a continuous flow system tha...

Page 20: ...stened in order for the intermittent flow hydraulics to operate Continuous Flow The continuous flow switch must be locked in its neutral positon in order to start the machine The operator is not required to be seated in the cab for the continuous flow hydraulics to operate In the event that the operator exits the cab while the contin uous flow hydraulics are in operation flow will cease You must r...

Page 21: ...O OP PE ER RA AT TI IO ON N CONTENTS 20 Pre Operation 21 Starting Procedure 22 Operation Techniques 23 Cargo Bed Safety 25 ...

Page 22: ...in good condition and securely fas tened 8 Engine accessory belts are in good condition and properly tensioned 9 Hydraulic hoses and fittings are in good condition 10 Continuous flow switch is in its neutral position 11 Engine cover is latched in place and bystanders are clear of all moving parts 12 All grease points have been properly lubricated Note The parking brake is auto matically on activat...

Page 23: ...glow plug opera tion light in the fuel gauge will illuminate 5 Once the engine has been pre heated turn the key to the right and hold to start the engine Release the key as soon as the engine fires 6 Once running reduce throttle to a low idle by slowly pulling back on the hand lever Allow the engine to idle for approxi mately 5 minutes to allow it to reach operating temperature 7 Once the engine h...

Page 24: ...may damage the machine or cause injury Avoid terrain that appears unsafe or unstable Operating the ST 50 Once all of the pre operation checks have been performed Start the engine according to the procedure on page 22 At this point the operator and passen ger if present are seated inside the cab with seat belts fastened the engine is at operating tem perature and the desired operat ing RPM is set P...

Page 25: ...rating the ST 50 on an incline Never operate the ST 50 on an incline in excess of 20 standard machine no load Do not make sudden changes in direction and move slowly to maximize machine stability When turning on an incline back down the hill while slowly turning until the machine is pointed in the desired direction then pro ceed forward Operating On Turf ASV rubber track vehicles are designed to t...

Page 26: ...always use extra caution Move slow ly and avoid steep inclines rough terrain and obstacles that may cause the load to shift or spill The ST 50 s operating character istics can change dramatically when carrying a load Terrain and maneuvers that are consid ered safe when operating an unloaded machine may not be safe when carrying a load Avoid inclines or side hills when operating with a load Loads e...

Page 27: ...ENTS 26 Precautions Safety Warnings 27 Jacking Procedure 28 Maintenance Schedule 29 Radiator Oil cooler Engine Cleaning 30 Air Cleaner 31 Fuel Filter 32 Engine 33 Electrical 36 Hydraulic System 37 Undercarriages 38 Drive Sprocket Rollers 46 ...

Page 28: ...ed Never work on a machine supported only by a jack Always use ASV approved jack stands to support vehicle weight while performing main tenance or service work Remove any attachments prior to working underneath the machine Never run the engine in a poorly ventilated area Exhaust fumes are fatal when inhaled in sufficient quantities Never smoke or allow open flame near flammable liquids or the batt...

Page 29: ...th the center of the front torsion axle 3 Once in place jack the machine upwards making sure it remains stable until it has reached sufficient height to install an ASV jack stand beneath the machine 4 Slide the jack stand into place making sure it is centered under the machine left to right when viewed from the front and far enough back for the machine to remain stable when the jack is lowered and...

Page 30: ... if damaged or heavily soiled Radiator oil cooler fins Inspect Daily Clean often as necessary Undercarriages Inspect Daily Clean often as necessary Engine compartment Inspect Daily Clean often as necessary Drive sprocket rollers Inspect 50 hr Replace if damaged or worn 35 min Engine oil and filter Replace 12 Mo or 500 hr Harsh conditions 6 Mo 250 hr interval 11 2 qt Hydraulic filter Replace 250 hr...

Page 31: ...he engine is off and cool then remove the front fascia to access the radiator oil cooler 2 Using compressed air or a pressure washer thoroughly clean the radiator oil cooler as shown Note Make sure to keep the water nozzle at least 12 8 for air away from the cooler and that the spray is directed straight through the cooler This will pre vent the cooling fins from being bent over which will decreas...

Page 32: ...filler caps to remove it from the machine 4 Remove the primary element B and inspect it If it appears damaged in any way replace it If the element is heavily soiled replace it If it appears to be in good condition clean the element if necessary and reinstall it 5 Once the primary element has been removed the secondary element C will be visible Remove the element and inspect it If it appears dam ag...

Page 33: ...tion Over time the filter can become plugged and may cause the engine to lose power run rough ly or fail to start The fuel filter should be replaced every 500 hours or more often as neces sary to prevent these conditions from occurring To change the filter 1 Thoroughly clean the outside of the filter assembly to reduce the chance of contam inants being introduced into the fuel system 2 Loosen the ...

Page 34: ...r a few minutes to warm the oil then turn the engine off and remove the key from the ignition to avoid accidental start 2 Remove the belly pan beneath the engine fig 1 3 Place a suitable container beneath the rear drain plug and filter to catch the used oil as it drains 4 Remove the drain plug from the oil pan and allow the oil to drain completely from the engine Use the correct size wrench to kee...

Page 35: ...rt the engine and watch the oil pressure indicator light in the warning light display The light should come on then go out when oil pressure has been achieved If the light doesn t go out turn the engine off immediately and look for potential problems If the light does go out as expected oil pressure has been achieved 14 Once the engine is running perform a visual inspection to make sure there are ...

Page 36: ...stick A from its tube 4 Wipe the dipstick with a clean shop cloth and re insert it into the tube until it comes to rest in its seated position 5 Remove the dipstick once again and inspect the end for oil on the level indi cator 6 Oil should be present on the dipstick up to but not over the upper full level indicator notch If the level is correct re install the dipstick and then reinstall the engin...

Page 37: ...from the igni tion to avoid accidental start 2 Remove the engine cover from the machine 3 Visually inspect the belt to make sure it is present tight on the pulleys and and in good condition Fuse Panel The electrical system in the ST 50 is equipped with fuses that protect the electrical compo nents from damage They can be found in the fuse panel locat ed beneath the passenger seat In the event of a...

Page 38: ... in the cargo bed behind the pas senger seat to access the hydraulic reservoir fig 2 6 Locate the hydraulic filter housing beneath the access cover 7 Thoroughly clean around the filter housing to prevent dirt or debris from entering the system 8 Remove the bolts securing the filter housing cover to the housing then remove the cover fig 3 4 9 Remove the filter from the housing and replace it with a...

Page 39: ...ponent wear A pressure washer works well for cleaning materials from the undercarriages At times when a pressure washer is not available use a bar shovel or similar device to remove foreign materials When cleaning pay particular attention to the drive motors sprockets and the front wheels where debris is likely to accumulate If traversing scrap or debris inspect more often and remove foreign objec...

Page 40: ...de between the rear sprocket and the front idler wheels Never tighten the tracks beyond this point Adjustment To tighten tracks 1 Locate the input grease zerk H on the tensioner unit J mounted within the frame rail fig 1 2 Connect a grease gun to the zerk and inject grease into the tensioner until the track is properly tensioned The track tension adjustment procedure is now complete If for some re...

Page 41: ...ded distance is 3 4 from the bottom of the track to the ground 2 Remove the outer snap ring and grease cover on the outer front 14 idler wheel fig 2 3 Then remove the nut and washer from the axle fig 4 5 Leave the wheel in place for now 3 Loosen the bleeder bolt I on the grease tension unit J and allow grease to flow out until the front wheels are almost touching the 10 wheels behind them fig 1 Th...

Page 42: ... again and move the front 14 wheels and axle as far rear ward as possible It may be necessary to assist in sliding the wheels rearward by step ping down on the inside of the track as shown fig 13 6 Grab hold of the track and the outer front 14 wheel then pull them off of the undercar riage together from the inside to the outside of the machine fig 14 15 Note Keep the 14 wheel center in line with t...

Page 43: ...the wheel as you remove it from the undercarriage Make sure to remove it or catch it if possible to keep it clean fig 16 7 Pull the track the rest of the way off of the undercarriage at the rear of the machine fig 17 Repeat this procedure if neces sary on the other side of the machine 13 14 15 16 17 ...

Page 44: ... line it up with the axle then slide it onto the axle as you slide the track over the inner 14 wheel Once on the axle tap the wheel gently inward into position fig 5 6 7 Note It is important to align the wheel center with the axle prior to sliding it on to avoid damag ing the inner seal during installa tion Note If for some reason your machine is higher off of the ground than recommended you may n...

Page 45: ...e grease cover or snap ring yet fig 9 10 Note The markings indenta tions on the lock nut face should be visible from the out side of the wheel during installa tion This indicates proper orien tation of the nut on the axle 6 Tighten the bleeder bolt and attach a grease gun to the input zerk Pump grease into the tensioner unit until the 14 wheel is just far enough for ward to install the 10 wheel fi...

Page 46: ...he input zerk and pump grease into the tensioner unit until there is no visible sag in the track when viewed from the side fig 14 15 9 Retighten the nut on the outer 14 wheel then install the grease cover and snap ring fig 16 17 18 Repeat this procedure if neces sary on the other side of the machine MAINTENANCE Undercarriages 45 14 15 16 17 18 12 13 ...

Page 47: ...working area remove the track to expose the sprocket for roller replacement see page 40 2 Remove one bolt A holding washer B steel pin C roller D and external roller E in place The pin and roller may then be removed from the sprocket fig 19 3 Install a new roller over the pin 4 Slide the bolt back through the sprocket washer pin and external roller fig 19 5 Install and tighten the retain ing nut F...

Page 48: ...47 ...

Page 49: ...T TR RO OU UB BL LE ES SH HO OO OT TI IN NG G CONTENTS 48 Overview No Start 49 Hydraulics Electrical Overheat 50 ...

Page 50: ...er 10 Loose broken or disconnect ed wiring at key relay or starter 11 Main power fuse 60 80 amp blown Problem Machine cranks but will not start Possible causes 1 Fuel tank empty fuel filter plugged or fuel line restricted 2 Battery discharged engine rotates slowly 3 Injection pump fuse blown 4 Power relay B fuse blown 50 amp 5 Faulty power relay B 6 Loose broken or disconnect ed wiring at injectio...

Page 51: ...lternator diode 4 Loose broken or disconnect ed wiring at battery alterna tor diode or fuse 5 Excessive current draw with key in off position 6 Faulty battery 7 Faulty alternator 8 Faulty resistor on back of fuse panel Problem Hydraulic oil light illuminated hydraulic system overheating Possible causes 1 Debris plugging oil cooler limiting airflow 2 Low hydraulic oil level 3 Loose or missing fan b...

Page 52: ...ue peak 105 ft lb 143 Nm O Op pe er ra at ti in ng g S Sp pe ec ci if fi ic ca at ti io on ns s Cargo bed capacity 4 000 lb 1814 kg Maximum speed low range 6 5 mph 10 5 kmh Maximum speed high range 11 5 mph 18 5 kmh A Au ux xi il li ia ar ry y H Hy yd dr ra au ul li ic c P Pu um mp p Continuous flow max 16 3 gpm 61 7 lpm Pressure 3 000 psi 20 670 kPa S Se er rv vi ic ce e R Re ef fi il ll l C Ca a...

Page 53: ...ecognized by the state as harmful Terex ASV complies with this requirement by providing the following information CALIFORNIA Proposition 65 Warning This product contains lead and lead compounds diesel engine exhaust and used engine oil chemicals known to the state of California to cause cancer CALIFORNIA Proposition 65 Warning This product contains lead a chemical known to the state of California ...

Page 54: ...ommended The ASV product line includes Heavy Duty Engine Oil 10W 30 Premium All Season MV Hydraulic Oil Multi Purpose EP Lithium Grease Long Life 50 50 Antifreeze Coolant Undercarriage Wheel Bearing Lubricant ASV fluids and lubricants are available through your ASV Dealer If ASV products are not available use high quality sub stitutions that meet or exceed the specifications listed above and throu...

Page 55: ...rd Torque 1 4 9 2 lb ft 5 16 18 4 lb ft 3 8 35 7lb ft 7 16 50 11 lb ft 1 2 75 15 lb ft 9 16 120 22 lb ft 5 8 160 30 lb ft 3 4 275 37 lb ft 7 8 460 60 lb ft 1 660 75 lb ft 1 1 8 960 110 lb ft 1 1 4 1320 150 lb ft 1 3 8 1780 220 lb ft 1 1 2 2280 260 lb ft Thread size Standard Torque M6 12 3 Nm M8 28 7 Nm M10 55 10 Nm M12 100 20 Nm M14 160 30 Nm M16 240 40 Nm M20 460 60 Nm M24 800 100 Nm M30 1600 200...

Page 56: ...SERVICE LOG 55 Hours Service Performed Notes ...

Page 57: ...SERVICE LOG 56 Hours Service Performed Notes ...

Page 58: ...Hours Service Performed Notes SERVICE LOG 57 ...

Page 59: ...SERVICE LOG 58 Hours Service Performed Notes ...

Page 60: ...Terex Construction Americas 8800 Rostin Road Southaven MS 38671 888 201 6008 662 393 1800 www terex com ASVST50 OM 1 09 Copyright 2009 Terex ...

Reviews: