background image

HG41..A

HG61..A/B
HG76..A/B
HG91..A/B
HG96..A/B 

ar

t.nr

. 700001302200

handleiding 

notice d'utilisation

anleitung 

manual

Summary of Contents for HG41 A Series

Page 1: ...HG41 A HG61 A B HG76 A B HG91 A B HG96 A B art nr 700001302200 handleiding notice d utilisation anleitung manual...

Page 2: ...wertes important information tip conseil Tipp tip 1 uw gaskookplaat beschrijving 2 inleiding 3 veiligheid waar u op moet letten 4 bediening ontsteken en instellen 5 comfortabel koken de kookplaat opti...

Page 3: ...hreven op welke manier u de gaskookplaat zo optimaal mogelijk kunt benutten Naast informatie over de bediening treft u ook achtergrondinformatie aan die u van dienst kan zijn bij het gebruik van dit p...

Page 4: ...een uitgeschakelde ventilator De branderdelen zijn heet tijdens en direct na het gebruik Vermijd directe aanraking en contact met niet hittebestendige materialen Dompel hete branderdoppen en pandrage...

Page 5: ...illustratie hieronder op het wokrooster Een verkeerd geplaatst hulprooster wordt te heet waardoor het beschadigd kan raken 6 COMFORTABEL KOKEN Zorg er altijd voor dat de vlammen onder de pan blijven A...

Page 6: ...ieve reinigingsmiddelen De branderdoppen van de wokbrander zijn vervaardigd uit messing Het is normaal dat de kleur van de messing doppen verandert als gevolg van de hoge temperaturen die tijdens het...

Page 7: ...nformeer bij uw gasleverancier Sluit een nieuwe gasfles aan of laat de tank vullen Houd de bedieningsknop minimaal 5 seconden en voldoende diep ingedrukt tussen vol en kleinstand Ontsteek de brander i...

Page 8: ...nraking komen met bewegende delen van het keukenmeubel In alle gevallen moet er voor het toestel een aansluitkraan geplaatst worden op een makkelijk bereikbare plaats Voordat u het toestel in gebruik...

Page 9: ...sche aansluiting alleen voor toestellen met vonkontsteking 230 V 50 Hz 0 6 VA De elektrische aansluiting moet voldoen aan de nationale en lokale voorschriften Wandcontactdoos en stekker moeten te alle...

Page 10: ...17 16 inbouwen inbouwmaten HG91 HG96 INSTALLATIEVOORSCHRIFT inbouwen INSTALLATIEVOORSCHRIFT HG61 B HG76 B HG91 B HG96 B inbouwhoogte 51 mm in plaats van 43 mm inbouwmaten HG41 HG61 inbouwmaten HG76...

Page 11: ...65 0 79 57 0 90 65 1 00 72 0 88 63 normaal 2 00 2 00 1 80 1 60 115 1 41 101 1 60 115 2 00 144 1 76 127 sterk 3 00 3 00 2 70 2 30 166 2 02 146 2 30 166 2 70 194 2 38 171 supersterk 3 60 3 60 3 60 3 00...

Page 12: ...otre attention 24 commande allumer et r gler 25 cuisiner confortablement utilisation optimale 26 27 entretien g n ralit s 28 30 pannes tableau 31 environnement que faire de l emballage et de l apparei...

Page 13: ...d utiliser la plaque de cuisson au gaz d une mani re aussi optimale que possible En plus d une information sur la commande vous trouverez galement une information de base qui vous sera utile lors de l...

Page 14: ...n raison de flammes lev es un incendie peut se d clencher aussi en cas d un ventilateur mis l arr t Les l ments du br leur sont br lants pendant l utilisation mais aussi directement apr s l utilisatio...

Page 15: ...e est mal plac e et risque ainsi de subir des d t riorations faute correct CUISINER CONFORTABLEMENT Veillez toujours ce que les flammes se trouvent sous la casserole Un grand gaspillage d nergie se pr...

Page 16: ...rovoquer des t ches tenaces difficiles supprimer Utilisez de pr f rence un produit d entretien doux Nettoyez d abord les touches de commande les br leurs et les grilles de cuisson avant le plan profon...

Page 17: ...d air soit suffisante Ouvrez le robinet principal du gaz Informez vous aupr s de votre fournisseur en gaz Branchez une nouvelle bouteille de gaz ou remplissez le r servoir Appuyez sur la touche de com...

Page 18: ...attention Un cordon de s curit ne peut tre cass ni toucher les parties mobiles du meuble de cuisine Dans tous les cas il convient de placer un robinet de raccordement dans un endroit facilement access...

Page 19: ...INSTALLATION g n ralit s branchement lectrique uniquement pour les appareils avec allumage lectrique 230 V 50 Hz 0 6 VA Le branchement lectrique doit satisfaire aux prescriptions nationales et locales...

Page 20: ...t HG91 HG96 INSTRUCTIONS D INSTALLATION encastrement HG61 B HG76 B HG91 B HG96 B hauteur d encastrement 51 mm au lieu de 43 mm dimensions hors tout HG41 HG61 dimensions hors tout HG76 INSTRUCTIONS D I...

Page 21: ...2 00 1 80 1 60 115 1 41 101 1 60 115 2 00 144 1 76 127 puissant 3 00 3 00 2 70 2 30 166 2 02 146 2 30 166 2 70 194 2 38 171 super puissant 3 60 3 60 3 60 3 00 216 2 64 190 3 00 216 3 50 252 3 08 222 w...

Page 22: ...achten m ssen 44 Bedienung Z nden und Einstellen 45 Bequem kochen Die optimale Benutzung der Kochmulde 46 47 Pflege Allgemeines 48 50 St rungen Tabelle 51 Umweltaspekte Verpackung und Ger t entsorgen...

Page 23: ...Gerichte frei Auf dem HG91 bereiten Sie die Gerichte auf sechs gro bemessenen Brennern In diesem Handbuch ist beschrieben wie die Gaskochmulde so optimal wie m glich benutzt werden kann Neben Angaben...

Page 24: ...on R umen geeignet Flambieren Sie niemals unter einer Dunstabzugshaube Die hohen Flammen k nnen auch bei ausgeschaltetem Gebl se Brand verursachen Die Brennerteile sind bei der Benutzung und auch noch...

Page 25: ...falsch aufgelegter Rost wird zu hei wodurch er besch digt werden kann falsch richtig BEQUEM KOCHEN Sorgen Sie immer daf r dass die Flammen unter dem Topf bleiben Wenn die Flammen um den Topf z ngeln g...

Page 26: ...aggressiven Reinigungsmittel verwenden Die Brennerdeckel des Wokbrenners sind aus Messing gefertigt Es ist normal dass sich die Messingdeckel durch die hohen Temperaturen beim Wokken verf rben Ihr Ge...

Page 27: ...auptgashahn Fragen Sie bei Ihrem Gaslieferanten nach Schlie en Sie eine neue Gasflasche an oder lassen Sie den Tank f llen Halten Sie den Knebel mindestens 5 Sekunden und zwischen Gro und Kleinstellun...

Page 28: ...geknickt werden und nicht mit bewegenden Teilen eines K chenm bels in Ber hrung kommen Auf jeden Fall mu f r das Ger t der Gashahn an einer gut erreichbaren Stelle angebracht werden Vor dem ersten Geb...

Page 29: ...rsorgung nur f r Ger te mit elektrischer Z ndung 230 V 50 Hz 0 6 VA Der elektrische Anschlu mu den nationalen und kommunalen Vorschriften entsprechen Steckdose und Stecker m ssen immer gut zug nglich...

Page 30: ...57 56 INSTALLATIONSANWEISUNG Einbauen Einbauma e HG91 HG96 INSTALLATIONSANWEISUNG Einbauen HG61 B HG76 B HG91 B HG96 B Einbauh he 51 mm anstatt 43 mm Einbauma e HG41 HG61 Einbauma e HG76...

Page 31: ...1 00 72 0 88 63 Normalbrenner 2 00 2 00 1 80 1 60 115 1 41 101 1 60 115 2 00 144 1 76 127 Starkbrenner 3 00 3 00 2 70 2 30 166 2 02 146 2 30 166 2 70 194 2 38 171 Superstarkbr 3 60 3 60 3 60 3 00 216...

Page 32: ...tention to 64 controls igniting and adjusting 65 comfortable cooking optimal use of the hob 66 67 maintenance general 68 70 faults table 71 environmental aspects disposal of packaging and appliance 72...

Page 33: ...l explains optimum use of the gas hob In addition to information on operation you will also find background information that may be useful to you when using this product Keep this manual carefully so...

Page 34: ...eparing dishes The appliance is not suitable for space heating Never flamb under an extractor hood The high flames can cause a fire even if the fan is switched off The burner parts are hot during and...

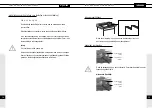
Page 35: ...on the wok support at a 45 degree angle as per the illustration below If positioned incorrectly the auxiliary support will get too hot and may become damaged wrong right COMFORTABLE COOKING Always en...

Page 36: ...on the wok burner are made of brass It is normal for the colour of the brass caps to change as a result of the high temperatures that occur during use of the wok Your appliance has been manufactured f...

Page 37: ...with your gas supplier Connect a new gas bottle or have the tank filled Keep the control knob pressed in far enough between full and low for at least 5 seconds Light the burner in the ignition zone A...

Page 38: ...h moving parts of kitchen units In all cases the connection tap for the appliance must be positioned such that it is easily accessible Before using the appliance for the first time check the connectio...

Page 39: ...UCTIONS general electrical connection solely for appliances with a spark switch 230 V 50 Hz 0 6 VA The electrical connection must comply with national and local regulations Wall socket and plug must b...

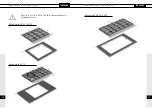
Page 40: ...UCTIONS building in building in dimensions HG91 HG96 INSTALLATION INSTRUCTIONS building in HG61 B HG76 B HG91 B HG96 B installation height 51 mm in place of 43 mm building in dimensions HG41 HG61 buil...

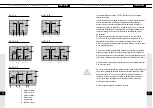
Page 41: ...65 0 79 57 0 90 65 1 00 72 0 88 63 normal 2 00 2 00 1 80 1 60 115 1 41 101 1 60 115 2 00 144 1 76 127 strong 3 00 3 00 2 70 2 30 166 2 02 146 2 30 166 2 70 194 2 38 171 super strong 3 60 3 60 3 60 3 0...

Page 42: ...ITEMNR bereit wenn Sie mit der Kundendienstabteilung Kontakt aufnehmen When contacting the service department have the production code PCODE and complete item number ITEMNR to hand Adressen en telefo...

Reviews: