background image

general information

pans

GB 9

safety

what you should pay attention to

GB 8

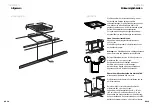
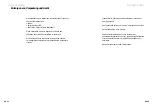
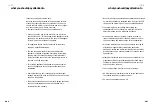
Grains of sand may cause scratches which cannot be

removed.

• Only put pans with a clean base on the cooking surface.

• Always pick pans up to move them.

• Do not use the hob as a worktop.

A tip:

slide the bottom of the pan across a damp cloth,

before you put the pan on the cooking surface. This will

prevent grains of sand or the like being transferred to the hob

surface.

Always pick pans up;

never slide them.

6

10

12

6

10

12

6

10

12

6

10

12

6

10

12

6

10

12

6

10

12

6

10

12

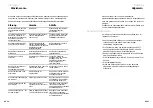
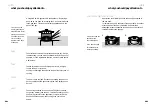
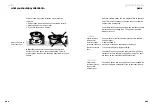
Induction cooking makes use of a magnetic field to generate

heat. This is why the bases of the pans have to contain iron

and therefore be magnetic.

You achieve the best result by using a pan that has the same

dimensions as the cooking zone. The minimum pan base

diameter is 12 cm.

suitable

You can check for yourself whether your pans are suitable

using a magnet.

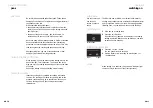
A pan is suitable if:

• the base of the pan is attracted by the magnet;

• the pan is suitable for electric cooking.

You should only use pans with a thick (minimum 2.25 mm),

flat base which are suitable for induction cooking. The best

are pans with the "Class Induction" quality mark.

unsuitable

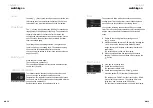
Pans with a base which is not magnetic or is not suitable for

electric cooking are unsuitable for use on the induction hob.

Special stainless-

steel pans for

induction cooking;

solid enamelled pans;

enamelled cast-iron

pans.

Earthenware,

aluminium, plastic,

copper, china,

stainless steel.

Summary of Contents for HI6071G

Page 1: ...allatievoorschrift inductiekookplaat mode d emploi instruction d installation plaque de cuisson à induction Bedienungsanleitung Installationsanweisung Induktionskochfeld instructions for use installation instructions induction hob HI6071G ...

Page 2: ...informatie over bediening geschikte pannen en achtergrondinformatie over de werking van het toestel Daarnaast zijn kooktabellen en onderhoudstips opgenomen De veiligheidsvoorschriften die van belang zijn tijdens de installatie zijn opgenomen in het hoofdstuk installatie Bewaar deze handleiding zorgvuldig zodat een eventuele volgende gebruiker er ook zijn voordeel mee kan doen Veel kookplezier uw i...

Page 3: ...rmogen is in te stellen Dankzij het hoge vermogen gaat het aan de kook brengen zeer snel De kookplaat is eenvoudig te reinigen de plaat zelf wordt niet erg heet doordat de warmte in de pan zelf wordt opgewekt In het hoofdstuk veiligheid op de pagina s 4 en 5 vindt u uitgebreide informatie over de voordelen van inductiekoken uw inductiekookplaat inhoud veiligheid waar u op moet letten 4 8 algemene ...

Page 4: ...edselresten niet inbranden veilig De warmte wordt opgewekt in de pan zelf De glasplaat wordt niet warmer dan de pan Hierdoor is de kans uiterst klein dat u zich brandt aan het toestel Na het wegnemen van een pan is de kookzone snel afgekoeld 4 3 2 1 De spoel 1 in de kookplaat 2 wekt een magnetisch veld 3 op Door een pan met een ijzeren bodem 4 op de spoel te plaatsen ontstaat in de panbodem een in...

Page 5: ...n is de kans klein dat u zich aan het toestel zou branden Toch zijn er net als bij elk toestel een aantal zaken waar u op moet letten Als de kookplaat voor de eerste maal gebruikt wordt zult u een nieuwigheidsluchtje ruiken Het is de lak van het toestel die opgewarmd wordt Dit is normaal Door ventileren verdwijnt de geur vanzelf Dit toestel mag alleen door een erkend installateur worden aangeslote...

Page 6: ...aarom moet de panbodem ijzer bevatten en dus magnetisch zijn Bij voorkeur pannen gebruiken die de gehele cirkel van de kookzone bedekken De panbodem moet altijd groter zijn dan 12 cm geschikt U kunt zelf met een magneet controleren of uw pannen geschikt zijn Een pan is geschikt wanneer de panbodem wordt aangetrokken door de magneet de pan geschikt is voor elektrisch koken Gebruik alleen pannen met...

Page 7: ... als ze gebruikt worden voor inductiekoken Met name wanneer deze pannen een te dunne bodem hebben Bij plaatstaal geëmailleerde pannen kan email afspringen het email laat los van het staal wanneer u de kookplaat op een hoge stand inschakelt terwijl de pan te droog is de panbodem kromtrekken door bijvoorbeeld oververhitting of door gebruik van een te hoog vermogen Gebruik nooit pannen met een vervor...

Page 8: ... uur In het display wordt het gekozen aantal minuten weergegeven NL 13 NL 12 bediening inschakelen boost Bij stand boost geeft de kookzone een vermogen af van maximaal 2800 Watt behalve de kookzone linksachter Gebruik deze stand als u gerechten snel aan de kook wilt brengen powerboost De stand is een speciale stand 3200 Watt om extra snel een grote hoeveelheid van een vloeibaar gerecht op te warme...

Page 9: ...keld is is deze ook niet te selecteren om uitgeschakeld te worden door de timer en wordt deze overgeslagen in bovenstaande tabel Indien beide linker of rechter kookzones zijn ingeschakeld kan door nogmaals op de toets te drukken gekozen worden tussen de voorste of achterste kookzone Aan het einde van de bereidingstijd hoort u een pieptoon De zone schakelt uit Schakel aan het einde van de bereiding...

Page 10: ...hillende beveiligingen ingebouwd om de elektronica en uw kookgerei te beschermen Wanneer het toestel op de juiste wijze is geïnstalleerd zullen de beveiligingen zelden of nooit ingrijpen kookduurbegrenzing vermogens De kookduurbegrenzer schakelt de kookzones afhankelijk van de ingestelde stand na een bepaalde tijd automatisch uit De tijd loopt vanaf het moment dat een stand is gekozen dus bij een ...

Page 11: ...s tot een van de volgende reacties de kookplaat zal het toegevoerde vermogen iets af laten nemen dit is niet zichtbaar bij de kookstanden in de displays wanneer dit niet helpt zal de kookplaat het vermogen verder terugregelen en afwisselend de gekozen kookstand en F7 weergeven in de displays Als de kookplaat hierdoor voldoende af is gekoeld komt het ingestelde vermogen weer terug mocht de kookplaa...

Page 12: ...tevens de wok voorkeurstand Het indicatielampje wok licht op Dit geldt alleen voor de kookzone rechtsvoor Er mogen echter ook andere standen of kookzones worden gebruikt Heeft u bijvoorbeeld een gietijzeren wokpan met een kleine bodem en laat de ruimte het toe dan kan ook de kookzone linksachter worden gebruikt kookaanwijzingen standen en vermogens vermogen Het vermogen is instelbaar van 50 W tot ...

Page 13: ...ik van een wok is het van belang dat de bodem vlak is en dat de wok goed voorverwarmd wordt op hoog vermogen kookaanwijzingen kooktabellen aan de kook tussenstand doorkook brengen stand soep bouillon trekken 12 9 3 heldere soep 12 9 2 3 4 gebonden soep 10 vlees klein vlees 9 groot vlees 11 9 3 5 biefstuk 7 8 vis bakken 11 10 8 aardappels koken 12 8 6 bakken rauwe aardappels 12 8 6 gekookte aardapp...

Page 14: ...en kalkresten metaalsporen extra instellingen pieptoon uit inschakelen pieptoon De pieptoon die hoorbaar is bij het bedienen van de toetsen kan worden uit of ingeschakeld de pieptoon uitschakelen 1 Schakel de kookzone linksvoor in en vervolgens uit door twee keer op de aan uit toets te drukken 2 Druk binnen 3 seconden tegelijk de toets van de kookzone linksvoor en de toets van de zone linksachter ...

Page 15: ...nstallateur de installatie controleren Bedieningsfout of glasplaat reinigen De ventilator schakelt vanzelf uit Laat het toestel afkoelen Druk op een willekeurige toets en de melding ver dwijnt Opnieuw beginnen op een lagere stand Geschikte pan gebruiken zie pag 9 Druk de toets met het sleutelsymbool enkele seconden onafgebroken in Gebruik een pan die ongeveer gelijk is aan de diameter van de kookz...

Page 16: ...op een lade mag de ventilatieopeningen aan de onderzijde van het toestel niet afsluiten Bij een lade moet er aan de voorzijde een spleet gemaakt worden van minimaal 560 x 6 mm De afstand tussen lade A en de kookplaat moet minimaal 10 mm bedragen Bij een vaste blende hoeven geen extra aanpassingen voor beluchting te geschieden Boven een 60 cm oven van het merk ATAG Nismaat minimaal 600 mm hoog Belu...

Page 17: ...en oven van een ander merk e Zaag de beluchtingsopening en uit zodat de totale oppervlakte van de gaten minimaal 100 cm2 is Zie bijvoorbeeld figuur met twee gaten van 50 cm2 r Plaats een schermplaat tussen de oven en de kookplaat De plaat moet minimaal 10 mm dik zijn en hittebestendig 85 C De ruimte tussen de onderzijde van de kookplaat en schermplaat moet minimaal 50 mm bedragen t Plaats voor afs...

Page 18: ... aansluiting 2 fase 2 nul 2 2N a c 230 V Uw groep moet gezekerd zijn met 16 A nulaansluiting N1 blauw nulaansluiting N2 bruin faseaansluiting L1 zwart naast blauw faseaansluiting L2 zwart naast bruin 2 fase aansluiting 2 fase 1 nul 2N a c 400 V Uw groep moet gezekerd zijn met 16 A Let op 3e fase niet gebruiken nulaansluiting N blauw met bruin faseaansluiting L1 zwart faseaansluiting L2 zwart De vo...

Page 19: ...rsonen teneinde gevaarlijke situaties te voorkomen Dit toestel voldoet aan de geldende CE richtlijnen NL 35 NL 34 technische gegevens milieu aspecten verpakking en toestel afvoeren De verpakking van het toestel is recyclebaar Gebruikt kunnen zijn karton polyethyleenfolie PE CFK vrij polystyreen PS hardschuim Deze materialen op verantwoorde wijze en conform de overheidsbepalingen afvoeren De overhe...

Page 20: ...s vous souhaitons bien du plaisir en utilisant cet appareil votre plaque de cuisson à induction préface votre plaque de cuisson à induction description bande de commande zone de cuisson témoin lumineux sécurité enfant en hors service indications de la zone de cuisson positions de cuisson touche le minuteur touche memory visuel des positions de cuisson réglage de l heure zone de cuisson avant enreg...

Page 21: ... l amateur de cuisine Cuire sur une plaque de cuisson à induction est autre chose que cuire sur un appareil traditionnel La cuisson à l induction utilise un champ magnétique pour générer de la chaleur Ceci veut dire que vous ne pouvez pas utiliser n importe quelle casserole Le chapitre casseroles pages 9 et 10 vous fournira de plus amples informations sur ce sujet Cuire sur une plaque de cuisson à...

Page 22: ...dépôts alimentaires ne peuvent pas brûler sûr La chaleur est activée dans la casserole en question La plaque en verre ne chauffe pas plus que la casserole En raison de cela le risque que vous vous brûliez à l appareil est vraiment minime Après avoir enlevé la casserole la zone de cuisson se refroidit très vite 4 3 2 1 La bobine 1 située dans la plaque de cuisson 2 active un champ magnétique 3 En p...

Page 23: ...one de cuisson ils risqueraient de devenir très chauds N utilisez pas l appareil en dessous de 5 C FR 7 sécurité les points qui méritent votre attention La cuisson à induction est extrêmement sûre Parce que la chaleur est générée dans la casserole et que la plaque de cuisson ne devient pas plus chaude que le contenu de la casserole il y a peu de danger de se brûler à l appareil Pourtant comme pour...

Page 24: ...onc magnétique Vous obtiendrez les meilleurs résultats en utilisant une casserole qui a les mêmes dimensions que la zone de cuisson Le fond de la casserole doit toujours être plus large que 12 cm approprié Vous pouvez contrôler si vos casseroles sont appropriées en utilisant un aimant Une casserole est appropriée lorsque le fond de la casserole est attiré par l aimant le fond est approprié pour la...

Page 25: ...action dans le fond de la casserole Vous pouvez réduire le bruit en question en sélectionnant une position plus basse cocottes minutes La cuisson à l induction est très appropriée pour cuire dans les cocottes minutes La zone de cuisson réagit très vite ce qui fait que la cocotte minute se trouve très vite sous pression Dès que vous arrêtez une zone de cuisson le processus de cuisson s arrête aussi...

Page 26: ...vice boost Sur la position boost la zone de cuisson émet une puissance de 2800 Watts au maximum sauf la zone de cuisson située à l arrière gauche Utilisez cette position si vous souhaitez porter rapidement à ébullition des mets powerboost La position est une position spéciale 3200 Watts pour réchauffer encore plus rapidement une substance liquide La puissance Powerboost fonctionne pendant 5 minute...

Page 27: ... du symbole clé s éteint sécurité enfants fonction mémoire L appareil est équipé d une fonction mémoire Cette fonction vous permet de programmer pour chaque zone de cuisson les positions de cuisson et les temps de cuisson correspondants mise en service play de la fonction mémoire 1 Appuyez brièvement sur la touche memory Le voyant situé à côté de PLAY s allume Les voyants situés à côté de REAR et ...

Page 28: ...0 W 4 heure 7 650 W 750 W 825 W 4 heure 8 950 W 1000 W 1100 W 4 heure 9 1400 W 1400 W 1400 W 3 heure 10 1800 W 1800 W 1800 W 2 heure 11 2050 W 2050 W 2400 W 1 heure 12 b 2200 W 2800 W 2800 W 1 heure Pb 3200 W 5 min FR 17 commande mise en service Programmation record de la touche mémoire 1 Appuyez sur la touche mémoire jusqu à ce que le voyant situé à côté de RECORD s allume Les voyants situés à cô...

Page 29: ...isquent de se présenter la plaque de cuisson veillera à une légère réduction de la puissance ajoutée ce n est pas visible aux positions de cuisson affichées dans les écrans si ceci reste sans effet la plaque de cuisson abaissera davantage la puissance l écran affichera tour à tour la position de cuisson sélectionnée et F7 Si la plaque de cuisson est ainsi suffisamment refroidie la puissance progra...

Page 30: ... Le voyant lumineux wok s allume Ceci vaut seulement pour la zone de cuisson située sur l avant droit Toutefois il est possible d utiliser d autres positions ou zones de cuisson Si vous avez par exemple un wok en acier en fonte avec un petit fond et si l espace le permet il est aussi possible d utiliser la zone de cuisson à l arrière gauche conseils de cuisson positions et puissances puissance Il ...

Page 31: ...entez la progressivement En cas d utilisation d un wok il est important que le fond soit plat et que le préchauffement du wok se produise en sélectionnant une position élevée conseils de cuisson tableaux de cuisson position position cuisson faire bouillir intermédiaire douce potage faire un bouillon 12 9 3 consommé clair 12 9 2 3 4 potage 10 viande morceaux de viande 9 rôti 11 9 3 5 bifteck 7 8 po...

Page 32: ...se en hors service du bip Le bip qui se fait entendre lors de la commande des touches peut être mis en hors service mise hors service du bip 1 Enclenchez la zone de cuisson située sur l avant gauche puis arrêtez la en appuyant deux fois sur la touche marche arrêt 2 Appuyez en même temps dans un délai de 3 secondes sur la touche de la zone de cuisson située à l avant gauche et sur la touche de la z...

Page 33: ...té connecté La plaque de cuisson ne fonctionne pas L écran affiche F99 Le ventilateur s enclenche spontanément La plaque de cuisson s arrête brusquement Le message F7 ou F8 s affiche Après arrêt de la zone les écrans de la zone continuent de clignoter L appareil n entre pas en service La mise à ébullition dure plus longtemps que prévu Code erreur F00 visualisés Codes erreur F00 F11 visualisés caus...

Page 34: ...inférieure de l appareil Avec un tiroir il faudra effectuer à l avant une fente d au moins 560 x 6 mm L espace entre le tiroir A et la plaque de cuisson doit être au moins de 10 mm Dans le cas d un panneau fixe aucune aération supplémentaire n est nécessaire Au dessus d un four de 60 cm de la marque ATAG Evidement 600 mm de hauteur minimum L aération se produit via la plinthe et l arrière du four ...

Page 35: ...u d un four d une autre marque e Sciez les l évent s pour que la surface totale des ouvertures soit au minimum de 100 cm2 A titre d exemple voir le dessin ci dessus avec deux ouvertures de 50 cm2 r Placez une plaque de protection entre le four et la plaque de cuisson La plaque doit mesurer au moins 10 mm de hauteur et résister à la chaleur 85 C L espace entre la face inférieure de la plaque de cui...

Page 36: ... fusible 16 A branchement sur le neutre N1 bleu branchement sur le neutre N2 brun branchements sur la phase L1 noir à côte de bleu branchements sur la phase L2 noir à côte de brun branchement à 2 phases 2 phase 1 neutre 2N a c 400 V L installation de votre domicile doit être munie d un fusible 16 A Attention ne pas utiliser la 3ème phase branchement sur le neutre N bleu et brun branchements sur la...

Page 37: ... le câble de connexion ceci afin d éviter des situations dangereuses Cet appareil répond aux directives CE FR 35 environnement que faire de l emballage et de l appareil L emballage de l appareil est recyclable Peuvent être utilisés le carton le feuil de polyéthylène PE le polystyrène sans CFC polystyrène PS Evacuez ces matériaux en bonne et due forme et conformément aux dispositions légales Les po...

Page 38: ...uf Auch für einen Nachbenutzer des Gerätes kann sie von Nutzen sein Viel Spaß beim Kochen Ihr Induktionskochfeld Vorwort Ihr Induktionskochfeld Beschreibung Bedienungsblende Bedienungsblende Kochzone Anzeigelampe Kindersicherung Ein aus Taste Kochzonenanzeige Kochstufen Kurzzeitwecker Taste Taste Memory Display Kochstufen Zeiteinstellung hintere Kochzone Aufnahme des Kochprogramms Ablauf des Kochp...

Page 39: ...ll für den Hobbykoch entworfen Das Kochen mit einem Induktionskochfeld unterscheidet sich vom Kochen auf herkömmliche Art Beim Induktionskochfeld wird ein Magnetfeld zur Wärmeerzeugung verwendet Deshalb ist auch nicht jeder Topf ohne weiteres verwendbar Näheres hierzu finden Sie im Kapitel Kochgeschirr auf den Seiten 9 und 10 Das Kochen mit einem Induktionskochfeld bietet eine Reihe von Vorteilen ...

Page 40: ... selbst können Speisereste nicht einbrennen Sicher Die Hitze wird im Topf selbst erzeugt Die Glasplatte wird nicht heißer als der Topf Die Wahrscheinlichkeit sich am Gerät zu verbrennen ist daher äußerst gering Nachdem ein Topf von der Kochzone genommen wurde kühlt sich diese schnell ab 4 3 2 1 Die Spule 1 im Kochfeld 2 erzeugt ein magnetisches Feld 3 Wenn ein Topf mit eisernem Boden 4 auf die Spu...

Page 41: ...önnten Das Gerät nicht unter 5 C benutzen DE 7 Sicherheit Worauf Sie achten müssen Induktionskochen ist äußerst sicher Da die Wärme im Topf erzeugt wird und die Glasplatte nicht heißer werden kann als der Topfinhalt ist es kaum möglich daß Sie sich an dem Gerät verbrennen Jedoch gibt es wie bei jedem Elektro gerät einige Dinge die Sie beachten sollten Wenn das Kochfeld zum ersten Mal benutzt wird ...

Page 42: ... Eisen enthalten d h er muss magnetisch sein Das beste Ergebnis wird mit einem Topf mit den gleichen Abmessungen wie die Kochzone erzielt Der Topfboden muss immer größer als 12 cm sein Geeignet Sie können selbst mit Hilfe eines Magneten überprüfen ob Ihr Kochgeschirr geeignet ist Ein Topf ist geeignet wenn der Topfboden vom Magneten angezogen wird der Topf für den Elektroherd geeignet ist Verwende...

Page 43: ... der Kochzone auf den Topfboden infolge der hohen Leistung Bei einer niedrigeren Stufe wird das ratternde Geräusch leiser Schnellkochtöpfe Schnellkochtöpfe eignen sich ausgesprochen gut für Induktionskochfelder Die Kochzone reagiert sehr schnell wodurch auch der Schnellkochtopf schnell seinen Druck erreicht Sofort nach dem Ausschalten einer Kochzone wird der Kochprozess angehalten Einführung Das I...

Page 44: ...n wird die Kochzeit eingestellt max 3 Std 59 Min Im Display wird die gewählte Minutenzahl angezeigt Boost Bei Stufe Boost beträgt die Leistung der Kochzone maximal 2800 Watt außer der Kochzone hinten links Benutzen Sie diese Stufe wenn Gerichte schnell zum Kochen gebracht werden sollen Powerboost Die Stufe ist eine Spezialstufe 3200 Watt um extra schnell eine große Menge eines flüssigen Gerichtes ...

Page 45: ...altet ist braucht sie auch nicht zum Ausschalten durch den Kurzzeitwecker gewählt zu werden Sie wird in obiger Tabelle übersprungen Wenn beide linke oder rechte Kochzonen eingeschaltet sind kann bei nochmaligem Druck der Taste zwischen der vorderen oder hinteren Kochzone gewählt werden Am Ende der Zubereitungszeit ertönt ein akustisches Signal Die Zone schaltet sich aus Schalten Sie am Ende der Ko...

Page 46: ... 450 W 5 Stunde 6 400 W 500 W 600 W 4 Stunde 7 650 W 750 W 825 W 4 Stunde 8 950 W 1000 W 1100 W 4 Stunde 9 1400 W 1400 W 1400 W 3 Stunde 10 1800 W 1800 W 1800 W 2 Stunde 11 2050 W 2050 W 2400 W 1 Stunde 12 b 2200 W 2800 W 2800 W 1 Stunde Pb 3200 W 5 min DE 17 Bedienung Einschalten Speicherfunktion programmieren record 1 Drücken Sie die Taste memory bis die Lampe neben RECORD aufleuchtet Die Lampen...

Page 47: ...g etwas reduzieren das ist bei den Kochstufen in den Displays nicht sichtbar wenn das nicht hilft schaltet das Kochfeld die Leistung weiter zurück Abwechselnd wird dann in den Displays die gewählte Kochstufe und F7 angezeigt Wenn das Kochfeld dadurch genug abgekühlt ist wird wieder auf die eingestellte Leistung zurückgeschaltet sollte das Kochfeld noch nicht genug abgekühlt sein dann schaltet das ...

Page 48: ...ch die Wok Vorzugsstufe Die Anzeigelampe Wok leuchtet auf Dies gilt nur für die Kochzone vorne rechts Andere Stufen oder Kochzonen können natürlich auch benutzt werden Wenn Sie zum Beispiel eine gusseiserne Wokpfanne mit einem kleinen Boden haben dann kann auch die Kochzone hinten links benutzt werden wenn der Platz dazu reicht Kochanleitungen Kochstufen und Leistungen Leistung Die Leistung ist zw...

Page 49: ...g allmählich Bei Verwendung eines Woks ist es wichtig dass der Boden flach ist und der Wok mit hoher Leistung gut vorgeheizt wird Kochanleitungen Kochtabellen zum Kochen Zwischen Fortkochen bringen stellung Suppe Bouillon ziehen 12 9 3 Klare Suppe 12 9 2 3 4 Gebundene Suppe 10 10 Fleisch Kleines Stück Fleisch 10 Großes Stück Fleisch 11 9 3 5 Beefsteak 7 8 Fisch braten 11 10 8 Kartoffeln kochen 12 ...

Page 50: ...erflecken Kalkreste Metallrückstände Akustisches Signal ein ausschalten Der Signalton der bei der Bedienung der Tasten ertönt kann ein bzw ausgeschaltet werden Signalton ausschalten 1 Schalten Sie die Kochzone links vorne ein und betätigen Sie anschließend zweimal die Ein Aus Taste 2 Drücken Sie innerhalb von 3 Sekunden gleichzeitig die Taste der Kochzone vorne links und die Taste der Zone hinten ...

Page 51: ...schlüsse Lassen Sie das Gerät erneut gemäß Anschlussplan vom Installateur anschließen Bedienungsfehler oder die Glaspatte reinigen Das Gebläse schaltet sich selbständig aus Lassen Sie das Gerät abkühlen Drücken Sie eine beliebige Taste Der Fehlercode verschwindet Erneut beginnen auf niedrigerer Stufe Geeigneten Topf verwenden siehe Seite 9 Halten Sie die Taste mit dem Schlüsselsymbol ein paar Seku...

Page 52: ...abschließen Bei einer Schublade ist vorne für einen Schlitz von mindestens 560 x 6 mm zu sorgen Der Abstand zwischen Schublade A und dem Kochfeld muss minimal 10 mm betragen Bei einer festen Blende sind keine zusätzlichen Anpassungen für die Belüftung erforderlich Über einem 60 cm Backofen der Marke ATAG Nischenmaß mindestens 600 mm hoch Die Belüftung erfolgt über die Sockelblende und an der Ofenr...

Page 53: ...90 cm oder einem Backofen einer anderen Marke e Sägen Sie die Belüftungsöffnung en aus so dass die Gesamtfläche der Öffnungen minimal 100 cm2 beträgt Siehe hierzu z B Abbildung mit 2 Öffnungen von je 50 cm2 r Zwischen dem Backofen und dem Kochfeld ist eine Schirmplatte vorzusehen Sie muss mindestens 10 mm hoch und hitzebeständig sein 85 C Der Abstand zwischen der Unterseite des Kochfeldes und der ...

Page 54: ...hre Hausanlage muß mit einer Sicherung von mindestens 16 A ausgestattet sein Nullanschluß N1 blau Nullanschluß N2 braun Phasenanschluß L1 schwarz neben blau Phasenanschluß L2 schwarz neben braun 2 Phasenanschluß 2 Phasen 1 Nulleiter 2N a c 400 V Ihre Hausanlage muß mit einer Sicherung von mindestens 16 A ausgestattet sein Achtung 3 Phase nicht benutzen Nullanschluß N blau und braun Phasenanschluß ...

Page 55: ...zt werden um gefährliche Situationen zu vermeiden Dieses Gerät entspricht den CE Richtlinien DE 35 Umweltaspekte Entsorgen von Verpackung und Gerät Die Verpackung des Gerätes ist wiederverwertbar Folgendes kann benutzt worden sein Pappe Polyethylenfolie PE FKW freies Polystyrol PS Hartschaum Diese Materialien sind umweltgerecht und nach den geltenden behördlichen Vorschriften zu entsorgen Die Behö...

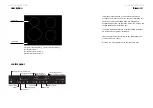
Page 56: ...efully as any subsequent user will also find it very useful We wish you much pleasure with your induction hob your induction hob foreword your induction hob description control panel control panel cooking zone indicator light for childproof lock on off button cooking zone indication cooking settings timer button memory button cooking setting display time setting rear cooking zone record cooking pr...

Page 57: ... will completely satisfy anyone who loves cooking Cooking on an induction hob is different from cooking on a traditional appliance Induction cooking makes use of a magnetic field to generate heat This means that you cannot use just any pan on it The pans section on pages 9 and 10 gives more information about this Cooking on an induction hob has a number of advantages It is easy because the hob rea...

Page 58: ...er than the pans themselves food spills cannot burn on safe The heat is generated in the pan itself The glass top does not get any warmer than the pan This means that the risk of you burning yourself on the appliance is very small Once a pan has been taken away the cooking zone cools down quickly 4 3 2 1 The coil 1 in the hob 2 generates a magnetic field 3 By placing a pan with an iron base 4 on t...

Page 59: ...e the appliance below 5 C GB 7 safety what you should pay attention to Induction cooking is extremely safe Because the heat is generated in the pan and the ceramic plate will not get hotter than the contents of the pan the chance that you will burn yourself on the hob is very slight However there are as with any other hob a number of matters of which you should be aware When you use the hob for th...

Page 60: ...ases of the pans have to contain iron and therefore be magnetic You achieve the best result by using a pan that has the same dimensions as the cooking zone The minimum pan base diameter is 12 cm suitable You can check for yourself whether your pans are suitable using a magnet A pan is suitable if the base of the pan is attracted by the magnet the pan is suitable for electric cooking You should onl...

Page 61: ...on cooking particularly if their bases are too thin With enamelled sheet steel pans the enamel may chip the enamel comes loose from the steel if you switch the hob on at a high setting when the pan is too dry the base of the pan may warp due for example to overheating or to the use of too high a power level Never use pans with a misshapen base A hollow or rounded base can interfere with the operat...

Page 62: ...n in the display GB 13 operation switching on boost In setting boost each cooking zone except for the rear left cooking zone has a maximum capacity of 2800 W Use this setting if you want to bring dishes to the boil quickly Powerboost The setting is a special setting 3200 W for heating up a large quantity of a liquid dish extra quickly The powerboost capacity is available for 5 minutes After 5 minu...

Page 63: ...lock as cooking timer 2 Clock switches the rear zone off after the selected time if the zone has been switched on 3 Clock switches the front zone off after the selected time if the zone has been switched on 4 Clock is switched off displays are dark and so on operation switching on memory function The appliance is fitted with a memory function This function enables the cooking settings and associat...

Page 64: ...rs 5 275 W 400 W 450 W 5 hours 6 400 W 500 W 600 W 4 hours 7 650 W 750 W 825 W 4 hours 8 950 W 1000 W 1100 W 4 hours 9 1400 W 1400 W 1400 W 3 hours 10 1800 W 1800 W 1800 W 2 hours 11 2050 W 2050 W 2400 W 1 hour 12 b 2200 W 2800 W 2800 W 1 hour Pb 3200 W 5 min GB 17 operation switching on programming memory function record 1 Press the memory button until the light next to RECORD comes on The lights...

Page 65: ...g reactions the hob will reduce the power supplied slightly this is not visible in the cooking settings in the displays if this does not help the hob will further reduce the power level and show the selected cooking setting and F7 alternately in the displays If this results in the hob cooling down sufficiently the power level that has been set is restored should the hob still not have cooled down ...

Page 66: ...ng Setting 11 is also the wok pre selected setting The wok indicator light comes on This only applies to the front right cooking zone Other settings or cooking zones however may also be used If for example you have a cast iron wok with a small base and if space permits the rear left cooking zone may also be used cooking information settings and power levels power The power can be set from 50 W to ...

Page 67: ...he setting slowly When using a wok it is important that the base is flat and that the wok is preheated thoroughly at a high power level cooking information cooking tables cooking bringing to intermediate through the boil setting setting soup making stock 12 9 3 clear soup 12 9 2 3 4 thick soup 10 meat small cut 9 large cut 11 9 3 5 steak 7 8 fish frying 11 10 8 potatoes boiling 12 8 6 frying raw p...

Page 68: ... the beep off on The beep which can be heard when the buttons are pressed can be switched off or on switching the beep off 1 Switch the front left cooking zone on and then off by pressing the on off button twice 2 Press simultaneously within 3 seconds the button of the front left cooking zone and the button of the rear left zone A beep confirms the setting that has just been selected The beep for ...

Page 69: ...al installation main fuse s connection check the installation Operation error or clean glass top The fan switches itself off Let the appliance cool down Press any button and the message disappears Start again on a lower setting Use a suitable pan see page 9 Keep the button with the key symbol pressed for a few seconds Use a pan with a diameter approximately the same as the cooking zone Clean the a...

Page 70: ...to be blocked by a drawer Where there is a drawer a gap of at least 560 x 6 mm should be made at the front The distance between drawer A and the hob should be a minimum of 10 mm No extra modifications for ventilation need be made where there is a fixed panel Above a 60 cm oven of the ATAG brand Recess height minimum 600 mm Ventilation is via plinth and rear of oven Where there is a oven a gap of a...

Page 71: ...oles of 50 cm2 r Fit a protective plate between the oven and the hob The plate should be at least 10 mm thick and heat resistant 85 C The space between the underside of the hob and the protective plate must be at least 50 mm t To protect the air flow fit a protective panel of the same material as the protective plate between the protective plate and the hob Ventilation is via the adjoining cupboar...

Page 72: ... fitted with a 16 A fuse negative connection N1 blue negative connection N2 brown positive connections L1 black next to blue positive connections L2 black next to brown 2 phase connection 2 positive 1 negative 2N a c 400 V The fuse box in your home must be fitted with a 16 A fuse N B Don t use 3rd phase negative connection N blue and brown positive connections L1 black positive connections L2 blac...

Page 73: ...imilarly qualified persons in order to prevent dangerous situations This appliance complies with the CE directives GB 35 environmental aspects disposal of packaging and appliance The appliance s packaging is recyclable The following may be used cardboard polyethylene film PE CFC free polystyrene PS rigid foam Dispose of these materials responsibly and in accordance with government regulations The ...

Reviews: