background image


www.AtairCanopies.com


                                                                                                           Dragon User Manual 


Page 31                                                                                                         Atair Canopies


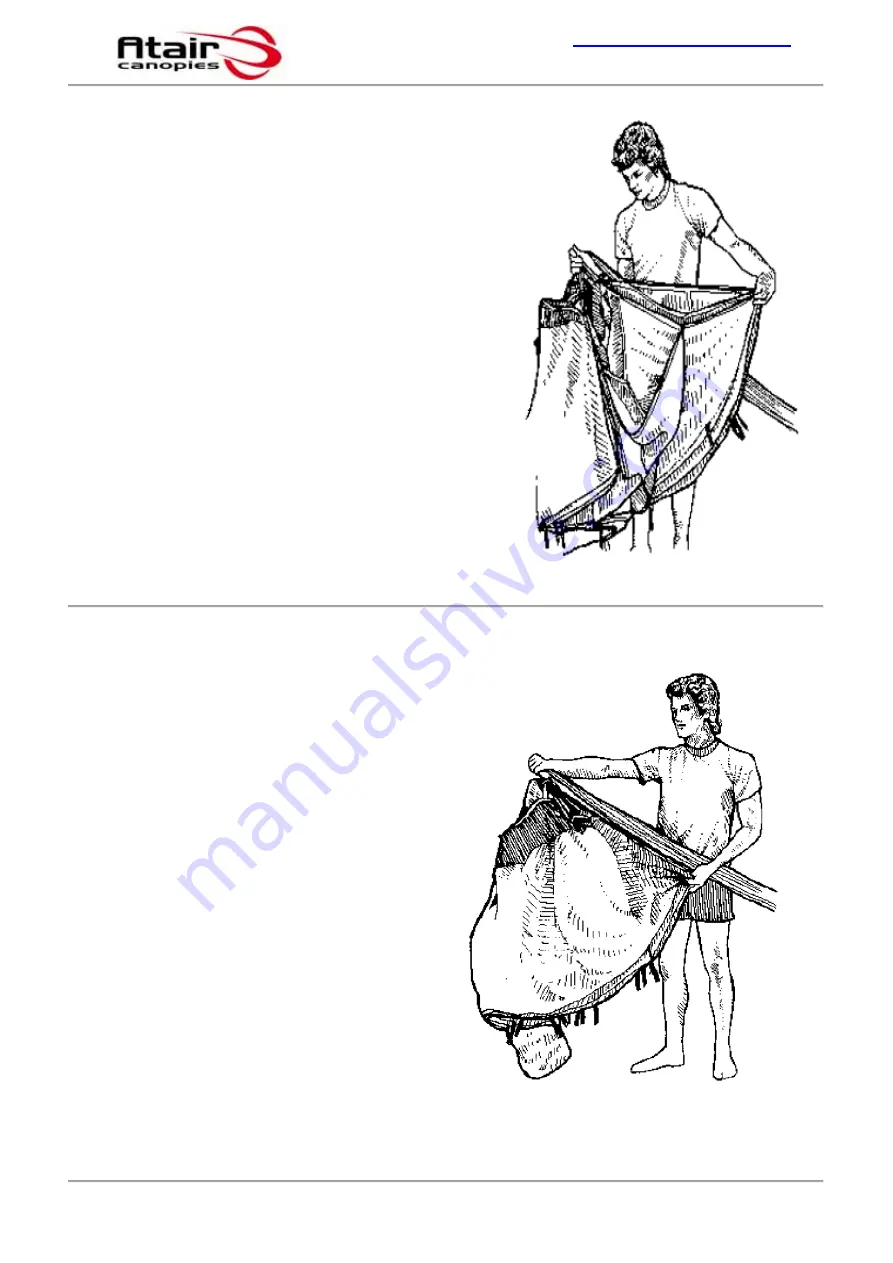
Step 12 

Then pick up the next, taking care not to miss 

any until all seven of them are in your hand. 


Step 13 & 14 

When you have the entire nose flaked, 
tuck it between your knees and hold it 
there. 


Summary of Contents for DRAGON

Page 1: ...www AtairCanopies com Dragon User Manual Page 1 Atair Canopies Canopy User Manual Version 1 0 December 2007 ...

Page 2: ...ck all skydiving equipment and replace any defective or worn component prior to use Review emergency procedures before each use of this and all skydiving equipment Check equipment warnings do not exceed equipment limitations Never violate the training and experience requirements for the specific equipment in use Because of the unavoidable dangers involved in the use of this and all parachute equip...

Page 3: ...opy 9 11 5 Atair 2 Stage Opening Technology 11 12 6 Setting Up Your Dragon Canopy 13 18 6 1 Toggle Assembly 17 7 Recommended drills for first flight 19 20 8 Packing your Dragon Canopy 21 43 8 1 Pre Packing 21 25 8 1 Packing the Dragon 25 43 9 High Performance Landings 44 45 10 Inspecting and Maintaining your Equipment 46 47 10 1 Cleaning your canopy 47 10 2 Storage 48 Appendix A Contact Info Appen...

Page 4: ...fully inspect your new canopy to completely familiarise yourself with its features and the quality workmanship Should you find anything that does not seem right or if you have any questions please don t hesitate to contact us Thank you again for selecting an Atair canopy With proper care it should last many years and hundreds of jumps Blue Skies Stane Krajnc The Atair Canopies Team CAUTION Please ...

Page 5: ...ken parachutes The damage may or may not be obvious To help minimize the risk of parachute failure and possible serious injury or death the entire parachute system should be thoroughly inspected at least every 120 days or 50 jumps whichever comes first It should be immediately inspected if at any time it is exposed to a degrading element unusually hard opening or at any time damage may be suspecte...

Page 6: ...time to read this manual completely regardless of your experience level You will learn about How to assemble pack and safely use your The great new features of your How to get the most out of your How to take care of your W A R N I N G ATAIR DRAGON CANOPY USER MANUAL This manual is not a course of instruction on how to make a parachute jump nor does it contain regulations that govern sport parachu...

Page 7: ...ver 12 000 rounds and several thousand skydiving and BASE canopies In the past Atair canopies have been sold through private labelling Alpha Ace Viper Impulse Space etc Now all of the Atair products are available directly from Atair Stane Krajnc the owner of Atair has been involved in air sports for the past 30 years In 1973 Stane designed constructed and flew his own hang glider He has now accumu...

Page 8: ...e Dragon can be flown conservatively and lands easily even on straight in approaches but it can also be flown aggressively and offers nice swoops High grade zero porosity fabric and top class manufacturing guarantee a canopy that performs excellently and will keep doing so for many hundreds of flights Mission of the Dragon Canopy A 7 cell Tapered Canopy that has Atair 2 stage deployment technology...

Page 9: ...t you match your canopy with your ability and weight Our canopies are built in several models that span a wide range of canopy surface area Any canopy s decent rate and forward speed increases as the weight it is carrying the so called suspended weight increases The canopy also becomes more responsive as forward speed increases It also reacts more Dragonly when it is stalled or turned Because of t...

Page 10: ...he wind If this figure is between 0 9 and 1 2 the canopy will turn fast and have high forward speed It will require skill to land well in many weather conditions or at high altitudes Be sure your skill level is up to the demands of this wing loading If the wing loading is greater than 1 2 lb sq ft you are exposing yourself to a dangerous situation Turn rates forward speed and rate of descent will ...

Page 11: ...ition for a few seconds The 3 center cells will decelerate you until the force pushing the slider down overcomes the wind pushing it up Once the slider has moved substantially down the end cells are free to catch air and inflate for stage 2 How to operate Once you deploy your pilot chute stage 1 will occur right away The canopy will not snivel The 3 center cells will inflate and you will feel ligh...

Page 12: ...arded max speed listed on their canopies It is important to note that this is not because they have redesigned or tested for higher speed safety of the jumper The listed number is only a statement as to a max speed for canopy survival not jumper survival A fully functional canopy does you little good if your neck broke on opening When skydiving there is always the risk of a premature deployment At...

Page 13: ...Components Canopy lines and connector links Collapsible Slider Attaching to risers checking continuity Figure1 Risers Left Rear Left Front Right Front Right Rear Remember that each connector link has to show continuity from the lines to the canopy Check each one for proper assembly Each of the links will have five cascading lines The two steering lines each cascade into four Once you have orientat...

Page 14: ...Page 14 Atair Canopies Figure 2 Correct attachment of front line sets to the front risers Figure 3 Correct attachment of the rear line set to the rear risers Figure 4 Correct attachment of the steering lines through guide rings on rear risers ...

Page 15: ...rCanopies com Dragon User Manual Page 15 Atair Canopies Figure 5 The complete line set attached Fig 6 The front line set should look like this once inflated only right side shown Front Line Set A B Front Riser ...

Page 16: ...er Manual Page 16 Atair Canopies Fig 7 The rear line set and steering line should look like this when the canopy is inflated only left rear line set and right steering line shown Rear Line Set C D Rear Riser Rear Riser Steering lines ...

Page 17: ...ar and not interfering with the other line sets Route the left steering line through the guide rings on the left rear riser and repeat the process for right steering line right riser Section 6 1 Toggle Assembly Figure 1 Pass the control line through the toggle s grommet from the Velcro side of the toggle Figure 1 Figure 2 Then thread the bottom of the toggle through the attachment loop pulling the...

Page 18: ...k one more time that the connector links are tightened A complete check of the canopy installation must be performed It may be done on the ground following an order fixed by the rigger and or by inflating the canopy on the ground for a sufficient time to check line continuity and all the elements ...

Page 19: ... your canopy so you won t drift too far away Discontinue your experimenting when you ve descended to 1000ft 300m above the ground Plan and execute a conservative landing approach into a large unobstructed landing area Steer flare and land the canopy as you were taught by your instructor Since you might misjudge your early landings be prepared to perform a Parachute Landing Fall PLF rather than a s...

Page 20: ...l put your canopy out of shape and it will progressively lose its performance We advise you to test the reactions of your new canopy at a minimum height of 2000ft 600m Landing Make sure that you are facing into wind lined up with the landing area at a minimum of 300ft 100m Keep your arms high so as to keep full speed then execute your flare at the moment selected The landing procedure is classical...

Page 21: ...In other words it is difficult to pack a ram air canopy so that it will not open We re not saying other packing methods won t work with your canopy But the method shown here will probably help your canopy open more consistently Before You Begin Where you pack your canopy is important Since sunlight irreversibly damages nylon parachutes an indoor or shady area is the best Packing in the sunlight is...

Page 22: ...ice it will become just as easy You can make the pack job considerably easier to by getting a bag that is slightly larger than your main container It is easier to squeeze a small amount of the air out after the canopy is in the bag Consult the container manufacturer about this The key to making the job easy is to pack fast and accurately Each fold or roll must be done quickly and correctly the fir...

Page 23: ... that came with the rig contains specific inspection procedures be sure to check the items listed below Reserve It must sealed and in date The ripcord pin s must be seated properly and not bent The cable must move freely in its housing The ripcord handle must be properly stowed in its pocket If the rig is equipped with an automatic activation device it must be installed and calibrated correctly Ha...

Page 24: ...straighten things out Canopy Be sure the canopy is not on backwards Inspect it for tears especially at the line and pilot chute attachment points You should periodically look inside the centre cell to inspect the bridle attachment point Deployment Bag Bridle and Pilot Chute The owner s manual for these items is the best source of inspection information Tears or failing seams in the main pilot chut...

Page 25: ...lines Perform a line check check that the line sets are straight no pack rotation brake lines clear and on top check the continuity above and below the slider Step 2 Un collapse the slider as shown below and cock your pilot chute In order to ensure full flight performance and to avoid disturbing noise the slider is collapsible Once your canopy is opened grab the tapes at the rear edge of the slide...

Page 26: ... Set the brakes for both steering lines as follows Step 1 Pull the cats eye through the guide ring Step 2 Insert the toggle through the cats eye Step 3 Secure the toggle onto the riser Step 4 Stow the slack brake line Step 5 Repeat the process for the other steering line ...

Page 27: ...ps and grasp the lines as shown Be sure there are no twists in the risers Start moving up the lines allowing them to slide between your fingers Push the slider ahead until you reach the bottom of the canopy Step 5 At this point it s possible to determine if your canopy and lines aren t straight If there are twists in the lines as shown this means your rig did a loop through your risers at some poi...

Page 28: ...ill result in a malfunction that will almost surely require a breakaway If you don t know how to fix this get qualified assistance Step 7 When you reach your canopy pull both hands apart as far as the slider will allow Shake the canopy a couple of times to settle everything If the canopy is clear there will be four distinct line groups going all the way to the stabilizers with no lines crossing ea...

Page 29: ...ve then the canopy was attached to the harness backwards Step 9 Now step to one side outside the lines and transfer the lines to one hand so that the left and right sides of the canopy hang at the same height It isn t necessary to keep the line groups separated by the fingers of your hand because you ve already determined the lines and canopy are straight Your canopy should look like the above ill...

Page 30: ...nopies com Dragon User Manual Page 30 Atair Canopies Step 10 Starting with the end cell nearest your legs flake the entire nose with one hand as shown Step 11 Pull each cell completely out and keep it in your hand ...

Page 31: ...n User Manual Page 31 Atair Canopies Step 12 Then pick up the next taking care not to miss any until all seven of them are in your hand Step 13 14 When you have the entire nose flaked tuck it between your knees and hold it there ...

Page 32: ...tep 15 Clear the stabilizers Since all the lines are bunched up in the middle pull each stabilizer panel out one by one until they form an irregular shape resembling the petals of a flower when viewed from the top Be sure none of the lines are wrapped around a slider stop on a stabilizer ...

Page 33: ...t of fabric between the A and B line attachment points it is easy to separate the two line groups Look down inside the first small S fold of the stabilizer and find the A extra bunch of fabric Now make the rest of the canopy into S folds like the stabilizers Put your hand in between the A and B lines on one side near where they pass their own grommet and pull them out to the side This will give th...

Page 34: ...ter you ve done the flaking the folds should look neat like this Step 19 Now find the D line group the group of lines nearest the tail Not the steering lines they are attached at the trailing edge Pull the left hand steering lines off to the left to get them out of the way Follow the stabilizer down to the D lines and pick up all the D lines on the left side On the Dragon there are four D lines on...

Page 35: ...ou are holding only the correct D lines you may let go of the steering lines Take the whole D line group on one side and pull it out gently Step 21 Fold the D line group in with one motion to put a real fold in the fabric between the C and D lines Do the same thing on the other side ...

Page 36: ...re the stabilizers and their slider stops are correctly lying outside the suspension lines as described in Step 15 Canopy damage is likely if a stabilizer or its slider stop lies under a line Step 23 Now organize the steering lines and flake the tail so the canopy looks like this Even though it might seem like you ve got a disorganized wad of canopy hanging down in front of you it should actually ...

Page 37: ... middle point to help you Raise the tail a couple inches above the slider and hold it in place with the same hand that is holding the lines CAUTION The steering lines must stay positioned at the back of the canopy as shown in Step 23 If the steering lines are moved to the nose of the canopy rather than being kept at the back a line over malfunction and canopy damage may result ...

Page 38: ...ur thumb and pull the excess material straight out You re pulling out the trailing edge of the canopy that extends from the inside steering line to the very center of the trailing edge Step 26 27 Wrap that part of the tail half way around the canopy Hold in place with your knees Fold the tail on the other side of the canopy the same way ...

Page 39: ... grip on the nose and tail Take both tail pieces in one hand and roll them together in to the middle so they completely encase the rest of the canopy Step 29 30 Place your free hand carefully under the bundle Swing it out slightly so that the lines stay taught and gently lay it on the floor ...

Page 40: ... that way as you stuff the canopy into the deployment bag Step 32 Dress the canopy to a width slightly wider than the width of the bag All the slider should stay inside the rolled tail The slider must not be allowed to move down the lines even the smallest downward movement the slider may increase opening shock and decrease reliability Pay extra attention to the position of the slider until the ba...

Page 41: ...Step 33 34 Move to the side of the canopy and put one hand right under the slider edge of the bundle Place the other hand on top a little farther up and make a small S fold as shown Be sure the slider stays up against the stabilizers don t let it move down the lines ...

Page 42: ...w put one hand under the top of the bundle and make an S fold in the opposite direction as shown The remaining material can be rolled under the fold Step 36 You should now have a neat compact bundle Try to make the folds so that the bundle is only a little wider than the bag ...

Page 43: ...ll the canopy into the corner of the bag This helps get the canopy firmly into the corners making a neater pack job The whole canopy should be in the bag before you remove your knee This helps completely fill the corners of the bag by keeping the middle compressed Follow your rig manufacturer s instructions for closing the bag stowing the lines placing it in the pack tray and closing container It ...

Page 44: ...landings until you are very familiar with your canopy and the landing area Even people who are very skilled occasionally hurt themselves You do not need any more speed than full glide when first learning Never try a swoop landing unless the weather conditions are suitable As you become more familiar with your canopy you may want to start using a faster approach If so increase your speed in small i...

Page 45: ...ulling the toggles down as much as necessary The altitude to begin the flare varies with each approach and how fast the flare is executed It takes practice to determine these factors This practice can be hazardous to your health When using front risers to gain extra speed never let go of the toggles for any reason Also be sure not to use front risers in gusty or turbulent winds Pulling on front ri...

Page 46: ... is correctly attached to the canopy Check the integrity of the canopy fabric and reinforcement tapes in the area where the bridle ring is attached 2 Top surface Spread the canopy out on its bottom surface and inspect the top surface Look for rips stains or failed seams Check the fabric strength by grabbing a handful of fabric in each hand and trying to tear the canopy with a moderate tug 3 Bottom...

Page 47: ...ted with a substance that will degrade the material Mild soap and water will remove most contaminants If necessary mineral spirits may be used for grease or oil Do not use any other cleaning products Do not use cleaning agents that contain bleach Avoid agitating the canopy especially when wet Agitation will cause reduction in canopy performance Zero Porosity Fabric The ZP fabric is not affected by...

Page 48: ...s will prevent the permanent and difficult to detect damage caused by ultraviolet light from sunlight and other sources Certain other agents notable acids will quickly cause great damage to your parachute Do not store your parachute where it might come into contact with such substances For example automobile trunks contaminated with battery acid have destroyed many parachutes ...

Page 49: ... Morpheus Technologies North America Distributors of the Troll Canopy 5107 Lantana Street Zephyrhills FL 33542 USA Phone 813 780 8961 Fax 813 788 7072 info baserigs com http www BaseRigs com European distributors for the Troll canopy Jean Noel Itzstein 22 chemin du Bois de la Bossenaz 74310 Les Houches France Phone Fax 33 0 450 54 36 18 Mobile 33 0 613 03 31 60 adrenalin adrenalinbase com http www...

Page 50: ...AtairCanopies com Dragon User Manual Page 50 Atair Canopies Appendix B Recommended reading The safety articles on canopy piloting on Dropzone com http www dropzone com safety Canopy_Control index shtml End ...

Reviews: