background image

FIGURE 1

1

2

FIGURE 2

FIGURE 3

1

2

3

4

1

2

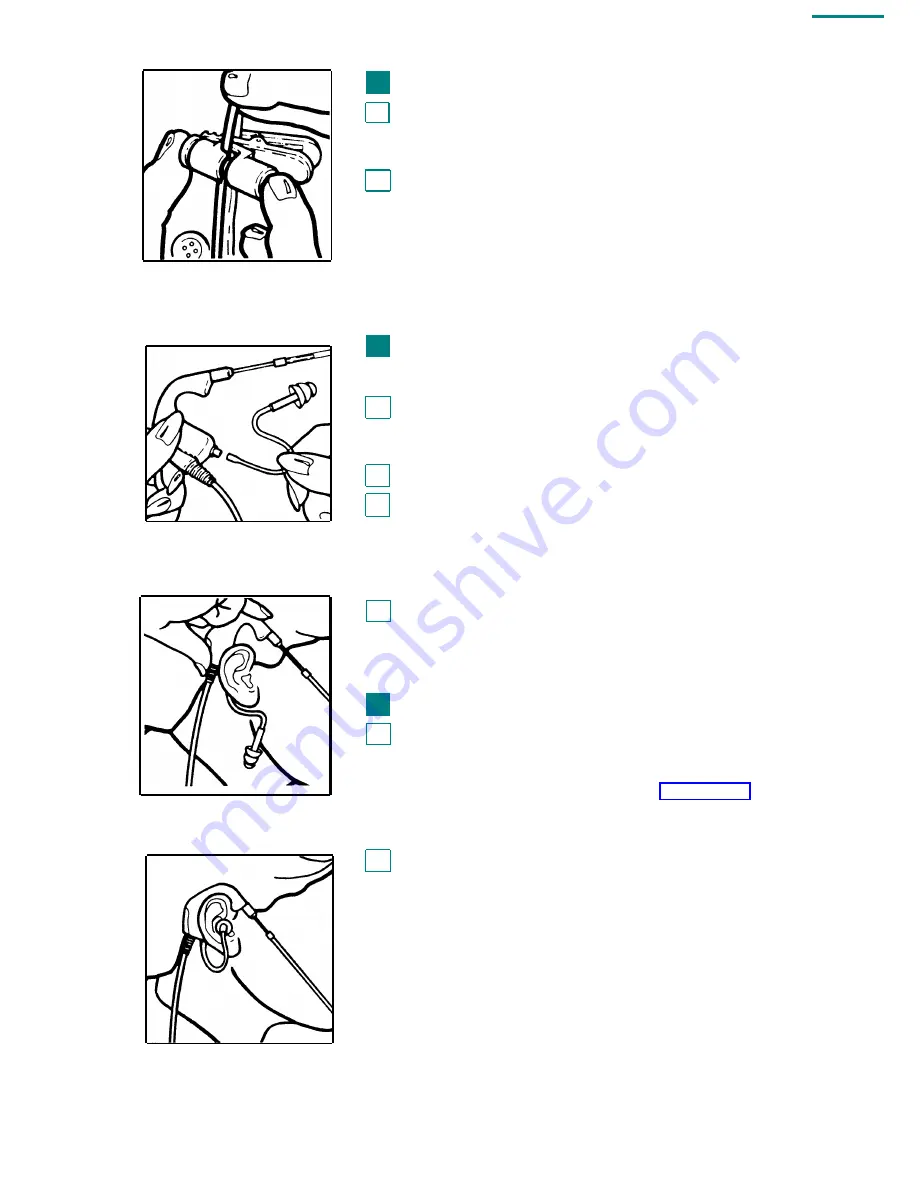
Adjusting the Clothing Clip

An AT&T headset will best serve you when it  is properly
adjusted for comfort and clarity. Use Clothing Clip to keep
the headset properly seated, free from the weight of the cord.

Attach the Clothing Clip to your clothing at a comfortable

level. To adjust the clip position, push the barrel end in and
slide the cord through to provide sufficient slack so that the
headset is not disturbed by head movements. (Refer to

FIGURE 1)

Positioning StarSet

®

StarSet has been designed to fit comfortably on either ear.

Attach the Versatip™ Eartip to the StarSet capsule by gently
working the clear plastic tube onto the small metal nib
(located near the capsule cord). (Refer to 

F I G U R E


2 )

Extend the voice tube approximately one inch.

Hold the StarSet capsule above your ear and against your
head, with the voice tube over your cheek and the cord behind
your ear. Then, slide the capsule downward behind the top
portion of your ear until positioned as shown. (Refer to

FIGURE 3)

Gently rotate StarSet back and forth until it rests securely and
comfortably on your ear. (Refer to 

F I G U R E


4 )

Fitting the Versatip

E a r t i p

To insert the Versatip Eartip, grasp the tube and gently insert
into the ear canal until the first third is comfortably seated.
The first third of a properly seated Versatip should fit easily
into the outer ear canal. (Refer to 

F I G U R E


5 )

 Fitting may be

made easier if you pull your ear upward and outward during
f i t t i n g .

To remove, slowly twist the Versatip Eartip while gently
pulling it outward.

WARNING:  DO NOT insert the Versatip so far into the
ear canal that it becomes difficult to remove. This
may cause discomfort over time and will hinder clear
reception.

If you have a history of ear infections, allergies to
plastics, or you notice any irritation after using the
Versatip, you should avoid this product.

2

FIGURE 4

Summary of Contents for StarSet CIB 3143

Page 1: ...AT T Customer Instruction Booklet StarSet Headset CIB 3143 STARSET HEADSET ...

Page 2: ... and conditions in your agreement with AT T apply For warranty and non warranty service of this product Plantronics Inc acts solely as a service agent for AT T and any claims are to be made solely with Plantronics SERVICE INFORMATION Should you encounter difficulties or be uncertain about proper installation please follow the procedures below Replace the faulty headset with a working headset If th...

Page 3: ...e contains information on the positioning and usage of the AT T StarSet Headset Refer to the amplifier user s guide for information on the installation and usage of the amplifier StarSet CAPSULE VERSATIP CLOTHING CLIP VOICE TUBE QUICK DISCONNECT 1 ...

Page 4: ...your head with the voice tube over your cheek and the cord behind your ear Then slide the capsule downward behind the top portion of your ear until positioned as shown Refer to FIGURE 3 Gently rotate StarSet back and forth until it rests securely and comfortably on your ear Refer to FIGURE 4 Fitting the Versatip Eartip To insert the Versatip Eartip grasp the tube and gently insert into the ear can...

Page 5: ...desire a more secure fit use the Eyeglass Clip Attach the clip to the side that you wear your headset A For plastic frames slip the clip onto the temple of your glasses with the grips for the headset facing away from your head Refer to FIGURE 7A B For metal or wire frames pull back the tab on top of the clip Then slip the clip onto the temple of your glasses with the grips for the headset facing a...

Page 6: ...andset For handset use depress the ON OFF button again so that the color indicator does not appear Pick up your handset as you would normally FIGURE 10 Setting the Volume Control To set the volume control to the hearing level most comfort able for you start with the wheel turned to number 1 the lowest level To increase the volume rotate the wheel to a higher number Refer to FIGURE 1 0 or 11 as app...

Reviews: