background image

VARENA


A73023342 


7


VARENA


DIGITAL ELECTRIC RADIATORS


1.  INTRODUCTION 

Dear customer, 

Thank you for choosing ATC VARENA electric radiators, with their modern design, state-of-the-
art technology, great reliability and great quality construction. 

ATC  VARENA  electric  radiators  and  all  their  materials  and  components  have  passed  strict 
controls to ensure their quality. 

Before installing and operating your heater, please read these instructions carefully as they will 
ensure the correct working order of the appliance features and ease of use. Keep them in a safe 
place for future reference. 
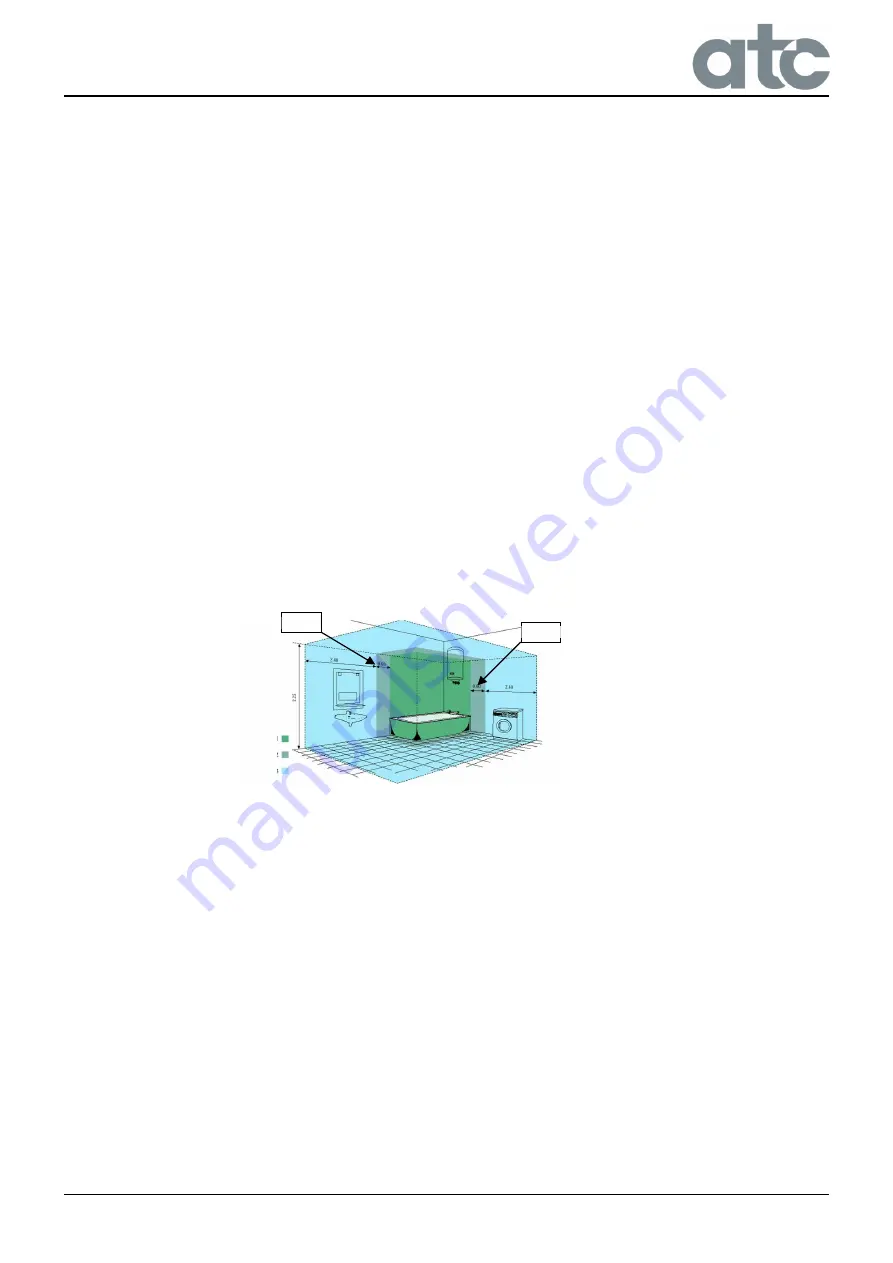
2.  LOCATION 

The radiator should be fitted in the part of the room where the client wants it, depending on the 
space available, although preferably on or near outside walls, leaving enough space around the 
heater for correct hot air circulation and at least 100 mm, from curtains and furniture, etc. The 
distance should be at least 100 mm from the floor. 

In bathrooms, the electric heater should be located outside of the protected area (Zone 1 & 2), as 
indicated by Figure 1. Keep the fitting away from bath and showers. 


Figure 1: Areas of the bathroom 

3.  ELECTRICAL CONNECTION 

The Varena radiator must be connected to the mains supply (230 V ~ 50 Hz). 
The maximum permissible impedance of the mains at the connection point will be: 

Z

max

 = 0.18 Ω.


It is required to install a switched spur for each heater. In addition, the following warnings must 
be considered: 


The electric radiator should not be located underneath a light switch where you need 
to stretch over the heater to reach or operate the switch. 


The  electric  line  should  be  protected  with  a  high  sensitivity  differential  device 
(RCBO). 


It is necessary to de-energise or disconnect the power from the fixed wiring before 
installation.


0,6 m 

0,6 m 

ZONE 1 

ZONE 2 

ZONE 3 

Summary of Contents for VARENA 1000

Page 1: ...VARENA Digital Electric Radiators Daily and weekly programming INSTRUCTIONS FOR USE INSTALLATION A73023342 2021 05 ...

Page 2: ......

Page 3: ...erential device RCBO The radiator must be installed so that around it there is sufficient space for proper circulation of hot air with a minimum distance of 100 mm to curtains furniture etc Anyone who is in the bathtub or shower should not have access to the switches and other power operation devices Always keep at least 0 6 m between the radiator and the bath or shower UK Outside zone 2 Ireland O...

Page 4: ... appliance unless they are constantly supervised Children between age 3 and younger than 8 years old should only turn on off the device whenever it has been placed or installed at its normal operating position provided they are supervised or have received instructions concerning using the appliance safely and understand the risks associated with the device Children from 3 years and under 8 years o...

Page 5: ...ecycled at the end of its working life its treatment and its environment friendly dismantling help prevent any negative effects on the environment and on public health and favour the recycling of the product components For more detailed information on the collection systems available contact the local collection facilities or the distributor where you made your purchase Packing List 1x Varena Radi...

Page 6: ... 5 2 Turning the radiator on and off 11 5 3 Operating modes 11 5 4 Temperature display 13 5 5 Edit day time and program 13 5 6 Manual mode 14 5 7 Open Window function 15 5 8 Adaptive Start control function 15 5 9 Keyboard lock 16 6 ERROR NOTIFICATIONS 16 7 MAINTENANCE AND CARE 16 8 CHARACTERISTICS TABLE 17 9 ECODESIGN TABLE 17 10 WARRANTY 20 ...

Page 7: ...r for correct hot air circulation and at least 100 mm from curtains and furniture etc The distance should be at least 100 mm from the floor In bathrooms the electric heater should be located outside of the protected area Zone 1 2 as indicated by Figure 1 Keep the fitting away from bath and showers Figure 1 Areas of the bathroom 3 ELECTRICAL CONNECTION The Varena radiator must be connected to the m...

Page 8: ...on a circuit protected by an RCBO 4 MOUNTING The electric radiator should be fixed to the wall by the adjustable brackets supplied with the radiator using the cardboard template printed on the box If for any reason cardboard template is missing you can follow the instructions below 1 Place the two metal brackets provided on the floor and against the wall as shown in image 1 below Ensure the MB sta...

Page 9: ...The grey plugs supplied require an 8 mm hole 6 Insert the grey plugs into the pre drilled holes Screw the metal brackets to the wall with the screws provided 7 Attach the plastic pieces to the metal brackets 8 Hang the heater as shown 3 4 STOP 5 2 ...

Page 10: ...y switches the radiator between Standby and operational Exit Open Window mode The Standby key has a raised bump to easily identify it by touch Temperature day hour Parameters selection Keyboard lock Edit day time and program Selection of operating mode Confirm day time Program parameters Copy the program Manual mode 1 Push the plastic bracket away from the metal bracket 2 Lift the plastic bracket ...

Page 11: ... it will be necessary to set the day and time again If the disconnection is for less than 4 days the time and day of the week will be saved Daily and weekly programs are never lost even when disconnected from power for long periods 5 3 Operating modes By repeatedly pressing the mode key the radiator is changed from one mode to another To identify the mode a mode screen is displayed for 2 seconds C...

Page 12: ...ne hour intervals Each one hour interval can be programmed as comfort eco or heating off The bar showing the current time flashes to indicate to the user what the current set point is Economy mode is used for short absence periods to prevent the temperature from falling excessively The configuration screen is at the end of the modes sequence before entering the initial comfort mode You can configu...

Page 13: ... the radiator now asks for the hour of the day by flashing the hour digits To change the hour use the and keys To confirm and set the hour press the OK key When the minute digits are flashing change to the appropriate time with the and keys and confirm by pressing the OK key The radiator will now edit the program Note If the radiator had simply lost the time and day it does not enter the program b...

Page 14: ... For example if you arrive when the heater is normally unheated you can heat the space to a comfortable temperature and then have the heater return to its normal mode without changing the program To enter Manual mode press and hold the OK key for 2 5 seconds then using the and keys enter the amount of time you want to force the radiator to heat or not The editing is circular from half an hour to 3...

Page 15: ...o keep it disabled This function is considered by Directive 2009 125 EC regulations and will give the unit more efficiency during operation 5 8 Adaptive Start control function When the Adaptive Start control function is enabled in the configuration menu the radiator automatically starts heating prior to the programmed time a maximum of 2 hours before to ensure that the next on set point is at the ...

Page 16: ...NTC temperature probe e g disconnected short circuited etc ERROR3 Failure of the EPROM memory When recovering from an error the radiator will always go to Standby mode the radiator will not retain any previous mode or state If the radiator goes to Standby without any specific reason it may have recovered from an error 7 MAINTENANCE AND CARE The Varena radiators require very little maintenance The ...

Page 17: ...1 2 kW 1 5 kW 1 8 kW Maximum continuous heat output Pmax c 0 5 kW 0 75 kW 1 0 kW 1 2 kW 1 5 kW 1 8 kW Auxiliary electricity consumption At nominal heat output elmax 0 000 kW 0 000 kW 0 000 kW 0 000 kW 0 000 kW 0 000 kW At minimum heat output elmin 0 000 kW 0 000 kW 0 000 kW 0 000 kW 0 000 kW 0 000 kW In standby mode elSB 0 0013 kW Type of heat output room temperature control Electronic room temper...

Page 18: ..._______________ _________________________________________________________________ _________________________________________________________________ _________________________________________________________________ _________________________________________________________________ _________________________________________________________________ ______________________________________________________...

Page 19: ...A73023342 19 ...

Page 20: ...aintenance operations described above in the instructions provided with the equipment have been carried out The consumer must inform ATC of the lack of conformity of the goods in a period of less than two months of them learning of it The warranty does not cover incidents caused by The power supply of insufficient capacity or equipment with generators or any other system that is not a stable power...

Reviews: