WARNING:
Always check for damaged, frayed or loose hoses and
Įƫ
ngs. Have any defec
Ɵ
ve or damaged parts
replaced immediately by qu
ĂůŝĮ
ed personnel.
WARNING:
Do not carry the tool by the hose. Protect the hose from sharp objects and heat.
WARNING:
Always use air hose and couplings with a minimum working pressure ra
Ɵ
ng of at least 1-1/2
Ɵ
mes
the maximum working pressure ra
Ɵ
ng of the tool.
WARNING:
Do not depress the tool trigger/lever when connec
Ɵ
ng the air supply hose.
WARNING:
Do not lock, tape, wire, or otherwise disable the “ON/OFF” valve in the “ON” posi
Ɵ
on. The trigger
must always be free to return to the “OFF” posi
Ɵ
on when released.
WARNING:
When the tool is not in use, shut o
ī
the air supply and press the trigger/lever to drain the air supply
line. If the tool is not to be used for a period of
Ɵ
me,
Į
rst lubricate, disconnect from the air supply and store in a clean
and dry loca
Ɵ
on at average room temperature.
NOTE:
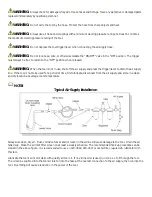
Typical Air Supply Installa
Ɵon
Always use clean, dry air. Dust, corrosive fumes and/or water in the airline will cause damage to the tool. Drain the air
tank daily. Clean the air inlet
Į
lter screen on at least a weekly schedule. The recommended hook up procedure can be
viewed in the above
Į
gure.
/ƚŝƐƌĞĐŽŵŵĞŶĚĞĚƚŽƵƐĞĂŶdͲϳϴϲϵ͕dͲϳϴϳϮŽƌƐŝŵŝůĂƌĮůƚĞƌ͕ƌĞŐƵůĂƚŽƌ
& lubricator with
this tool.
Lubricate the tool’s air motor daily with quality air tool oil. If no airline oiler is used, run 1/2 oz. of oil through the tool.
The oil can be squirted into the tool air inlet or into the hose at the nearest conne
ĐƟ
on to the air supply, then run into the
tool. Over
Į
lling will cause a redu
ĐƟ
on in the power of the tool.


