Chapter 7. Device Management
91
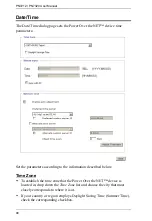
Manual Input
Use this section to specify the Power Over the NET™ device’s date and time
manually.
Click the calendar icon and click the calendar entry for the date.
Key the time into the Time field, using the HH:MM:SS (hours, minutes,
seconds) format.
Note:
This section is only enabled when
auto adjustment
(in the
Network Time
section) is disabled (the checkbox is unchecked).
As an alternative to specifying the date and time by entering them into the date
and time fields, you can click to put a check in the
Sync with PC
checkbox, in
which case the Power Over the NET™ device will take its date and time
settings from the locally connected PC.
Network Time
To have the time automatically synchronized to a network time server, do the
following:
1. Check the
Enable auto adjustment
checkbox.
2. Drop down the time server list to select your preferred time server
– or –
Check the
Preferred custom server IP
checkbox, and key in the IP address
of the time server of your choice.
3. If you want to configure an alternate time server, check the
Alternate time
server
checkbox, and repeat step 2 for the alternate time server entries.
4. Key in your choice for the number of days between synchronization
procedures.
Finishing Up
When you have finished making your settings on this page, click
Save
.
After you have saved your changes, if you want to synchronize immediately,
click
Adjust Time Now
.
Summary of Contents for Altusen PN7212
Page 1: ...Power Over the NET PN7212 PN7320 Power Distribution Unit User Manual www aten com ...
Page 18: ...PN7212 PN7320 User Manual 6 Components Front View PN7320 NEMA PN7320 IEC 1 2 1 3 3 4 6 5 ...
Page 28: ...PN7212 PN7320 User Manual 16 ...
Page 38: ...PN7212 PN7320 User Manual 26 This Page Intentionally Left Blank ...
Page 60: ...PN7212 PN7320 User Manual 48 This Page Intentionally Left Blank ...
Page 104: ...PN7212 PN7320 User Manual 92 This Page Intentionally Left Blank ...
Page 110: ...PN7212 PN7320 User Manual 98 This Page Intentionally Left Blank ...
Page 116: ...PN7212 PN7320 User Manual 104 This Page Intentionally Left Blank ...


