background image

CL1000M / CL1000N User Manual

14

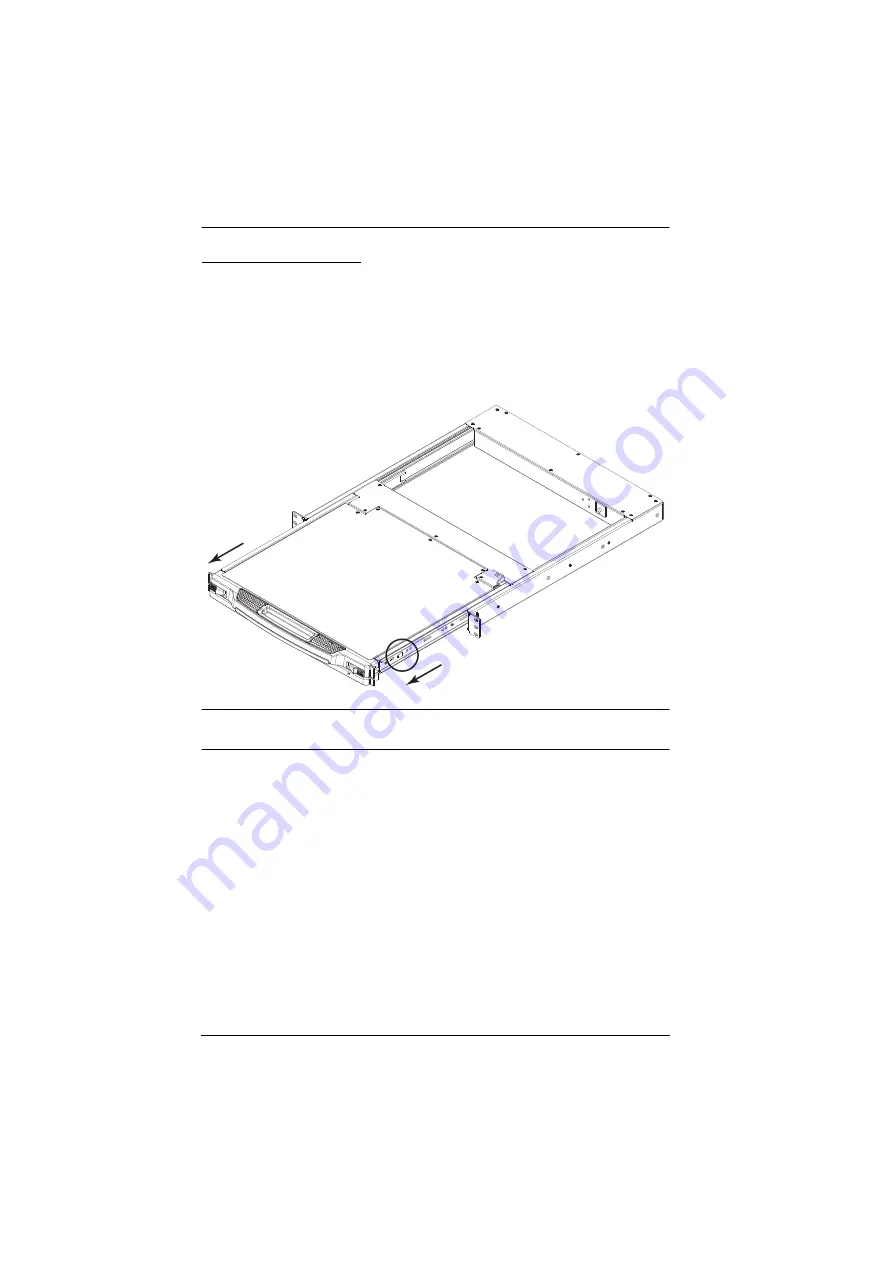
Closing the Console

To slide the CL1000M module back in, close the cover and do the following:

1. Pull the safety catches on the unit's side rails toward you and push the 

module in until it stops.

2. Release the catches. Pull the module slightly toward you, then push it all 

the way in.

Note:

The reason for the two step procedure is to minimize the chances of you 
pinching your fingers when sliding the module in.

Summary of Contents for CL1000M

Page 1: ...CL1000M CL1000N Single Rail LCD Console User Manual...

Page 2: ...on of this equipment in a residential area is likely to cause harmful interference in which case the user will be required to correct the interference at his own expense The device complies with Part...

Page 3: ...LCD Console User Manual iii Industry Canada Statement This Class A digital apparatus complies with Canadian ICES 003 RoHS This product is RoHS compliant...

Page 4: ...ve defective following their purchase the buyer and not the manufacturer its distributor or its dealer assumes the entire cost of all necessary servicing repair and any incidental or consequential dam...

Page 5: ...reens with dead pixels Class 1 is the best Class 4 is the worst Almost all manufacturers use Class 2 to establish their warranties which allows a certain amount of dead pixels to exist before they wil...

Page 6: ...blem please contact your dealer CL1000M The CL1000M package consists of 1 CL1000M 17 LCD Console with Standard Rack Mount Kit 1 custom KVM cable set 1 power cord 1 user instructions CL1000N The CL1000...

Page 7: ...3 Switches and Computers 3 Cables 3 Operating Systems 3 Components 4 CL1000M 4 CL1000M Rear View 5 CL1000N 6 CL1000N Rear View 7 Chapter 2 Hardware Setup Before you Begin 9 CL1000M CL1000N Standard Ra...

Page 8: ...Port Selection 20 Appendix Safety Instructions 21 General 21 Rack Mount 23 Consignes de s curit 24 G n ral 24 Montage sur b ti 27 Technical Support 28 International 28 North America 28 Specifications...

Page 9: ...ep by step instructions for setting up the LCD Console and explains some basic operation procedures Chapter 3 Operation explains the fundamental concepts involved in operating the LCD Console Appendix...

Page 10: ...If keys need to be chorded they appear together in the same bracket with a plus sign between them Ctrl Alt 1 Numbered lists represent procedures with sequential steps Bullet lists provide information...

Page 11: ...console module and the back end KVM switch module The CL1000M CL1000N is similar to the front end console module found on the CL1008 and CL1016 Its purpose is to serve as the front end sliding consol...

Page 12: ...h operation in a 1U high system rack LCD module rotates up to 120 degrees for a more comfortable viewing angle Standard rack mount kit included optional Easy Rack Mounting single person installation r...

Page 13: ...esolution Cables For optimum signal integrity and to simplify the layout we strongly recommend that you use the high quality custom cable set provided with this package For other cable sets with varyi...

Page 14: ...ee page 15 for details on sliding the console in and out 3 LCD display After sliding the KVM module out flip up the cover to access the LCD monitor 4 LCD controls The LCD On Off switch is located here...

Page 15: ...tion light Press the Exit Light pushbutton for two seconds to turn the LED light on or off Default On No Component Description 1 power socket This is a standard 3 prong AC power socket The power cord...

Page 16: ...or details on sliding the console in and out 3 LCD display After sliding the KVM module out flip up the cover to access the 19 LCD monitor 4 LCD controls The LCD On Off switch is located here as well...

Page 17: ...ndicates that only the monitor is off not the attached KVM switch 11 LED illumination light Press the Exit Light pushbutton for two seconds to turn the LED light on or off Default On No Component Desc...

Page 18: ...CL1000M CL1000N User Manual 8 This Page Intentionally Left Blank...

Page 19: ...ase review it before proceeding 2 Make sure that power to all the devices you will be connecting up have been turned off You must unplug the power cords of any computers with keyboard power on functio...

Page 20: ...1000M CL1000N using the standard rack mount kit follow the steps below 1 Have one person position the unit in the rack and hold it steady Have the second person screw the front brackets to the rack 2...

Page 21: ...isted in the table below Note For more information visit the product web page and refer to the Compatible Accessories For detailed installation steps visit the product web page and refer to the Option...

Page 22: ...keyboard monitor and mouse connectors of the KVM cable provided with this unit into the 5 in 1 console cable that connects to the console section of the KVM switch Note Supports PS 2 or USB KVM switc...

Page 23: ...the console slide the console module out and raise the cover Note As a safety precaution to keep the console from accidentally sliding out the console is locked into the In position Before you can pu...

Page 24: ...owing 1 Pull the safety catches on the unit s side rails toward you and push the module in until it stops 2 Release the catches Pull the module slightly toward you then push it all the way in Note The...

Page 25: ...aution to keep the console from accidentally sliding out the console is locked into the In position Before you can pull the console module out you must release it by pushing the catches on the unit s...

Page 26: ...CL1000M CL1000N User Manual 16 Closing the Console To slide the CL1000N module back in do the following 1 Close the cover 2 Push the module all the way in...

Page 27: ...the keyboard module as you work Wrong DO NOT lean your body weight on the keyboard module DO NOT place heavy objects on the keyboard module The maximum load bearing capacity of the keyboard module is...

Page 28: ...djustment it decreases the value EXIT When you have not entered the LCD OSD Menu function pressing this button performs an auto adjustment An auto adjustment automatically configures all the settings...

Page 29: ...e display area on the LCD panel vertically moves the display area up or down Color Temperature Adjusts the color quality of the display You can adjust the warmth value color balance etc The Adjust Col...

Page 30: ...00N User Manual 20 Port ID Numbering Port Selection Port ID numbering and Port Selection follow the method used by the KVM switch connected to the CL1000M CL1000N Consult your KVM switch s User Manual...

Page 31: ...n openings Likewise the device should not be placed in a built in enclosure unless adequate ventilation has been provided Never spill liquid of any kind on the device Unplug the device from the wall o...

Page 32: ...of fire or electrical shock Do not attempt to service the device yourself Refer all servicing to qualified service personnel If the following conditions occur unplug the device from the wall outlet a...

Page 33: ...ers After a device is inserted into the rack carefully extend the rail into a locking position and then slide the device into the rack Do not overload the AC supply branch circuit that provides power...

Page 34: ...res de ventilation se trouveraient bloqu es De m me l unit ne doit pas tre plac e dans un meuble ferm moins qu une ventilation adapt e ne soit assur e Ne renversez jamais de liquides de quelque sorte...

Page 35: ...syst me et les c bles d alimentation avec pr caution veillez ce que rien ne repose sur aucun des c bles Lors du branchement ou du d branchement des blocs d alimentation permettant la connexion chaud v...

Page 36: ...onctionne pas normalement bien que les instructions d utilisation soient respect es N utilisez que les commandes qui sont abord es dans le mode d emploi Le r glage incorrect d autres commandes peut tr...

Page 37: ...les rails Une fois qu une unit a t ins r e dans le b ti tendez avec pr caution le rail dans une position de verrouillage puis faites glisser l unit dans le b ti Ne surchargez pas le circuit de l alime...

Page 38: ...uct model number serial number and date of purchase Your computer configuration including operating system revision level expansion cards and software Any error messages displayed at the time the erro...

Page 39: ...Lock Green 1 x Caps Lock Green 1 x Scroll Lock Green 1 x Scroll Lock Green 1 x LED Illumination Light 1 x LED Illumination Light Panel Spec LCD Module 17 TFT LCD 19 TFT LCD Resolution 1280 x 1024 75...

Page 40: ...50 o C Storage Temp 20 60 o C 20 60 o C Humidity 0 80 RH Non condensing 0 80 RH Non condensing Physical Properties Housing Metal Plastic Metal Plastic Rail Type Single Rail Single Rail Weight 12 02 k...

Page 41: ...nnectors This product uses SPHD connectors for its KVM and or Console ports We have specifically modified the shape of these connectors so that only KVM cables that we have designed to work with this...

Page 42: ...have the option to 1 repair said product with new or repaired components or 2 replace the entire product with an identical product or with a similar product which fulfills the same function as the def...

Reviews: