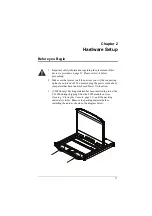
background image

17

Chapter 2

Hardware Setup

Before you Begin

1. Important safety information regarding the placement of this 

device is provided on page 51. Please review it before 
proceeding.

2. Make sure that power to all the devices you will be connecting 

up has been turned off. You must unplug the power cords of any 
computers that have the Keyboard Power On function.

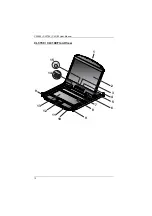
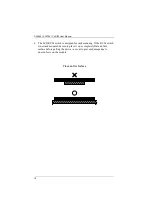
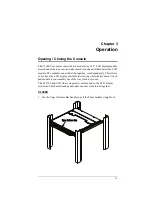
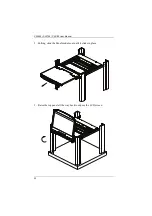
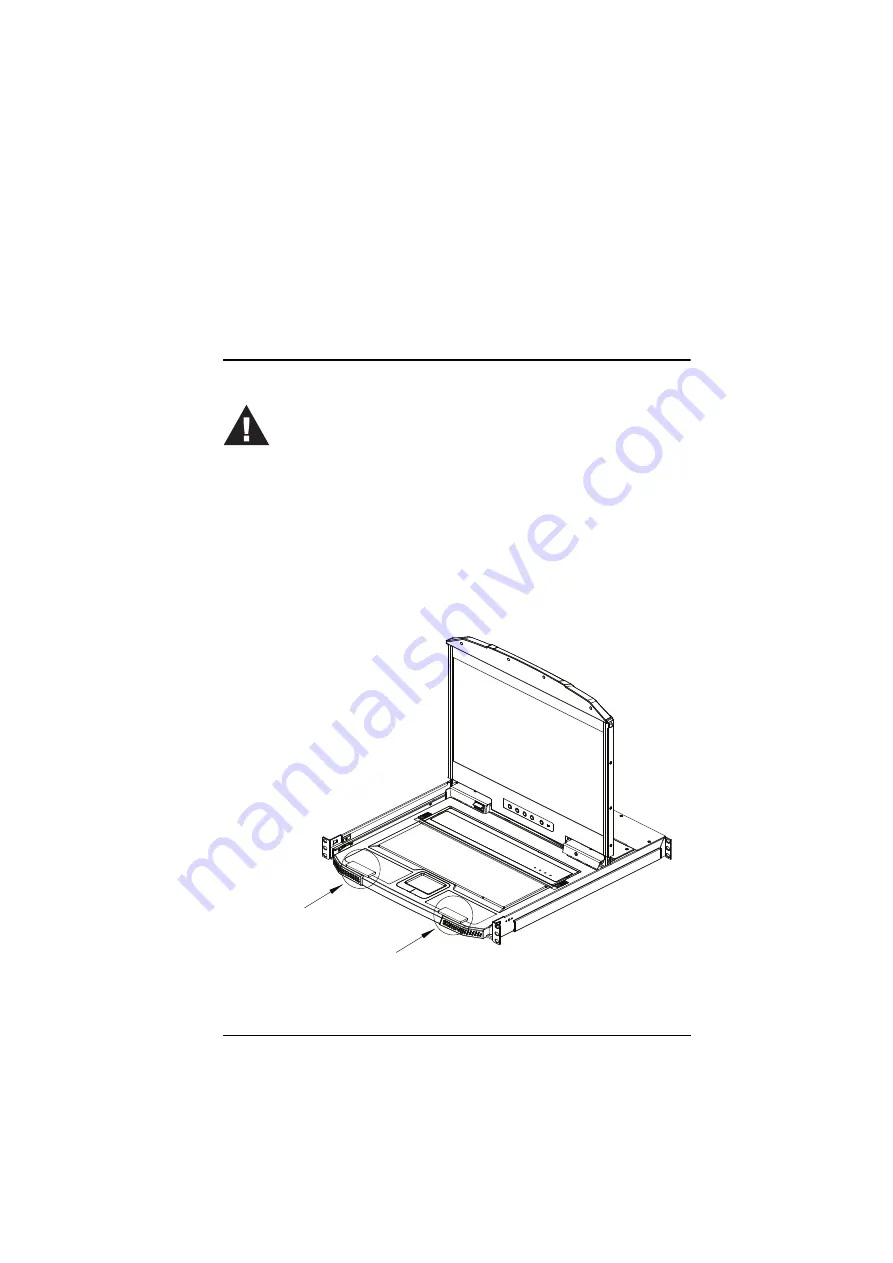
3. (CL3800 only) Packing material has been inserted to protect the 

CL3800 during shipping. Slide the LCD module out (see 

Opening / Closing the Console

, page 31), until the packing 

material is visible. Remove the packing material before 
installing the unit, as shown in the diagram below.

Summary of Contents for CL3100

Page 1: ...Short Depth WideScreen LCD Console CL3800 CL3700 CL3100 User Manual www aten com...

Page 2: ...ent in a residential area is likely to cause harmful interference in which case the user will be required to correct the interference at his own expense The device complies with Part 15 of the FCC Rul...

Page 3: ...ister your product at our online support center Telephone Support For telephone support call this number International http eservice aten com International 886 2 8692 6959 China 86 400 810 0 810 Japan...

Page 4: ...bility of the user to correct such interference The manufacturer is not responsible for any damage incurred in the operation of this system if the correct operational voltage setting was not selected...

Page 5: ...Cable 1 Power Cord 2 Front L Brackets 1 User Instructions CL3700 1 CL3700 USB HDMI Single Rail LCD Console with Standard Rack Mount Kit 1 USB HDMI KVM Cable Set 1 Firmware Upgrade Cable 1 Power Cord...

Page 6: ...y damage to the console or to any other devices on the CL3800 CL3700 CL3100 installation Changes may have been made to the manual since it was published Please visit our web site to download the most...

Page 7: ...ter 1 Introduction Overview 1 Rear Panel External Console Ports 2 Features 3 Requirements 5 LCD Console 5 External Console 5 Cables 5 Operating Systems 7 Components 8 CL3800 Front View 8 CL3800 Rear V...

Page 8: ...e The Firmware Upgrade Utility 43 Before You Begin 43 Firmware Upgrade Mode 44 Performing the Upgrade 45 Starting the Upgrade 45 Upgrade Succeeded 47 Upgrade Failed 48 Exiting Firmware Upgrade Mode 49...

Page 9: ...3100 Its purpose features and benefits are presented and its components are described Chapter 2 Hardware Setup provides step by step instructions for setting up your installation and explains some bas...

Page 10: ...ey in Indicates keys you should press For example Enter means to press the Enter key If keys need to be chorded they appear together in the same bracket with a plus sign between them Ctrl Alt Numbered...

Page 11: ...he LCD console s keyboard and touchpad modules can slide back to hideaway when not in use while the thin profile LCD monitor rotates back flush against the rack to allow the convenient monitoring of c...

Page 12: ...VM console and a built in space saving sliding module without having to purchase a new KVM switch The CL3800 CL3700 CL3100 s firmware is upgradable so you can stay current with the latest updates by d...

Page 13: ...VGA supports an external console with USB HDMI VGA DVI connectors CL3800 only Supports HDMI video input supports an external console with USB HDMI connectors CL3700 only Supports VGA video input supp...

Page 14: ...0 CL3100 and a rack KVM switch in 1U of space on a rack for space saving easy and flexible operation Optional rack mount kits available including easy installation options No software required Firmwar...

Page 15: ...sole An HDMI DVI or VGA monitor capable of displaying the highest resolution provided by any computer in the installation CL3800 An HDMI monitor capable of displaying the highest resolution provided b...

Page 16: ...0 CL3100 User Manual 6 CL3700 Length m Type Part Number 1 80 USB HDMI 2L 7D02UH CL3100 Length m Type Part Number 1 20 USB VGA 2L 5201U 2L 5301U 1 80 2L 5202U 2L 5302U 3 00 2L 5203U 2L 5303U 5 00 2L 52...

Page 17: ...Chapter 1 Introduction 7 Operating Systems Supported operating systems include Windows Mac Linux and Sun...

Page 18: ...CL3800 CL3700 CL3100 User Manual 8 Components CL3800 Front View EXIT LIGHT 1 2 3 4 5 8 9 6 7 13 14 10 11 16 15 12 8 10 17...

Page 19: ...situation 6 Firmware Upgrade Port The firmware upgrade cable that transfers the firmware upgrade data from the administrator s computer plugs into this 3 5 mm audio jack 7 Reset Switch Located to the...

Page 20: ...nation Light Illuminates the keyboard and touchpad to allow visibility in low light conditions 17 Exit Light Pushbutton Press the Exit Light pushbutton for two seconds to turn the LED Illumination Lig...

Page 21: ...Section For flexibility and convenience the CL3800 supports an independent external KVM console The external console s USB keyboard and mouse HDMI DVI or VGA monitor and speaker cable plug in here 4...

Page 22: ...CL3800 CL3700 CL3100 User Manual 12 CL3700 CL3100 Front View 2 4 3 EXIT LIGHT 1 2 3 4 5 8 9 6 7 13 14 10 11 12 9 15...

Page 23: ...ow to recover the situation 6 Firmware Upgrade Port The firmware upgrade cable that transfers the firmware upgrade data from the administrator s computer plugs into this 3 5 mm audio jack 7 Reset Swit...

Page 24: ...ers the CL3700 on and off 3 External Console Section For flexibility and convenience the CL3700 supports an independent external KVM console The external console s USB keyboard and mouse and HDMI cabl...

Page 25: ...CL3100 on and off 3 External Console Section For flexibility and convenience the CL3100 supports an independent external KVM console The external console s USB keyboard and mouse VGA monitor and speak...

Page 26: ...CL3800 CL3700 CL3100 User Manual 16 This Page Intentionally Left Blank...

Page 27: ...s you will be connecting up has been turned off You must unplug the power cords of any computers that have the Keyboard Power On function 3 CL3800 only Packing material has been inserted to protect th...

Page 28: ...KVM switch is designed for rack mounting If the KVM switch is not rack mounted be sure to place it on a completely flat and firm surface before pulling the device in or out to prevent damage due to un...

Page 29: ...epth of 47 75 cm A standard rack mounting kit enables the CL3700 CL3100 to be mounted in a rack with a depth of 42 72 cm Note It takes two people to mount the console The standard rack mounting kit do...

Page 30: ...cure them in place 2 While one person inserts the unit into place by sliding its left and right side bars into the left right L shaped brackets on the rack have a second person screw the front bracket...

Page 31: ...wing you to tilt the LCD screen more Instructions to use this option are shown below 1 Attach the left and right Front L brackets to the front of the rack placing screws in the tabs to secure them in...

Page 32: ...ckets on the rack have a second person screw the front brackets to the front L bracket 4 After the front brackets are secured tighten all the screws Allow at least 5 1 cm on each side for proper venti...

Page 33: ...mpatible Accessories For detailed installation steps visit the product webpage and refer to the Optional Rack Mount Kits Installation Guide Mounting Kit Description Standard Long Rack Mount Kit This k...

Page 34: ...eaker jack green to the CL3800 s audio port 2 Plug the keyboard monitor mouse and audio connectors of the KVM cable into their respective ports in the Console Section of a KVM switch 3 If you are inst...

Page 35: ...Chapter 2 Hardware Setup 25 Installation Diagram 5 3 4 1 CL3800 Rear HDMI DVI D or VGA 2 KVM Switch Rear...

Page 36: ...the CL3700 2 Plug the HDMI and USB Type B connectors of the KVM cable into their respective ports in the Console Section of a KVM switch 3 If you are installing an external console plug your keyboard...

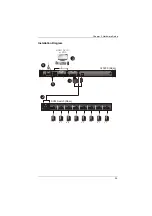
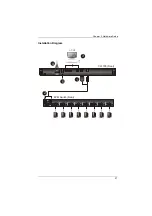
Page 37: ...Chapter 2 Hardware Setup 27 Installation Diagram 5 3 4 1 CL3700 Rear HDMI 2 KVM Switch Rear...

Page 38: ...crophone Connect the KVM cable s speaker jack green to the CL3100 s audio port 2 Plug the other end of the KVM cable into the Console Section of a KVM switch 3 If you are installing an external consol...

Page 39: ...Chapter 2 Hardware Setup 29 Installation Diagram 5 3 4 1 CL3100 Rear VGA 2 KVM Switch Rear...

Page 40: ...CL3800 CL3700 CL3100 User Manual 30 This Page Intentionally Left Blank...

Page 41: ...either slide together or independently This allows you to have the LCD display available for viewing while the keyboard touch pad module is conveniently out of the way when not in use The CL3700 and C...

Page 42: ...CL3800 CL3700 CL3100 User Manual 32 2 Pulling slide the Panel module out until it clicks in place 3 Raise the top panel all the way back to expose the LCD screen...

Page 43: ...r Release Bar handle to pull the keyboard module straight out unit it clicks in place 5 To independently retract the keyboard into the rack slide both Keyboard Module Releases and push the keyboard mo...

Page 44: ...CL3800 CL3700 CL3100 User Manual 34 6 Slide the keyboard in until it s completely inserted into the rack 7 To close the LCD screen lower the panel module until it lies flat and slide it back in...

Page 45: ...r close the console as you do the following 1 Pull on the Release Bar on the upper handle Slide the console module out until it clicks in place and then raise the LCD Module lid 2 To close the console...

Page 46: ...ly on the keyboard module as you work Wrong DO NOT lean your body weight on the keyboard module DO NOT place heavy objects on the keyboard module The maximum load bearing capacity of the keyboard modu...

Page 47: ...h the menus this button moves you Right or Up When making an adjustment it increases the value When navigating through the menus this button moves you Left or Down When making an adjustment it decreas...

Page 48: ...a on the LED panel vertically moves the display area up or down Color Temperature Adjusts the color quality of the display You can adjust the warmth value color balance etc The Adjust Color selection...

Page 49: ...ecomes necessary to Power Off the CL3800 CL3700 CL3100 to upgrade the firmware for example simply turn off the power to the unit using the rear panel power switch To restart the CL3800 CL3700 CL3100 t...

Page 50: ...in process Ctrl Alt Shift L Enter Enable Local LCD console Disable 2nd console or external console video 2 None Ctrl Alt Shift R Enter Enable 2nd console or external console video Disable Local LCD co...

Page 51: ...ed to invoke Shift Ctrl Alt hotkeys However when activating hotkey combinations Ctrl Alt Shift make sure you are using the keys on the same side of the keyboard 4 If the KVM switch connected to the CL...

Page 52: ...CL3800 CL3700 CL3100 User Manual 42 This Page Intentionally Left Blank...

Page 53: ...ges and information relating to them Before You Begin To prepare for the firmware upgrade do the following 1 From a computer that is not part of your CL3800 CL3700 CL3100 installation go to ATEN s Int...

Page 54: ...quence the firmware upgrade switch see page 9 must be set to the Normal position 1 Turn off the power to the CL3800 CL3700 CL3100 using the power switch located on the back side of the console 2 Slide...

Page 55: ...e run the downloaded Firmware Upgrade Package file from your computer either by double clicking the file icon or by opening a command line and keying in the full path and filename The Firmware Upgrade...

Page 56: ...e Utility compares the device s firmware level with that of the upgrade files If it finds that the device s version is higher than the upgrade version it brings up a dialog box informing you of the si...

Page 57: ...Chapter 4 Firmware Upgrade 47 Upgrade Succeeded After the upgrade has completed a screen appears to inform you that the procedure was successful Click Finish to close the Firmware Upgrade Utility...

Page 58: ...hen a firmware upgrade procedure is interrupted When a firmware upgrade procedure fails To recover a failed firmware upgrade do the following 1 Power off the unit 2 Connect the Firmware Upgrade Cable...

Page 59: ...To exit the Firmware Upgrade Mode do the following 1 Slide the firmware upgrade switch see page 9 to the Normal position 2 Power off and restart the CL3800 CL3700 CL3100 according to the instructions...

Page 60: ...CL3800 CL3700 CL3100 User Manual 50 This Page Intentionally Left Blank...

Page 61: ...ntilation has been provided Never spill liquid of any kind on the device Unplug the device from the wall outlet before cleaning Do not use liquid or aerosol cleaners Use a damp cloth for cleaning The...

Page 62: ...ervice personnel for repair The power cord or plug has become damaged or frayed Liquid has been spilled into the device The device has been exposed to rain or water The device has been dropped or the...

Page 63: ...fingers After a device is inserted into the rack carefully extend the rail into a locking position and then slide the device into the rack Do not overload the AC supply branch circuit that provides p...

Page 64: ...vertures de ventilation se trouveraient bloqu es De m me l unit ne doit pas tre plac e dans un meuble ferm moins qu une ventilation adapt e ne soit assur e Ne renversez jamais de liquides de quelque s...

Page 65: ...surez vous que le total des amp rages de tous les produits branch s sur la prise murale ne d passe pas 15 amp res Pour contribuer prot ger votre syst me contre les augmentations et diminutions soudain...

Page 66: ...mances de l unit sont visiblement alt r es ce qui indique la n cessit d une r paration L unit ne fonctionne pas normalement bien que les instructions d utilisation soient respect es N utilisez que les...

Page 67: ...ans les rails Une fois qu une unit a t ins r e dans le b ti tendez avec pr caution le rail dans une position de verrouillage puis faites glisser l unit dans le b ti Ne surchargez pas le circuit de l a...

Page 68: ...orehand Product model number serial number and date of purchase Your computer configuration including operating system revision level expansion cards and software Any error messages displayed at the t...

Page 69: ...e B Female 1 x 3 5 mm Audio Jack Female Green External Mouse Periph eral 1 x USB Type A Female Front Firmware Upgrade 1 x 3 5 mm Audio Jack Female Black Power 1 x IEC 60320 C14 Switches Reset 1 x Semi...

Page 70: ...trast Ratio 1000 1 700 1 Support Color 16 77M colors 16 77M colors Luminance 350 cd m 200 cd m Emulation Keyboard Mouse USB Maximum Input Power Rating 100 240V AC 50 60Hz 1A Power Consumption AC110V 2...

Page 71: ...60320 C14 Switches Reset 1 x Semi recessed Pushbutton Firmware Upgrade 1 x Slide Power 1 x Rocker LCD Power 1 x Pushbutton LCD Adjustment 4 x Pushbutton LEDs Power 1 x KVM Console Dark Green 1 x LCD...

Page 72: ...6 77M colors 16 77M colors Luminance 350 cd m 200 cd m Maximum Input Power Rating 100 240 V AC 50 60 Hz 1 A Power Consumption AC110V 23 3W 124BTU AC220V 23 9W 127BTU AC110V 13 6W 79BTU AC220V 13 5W 78...

Page 73: ...ont Firmware Upgrade 1 x 3 5 mm Audio Jack Female Black Power 1 x IEC 60320 C14 Switches Reset 1 x Semi recessed Pushbutton Firmware Upgrade 1 x Slide Power 1 x Rocker LCD Power 1 x Pushbutton LCD Adj...

Page 74: ...io 700 1 Support Color 16 7M colors Luminance 200 cd m Maximum Input Power Rating 100 240 V AC 50 60 Hz 1 A Power Consumption AC110 13 8W 80BTU AC220 14 1W 81BTU Environmental Operating Temperature 0...

Page 75: ...keys The corresponding functions are shown in the table below Note When using key combinations press and release the first key Ctrl then press and release the activation key PC Keyboard Sun Keyboard C...

Page 76: ...The emulation mappings are listed in the table below Note When using key combinations press and release the first key Ctrl then press and release the activation key PC Keyboard Mac Keyboard Shift Shi...

Page 77: ...le with one of an appropriately short length Some characters I enter from the keyboard do not display correctly The keyboard layout setting for the port does not match the keyboard you are using On yo...

Page 78: ...N will provide a repair service without charge during the Warranty Period If a product is detective ATEN will at its discretion have the option to 1 repair said product with new or repaired components...

Reviews: